It was a bit of a rush to get from the airport to class on time as my flight back from a business meeting in Dallas didn't land until after 4:30 and class starts at 6:00. The topics of discussion tonight were still tools. Tonight we talked about wrenches, including torque wrenchs.
The lab work tonight started with the proper way to remove screws. Like I said before: you probably think you know how to remove a screw, but you might be surprised at some of the things you've been doing wrong, at least as far as the FAA is concerned. For example, I didn't know that the proper way to remove a screw involves turning the screwdriver so that the teeth are engaged, then starting out with a sharp rotation. This is as opposed to a smooth application of torque. The idea is to break the screw loose before it has a chance to round the slots. The same method is used, albeit with a wrench, to remove a spark plug. I got to remove the bottom plug from cylinder one of an IO-540 that they have on a test stand. It was pretty easy, probably because that plug gets removed roughly 30 times a month.
From there we moved on to safety wiring. On this topic I thought I was on a pretty solid footing, considering that I had been trained by the Air Force to do saftey wiring on the SR-71. Still, there was a new twist. (Pun intended. HA! I just crack me up!!) Rather than jump right in and use safety wire pliers, we did the first few by hand. I had never done that before, and truth be told, I hope never to do it again. It's not much fun to do by hand, and doing so certainly convinced me that a good pair of safety wire pliers are by no means a luxury tool. I consider them a must-have. Which, of course, begs the question of why the school doesn't have any! Good thing I stopped by the hangar and picked mine up!
No school again until next Wednesday. Hopefully I'll get some flying done in the meantime. This mechanic stuff is fun, but I still miss flying.

Wednesday, January 11, 2006

Monday, January 09, 2006
Back to School: Night 2
This was the first real night of class - the full four hours. The FAA, understandably, has to assume that you may have never seen a hand tool before, so we had to go through the four major categories: holding, cutting, turning, and pounding.
You would think this would be pretty dull, but you'd be surprised to learn that you have probably been using at least one tool incorrectly for your entire life.
Interspersed with the lecture discussion were trips to various shops and to the hangar to look at examples of various tools and airplane features. Finally, we were ready to actually pick up some tools and do a little lab work. Tonight we worked on center punching aluminum and drilling straight holes through it with a pneumatic drill. The center punch is intended to put enough of a dimple in the aluminum to keep the drill bit from "walking" as you start to drill the hole. For the most part my holes were nice and straight, but one was pretty embarassing: I could still see the mark from the center punch! That's a pretty bad miss!
We talked a little bit about riveting, in the context of oversize holes leading to very bad riveting. As a pilot, the instructor thought it interesting to point out that most airplane wings are only flush riveted on the first 1/3 back from the leading edge. This is where the air over the wing is still laminar, or "attached" to the wing skin. Flush riveting here reduces drag. Further back on the wing where the air has separated, most manufacturers will not use flush rivets because it is more expensive and time consuming, and offers no benefit in return.
Interestingly, the wings on the RV are flush riveted all the way back to the trailing edge, as is the fuselage. There's no aerodynamic benefit to this that I know of, but it sure looks good!
As part of the hole drilling exercise, I asked the instructor about deburring the holes and the edges of the piece of scrap aluminum I was working with. I wanted to try this out since I will be doing a lot of this when I fabricate the new instrument panel. I had also hoped to try out a fly-cutter on a drill press, but that's a later lesson. The fly-cutter is a somewhat intimidating bit that I'll have to use to drill the 3 3/4" holes for the round instruments. I'd also like to practice a little with tin snips since I will need to cut rectangular holes for the radios, GPSs, and VM1000. Hopefully that will come in a later class as well. And I did confirm that we will be learning to rivet, too. This just gets better and better!
You would think this would be pretty dull, but you'd be surprised to learn that you have probably been using at least one tool incorrectly for your entire life.
Interspersed with the lecture discussion were trips to various shops and to the hangar to look at examples of various tools and airplane features. Finally, we were ready to actually pick up some tools and do a little lab work. Tonight we worked on center punching aluminum and drilling straight holes through it with a pneumatic drill. The center punch is intended to put enough of a dimple in the aluminum to keep the drill bit from "walking" as you start to drill the hole. For the most part my holes were nice and straight, but one was pretty embarassing: I could still see the mark from the center punch! That's a pretty bad miss!
We talked a little bit about riveting, in the context of oversize holes leading to very bad riveting. As a pilot, the instructor thought it interesting to point out that most airplane wings are only flush riveted on the first 1/3 back from the leading edge. This is where the air over the wing is still laminar, or "attached" to the wing skin. Flush riveting here reduces drag. Further back on the wing where the air has separated, most manufacturers will not use flush rivets because it is more expensive and time consuming, and offers no benefit in return.
Interestingly, the wings on the RV are flush riveted all the way back to the trailing edge, as is the fuselage. There's no aerodynamic benefit to this that I know of, but it sure looks good!
As part of the hole drilling exercise, I asked the instructor about deburring the holes and the edges of the piece of scrap aluminum I was working with. I wanted to try this out since I will be doing a lot of this when I fabricate the new instrument panel. I had also hoped to try out a fly-cutter on a drill press, but that's a later lesson. The fly-cutter is a somewhat intimidating bit that I'll have to use to drill the 3 3/4" holes for the round instruments. I'd also like to practice a little with tin snips since I will need to cut rectangular holes for the radios, GPSs, and VM1000. Hopefully that will come in a later class as well. And I did confirm that we will be learning to rivet, too. This just gets better and better!
Saturday, January 07, 2006
More thoughts on the panel
I'm still very comfortable with the additional electronics to add to my panel - the safety issues alone justify their cost. Contrast this with the other additions I considered such as replacing the gyro and pitot/static instruments with new solid state electronic stuff. The gyros are good enough for a day VFR plane, and that's what I consider Papa Golf to be. Deciding to ditch the King 89b and put both a new 396 and my existing 296 in the panel, however, might be a bad idea.
I originally thought the 89b would just be dead weight since having two other GPSs to use would really relegate the King to wasted panel space. I figured I'd get more utility out of a map box. I'm re-thinking that now, though.
I want to leave my options open for a Trio Ez-Pilot autopilot or similar, should I ever decide to buy one. This means I will need to reserve space for the control head, and it means that I will have to keep the 89b. The beauty of these new autopilots is that they are not based on inputs from the mechanical gyros, instead using a single onboard solid-state gyro. Mechanical gyros are to some degree somewhat untrustyworth, so removing them as a point of failure for the autopilot is nice.
To supplement the solid-state gyro, the autopilot uses GPS inputs. The 89b, being a true panel mount GPS, provides the outputs required by the autopilot. The Garmins I have do not. I still like the idea of having the 296 and the 396 since they both have nice color moving map screens, so to have all three GPSs I will have to forget about the map box. I also need to reserve space for a the control head.
Like so:
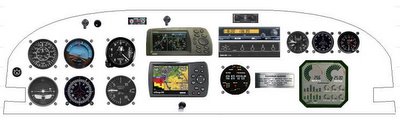
Update:
I forgot that the EZ-Pilot replaces the mechanical turn coordinator too. That looks like this:
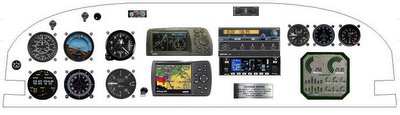
The old turn coordinator would work well as eBay fodder.
I originally thought the 89b would just be dead weight since having two other GPSs to use would really relegate the King to wasted panel space. I figured I'd get more utility out of a map box. I'm re-thinking that now, though.
I want to leave my options open for a Trio Ez-Pilot autopilot or similar, should I ever decide to buy one. This means I will need to reserve space for the control head, and it means that I will have to keep the 89b. The beauty of these new autopilots is that they are not based on inputs from the mechanical gyros, instead using a single onboard solid-state gyro. Mechanical gyros are to some degree somewhat untrustyworth, so removing them as a point of failure for the autopilot is nice.
To supplement the solid-state gyro, the autopilot uses GPS inputs. The 89b, being a true panel mount GPS, provides the outputs required by the autopilot. The Garmins I have do not. I still like the idea of having the 296 and the 396 since they both have nice color moving map screens, so to have all three GPSs I will have to forget about the map box. I also need to reserve space for a the control head.
Like so:
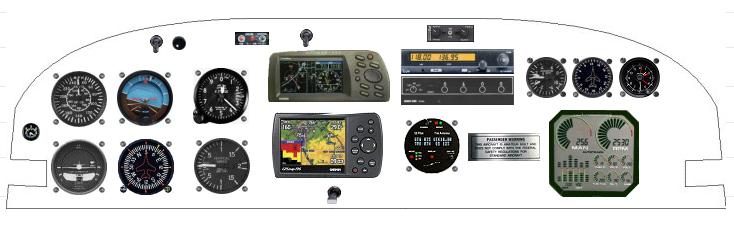
Update:
I forgot that the EZ-Pilot replaces the mechanical turn coordinator too. That looks like this:
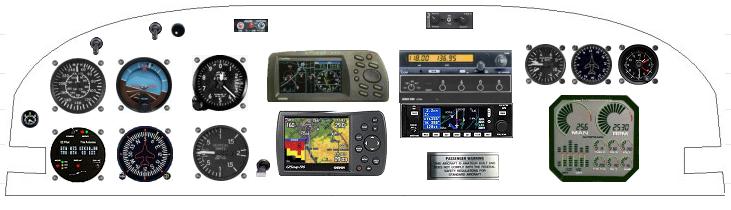
The old turn coordinator would work well as eBay fodder.
Wednesday, January 04, 2006
Back to School - First Night
I had the first night of A&P classes tonight. It was pretty light - mostly an introduction to the program, the implications of being an FAA Part 147 school, and a read-through of the curriculum. I had to buy books ($152 worth!) and we have a reading assignment for Monday. They say it's mostly hands-on, though, which I prefer.
The instructor is a pilot, and a very experience one at that. He has a Cessna Citation type rating, ATP, CFII, multi, yada yada yada. He owns a Piper Super Cub that he keeps hangared at Bolton. He's been teaching the A&P program for 16 years, and in fact taught my favorite mechanic over at Bolton. We had a nice chat about the RV-6, flying to Oshkosh, the joys of maintaining our own planes, and all kinds of other aviation related stuff.
It's a small class, only six students. Two of them are older than me. One is a pilot that wants to take a few classes and just learn more about how the plane works, thinking (correctly, in my opinion) that it will make him a better, safer pilot. The other has a long background in electronics and avionics, and says he takes the classes simply because he enjoys them.
The younger guys are more career oriented. One doesn't really care about planes; he wants to get on a good race team as a machanic. That makes more sense than you may realize - the tools and techniques are very similar. There's a 19 year old that is really into cars, and works at a local BMW dealer. The third is looking to get on with a major airline.
The curriculum looks great! Lot's of tool stuff, fabricating fluid lines, and non-destructive inspection techniques. All very applicable to maintaining the RV, so worth doing even if I never finish the program. Truth be told, though, I think I'm going to enjoy this so much I'll have the rating before I know it. I can easily see doing this for the next four years. Fascinating stuff!
The instructor is a pilot, and a very experience one at that. He has a Cessna Citation type rating, ATP, CFII, multi, yada yada yada. He owns a Piper Super Cub that he keeps hangared at Bolton. He's been teaching the A&P program for 16 years, and in fact taught my favorite mechanic over at Bolton. We had a nice chat about the RV-6, flying to Oshkosh, the joys of maintaining our own planes, and all kinds of other aviation related stuff.
It's a small class, only six students. Two of them are older than me. One is a pilot that wants to take a few classes and just learn more about how the plane works, thinking (correctly, in my opinion) that it will make him a better, safer pilot. The other has a long background in electronics and avionics, and says he takes the classes simply because he enjoys them.
The younger guys are more career oriented. One doesn't really care about planes; he wants to get on a good race team as a machanic. That makes more sense than you may realize - the tools and techniques are very similar. There's a 19 year old that is really into cars, and works at a local BMW dealer. The third is looking to get on with a major airline.
The curriculum looks great! Lot's of tool stuff, fabricating fluid lines, and non-destructive inspection techniques. All very applicable to maintaining the RV, so worth doing even if I never finish the program. Truth be told, though, I think I'm going to enjoy this so much I'll have the rating before I know it. I can easily see doing this for the next four years. Fascinating stuff!
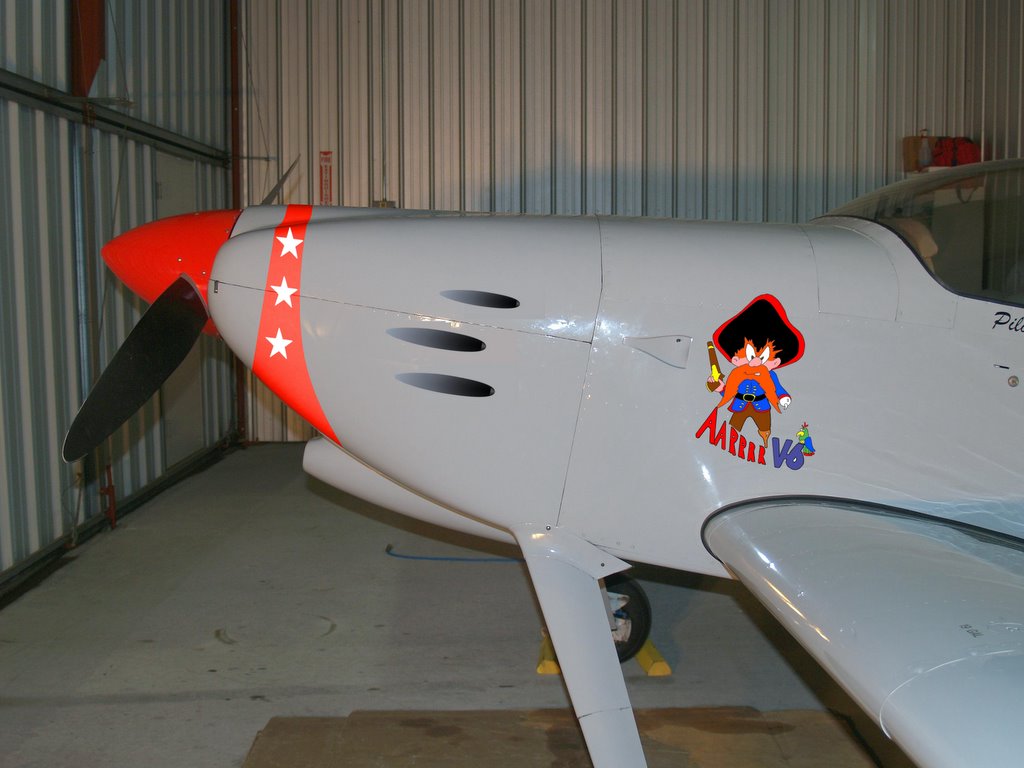
It's GIMPtastic!
Courtesy of Tom Webster, a local RV builder and graphic artist, I have really nice gun port images. I put those one a not-so-great picture of Papa Golf, along with the red stripe that I really think it needs, and the pirate. The gunports and pirate would go on as vinyl decals, but I think I'd paint the stripe.
So, here it is, love it or hate it:
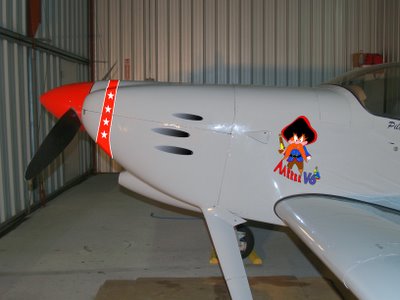
The more observant long-time readers of this blog will have noticed that the pirate "nose art" isn't actually on the nose. I'm ok with that, though, because upon further review, I have found indisputable video evidence that this is appropriate (although it also indicates that I have more work to do on the shape and width of the stripe):


Actually, I'm not sure I should copy the F-86's stripe exactly as it is. The rest of the red stripes on the RV are pretty narrow, and I think I'd be better off staying with that style. We'll see. I'll GIMP it around some more and see if I can come up with a good compromise.
I also wonder how the pirate would look with that red half-ellipse under it...
Eh, I don't know how to draw a half ellipse, but I did take another shot at the stripe:
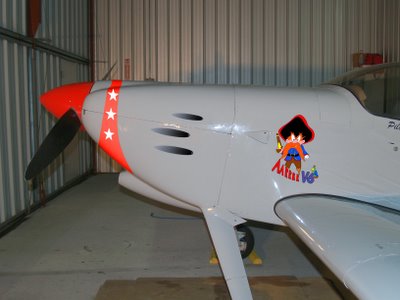
So, here it is, love it or hate it:
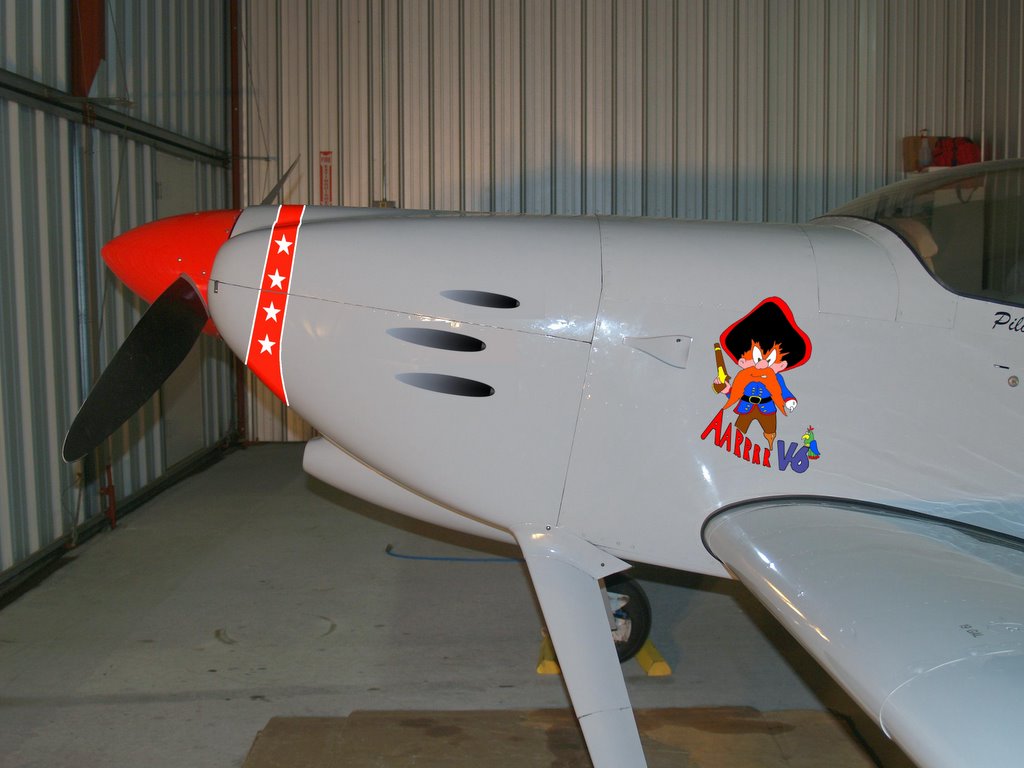
The more observant long-time readers of this blog will have noticed that the pirate "nose art" isn't actually on the nose. I'm ok with that, though, because upon further review, I have found indisputable video evidence that this is appropriate (although it also indicates that I have more work to do on the shape and width of the stripe):
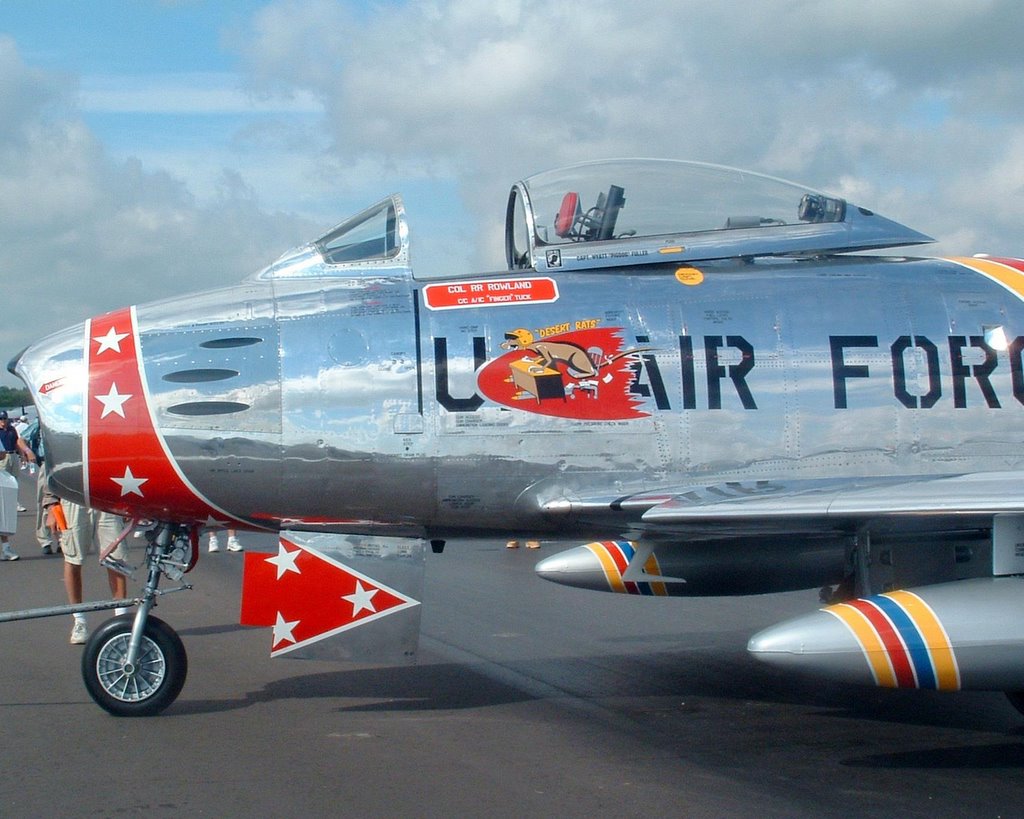

Actually, I'm not sure I should copy the F-86's stripe exactly as it is. The rest of the red stripes on the RV are pretty narrow, and I think I'd be better off staying with that style. We'll see. I'll GIMP it around some more and see if I can come up with a good compromise.
I also wonder how the pirate would look with that red half-ellipse under it...
Eh, I don't know how to draw a half ellipse, but I did take another shot at the stripe:
Monday, January 02, 2006
Thoughts about the panel
Even before I bought Papa Golf, I had been thinking about what I might want to do with the panel of ehatever RV I eventually bought. There are some really interesting things out there for Experimentals these days in both primary avionics and graphical engine monitors. The wildest dreams had me doing a full panel rebuild, using all of the modern "glass" boxes. In fact, one of the reasons I wanted a tip-up RV-6 is that the panel is screwed to the airframe using a couple of extended braces (more on that later) while other styles typically had the panel riveted in. A builder might consider drilling out the rivets to remove the old panel, but I'm not a builder. I'd rather concentrate on building a screw-in replacement panel.
After months of thought, I've finally designed the panel I think would best fit the mission of the airplane, which is a VFR airplane that could be asked to traverse 500 miles of weather in a single hop. I think back to my trip back from Oshkosh when I departed in great weather, but ran into a lot of low, scuddy clouds in Indiana. I could get over the clouds, but I didn't know for sure if conditions were clear in Ohio and I didn't want to get stuck on top and low on fuel when I got there. There are ways of getting an in-flight weather report, but are now better ways, and I decided that should be the first area to improve the panel.
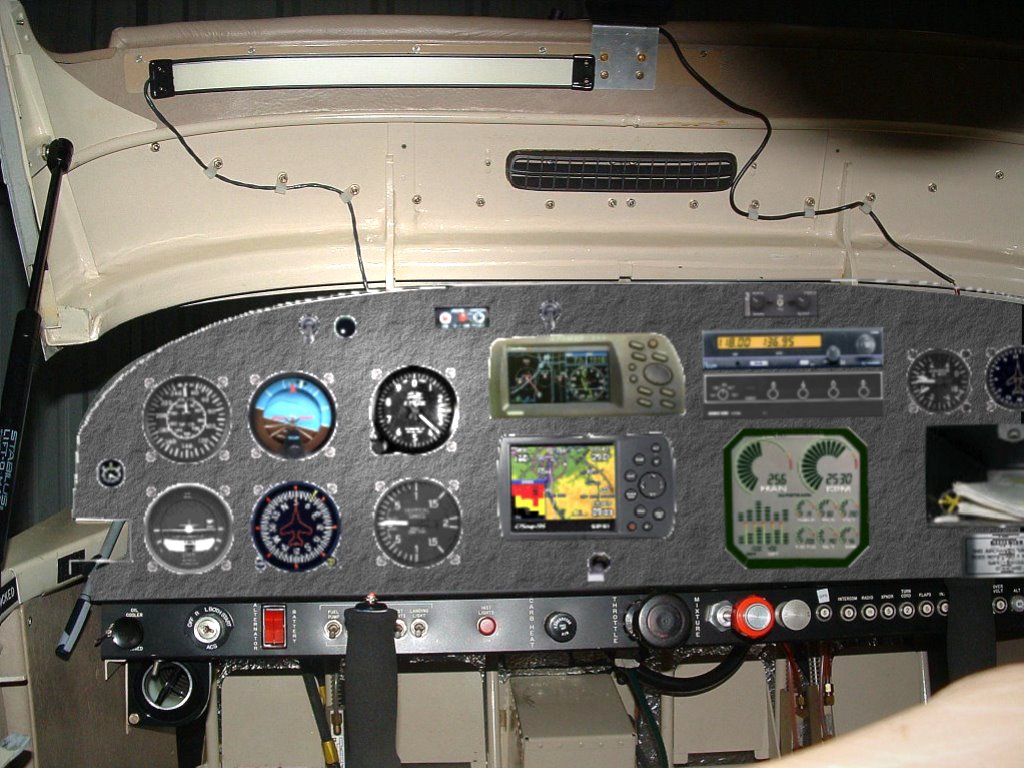
The design I came up with adds another Garmin portable GPS to the Garm 295 I have now, and places both of them in flush mounts in the panel. This takes room that is currently occupied by engine instruments, so I also planned on replacing the engine gauges with a graphical engine monitor. That would not only free up a lot of space, it would afford me an acroos the panel improvement in the quality of my engine management and monitoring gauges. And, referring again back to my Oshkosh trip, I decided to include a fuel totalizer option so I'll have a far more accurate reading of how much gas I have left.
I used www.ePanelBuilder.com to sketch out the panel with the new instruments, then grabbed a screen shot of the new panel. I imported that into GIMP and painted it gray rather than black to make the instruments stand out a little better. I pasted that onto a picture of the current panel, but it looked pretty bland. GIMP has a nice rendering feature that let me kind of lighten it up and make it look more natural. I continue to be amazed not only at the powers of GIMP and the fact that it's absolutely free, but how useful it is in prototyping stuff for the plane!
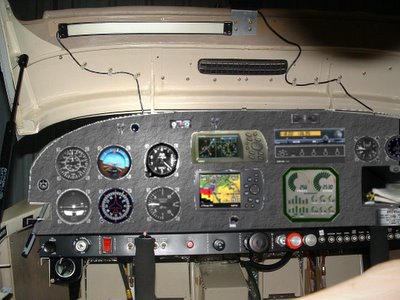
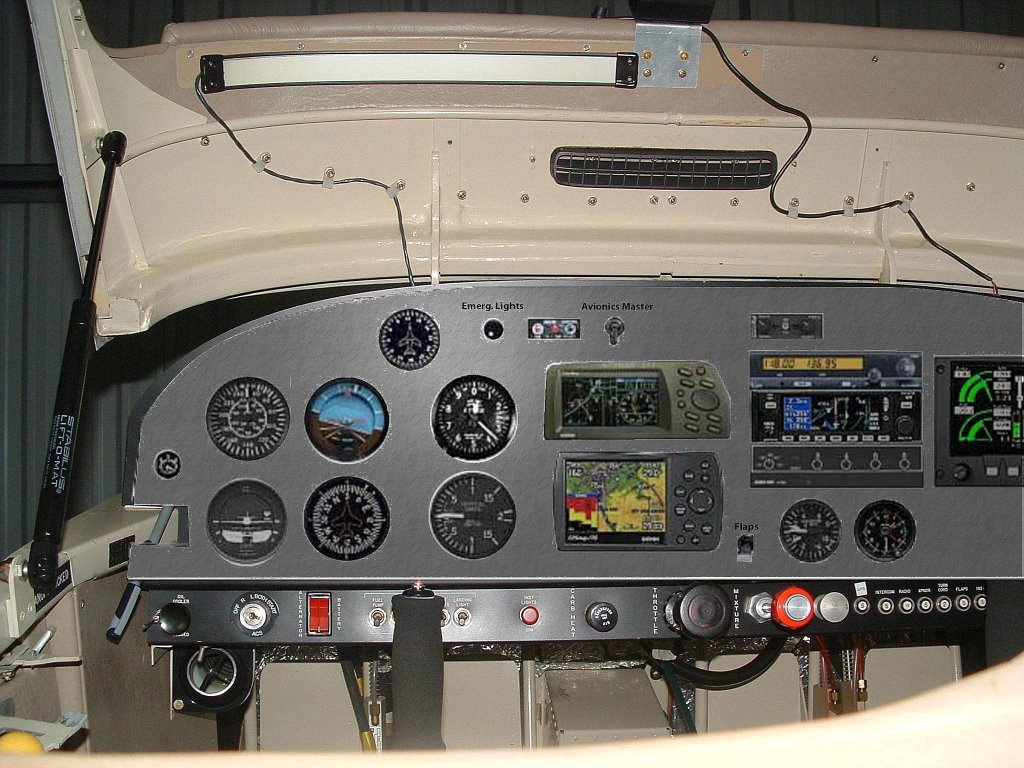
Here's the before and after:


The new panel carries over most of the stuff from the old panel, primarily in the interest of cost containment. I didn't bring over the old mag compass since I really prefer the vertical card model. In the new panel picture, I have the vertical card compass sitting on top of and between the attitude indicator and the altimeter.
The Garmin 295 that currently hangs from the canopy glare shield gets moved into a flush mount holder. Just below it is another flush mount holding a new Garmin 396. This is the first shockingly expensive new part. The benefits, however, are manifest and justify the $2500 price tag. The first and foremost benefit is the XM sattelite weather download. Having access to almost real-time NEXRAD radar and FAA weather observations right there in the plane is a huge safety deal. That alone would be worth the price, but the 396 also shows terrain elvations around where you're flying. I decided to put both the 296 and the 396 in the panel so I could use the 296 for the HSI display and the 396 for the moving map.
The repercussion of panel mounting the GPS units is that there is no room to keep all of the mechanical engine gauges. I looked at a lot of alternatives, and finally decided on the Grand Rapids Technology graphical engine monitor. It has everything currently on my panel plus more, but takes far less space. It's likely to be more accurate in a number of areas as well:

This is the second shockingly expensive decision. With the fuel flow option, this thing runs $3400. Yow! Bit again, the increased capabilites over what I have now in the critical area of engine management make that pill easier to swallow. Having both EGT and CHT measurements on all four cylinders is the only way to really know what's going on with your engine. The fuel totalizer is also a huge help in managing what's in the tanks and when it's time to get more.
I also think it would be instructive to do the installation of the panel and the related engine probes. In fact, this idea is competing for funding with the idea of restoring a Pitts biplane or something similar. One factor I'll have to consider is this: if I choose to spend this money on the RV, the cost is the cost. Once it's done, it's done. In rebuilding a Pitts, buying the plane is just the beginning. There will be thousands to spend on fabric, paint, tools, and engine parts, if not a complete major overhaul. One other consideration, though, is that I can't stretch out the panel project like I could the Pitts because I can't go that long without a flyable airplane.
Chances are I'll end up doing neither. But at least I'm getting better with GIMP!
Later:
I'm not sure why I kept the King KLN-89b GPS in the panel. I don't use it now, so I'm not very likely to start using it when I have the second Garmin. I suppose I could sell it on eBay, but I don't think I'd get much for it. Getting it out of the panel would probably free up enough space to move the engine monitor over to the left a bit, and might even free enough room for a map box. That would solve yet another problem: there's very little room to carry maps and other stuff in the cockpit.
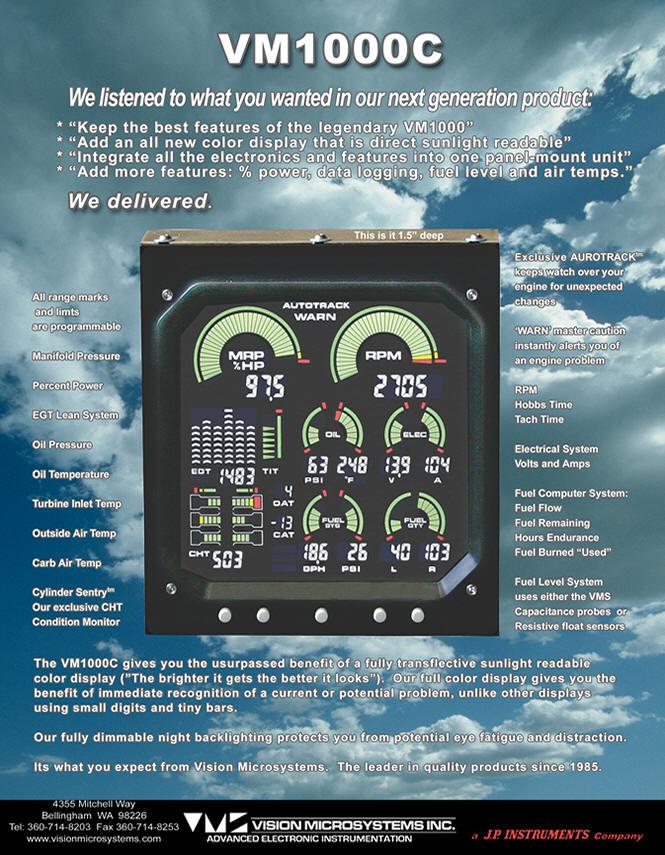
I also found a lower priced engine monitor:

It gives me everything I want, but for $1000 less.
A sloppy GIMP rendition of losing the King GPS, using the VM1000 instead of the GRT, and adding a map box:
After months of thought, I've finally designed the panel I think would best fit the mission of the airplane, which is a VFR airplane that could be asked to traverse 500 miles of weather in a single hop. I think back to my trip back from Oshkosh when I departed in great weather, but ran into a lot of low, scuddy clouds in Indiana. I could get over the clouds, but I didn't know for sure if conditions were clear in Ohio and I didn't want to get stuck on top and low on fuel when I got there. There are ways of getting an in-flight weather report, but are now better ways, and I decided that should be the first area to improve the panel.
The design I came up with adds another Garmin portable GPS to the Garm 295 I have now, and places both of them in flush mounts in the panel. This takes room that is currently occupied by engine instruments, so I also planned on replacing the engine gauges with a graphical engine monitor. That would not only free up a lot of space, it would afford me an acroos the panel improvement in the quality of my engine management and monitoring gauges. And, referring again back to my Oshkosh trip, I decided to include a fuel totalizer option so I'll have a far more accurate reading of how much gas I have left.
I used www.ePanelBuilder.com to sketch out the panel with the new instruments, then grabbed a screen shot of the new panel. I imported that into GIMP and painted it gray rather than black to make the instruments stand out a little better. I pasted that onto a picture of the current panel, but it looked pretty bland. GIMP has a nice rendering feature that let me kind of lighten it up and make it look more natural. I continue to be amazed not only at the powers of GIMP and the fact that it's absolutely free, but how useful it is in prototyping stuff for the plane!
Here's the before and after:

The new panel carries over most of the stuff from the old panel, primarily in the interest of cost containment. I didn't bring over the old mag compass since I really prefer the vertical card model. In the new panel picture, I have the vertical card compass sitting on top of and between the attitude indicator and the altimeter.
The Garmin 295 that currently hangs from the canopy glare shield gets moved into a flush mount holder. Just below it is another flush mount holding a new Garmin 396. This is the first shockingly expensive new part. The benefits, however, are manifest and justify the $2500 price tag. The first and foremost benefit is the XM sattelite weather download. Having access to almost real-time NEXRAD radar and FAA weather observations right there in the plane is a huge safety deal. That alone would be worth the price, but the 396 also shows terrain elvations around where you're flying. I decided to put both the 296 and the 396 in the panel so I could use the 296 for the HSI display and the 396 for the moving map.
The repercussion of panel mounting the GPS units is that there is no room to keep all of the mechanical engine gauges. I looked at a lot of alternatives, and finally decided on the Grand Rapids Technology graphical engine monitor. It has everything currently on my panel plus more, but takes far less space. It's likely to be more accurate in a number of areas as well:

This is the second shockingly expensive decision. With the fuel flow option, this thing runs $3400. Yow! Bit again, the increased capabilites over what I have now in the critical area of engine management make that pill easier to swallow. Having both EGT and CHT measurements on all four cylinders is the only way to really know what's going on with your engine. The fuel totalizer is also a huge help in managing what's in the tanks and when it's time to get more.
I also think it would be instructive to do the installation of the panel and the related engine probes. In fact, this idea is competing for funding with the idea of restoring a Pitts biplane or something similar. One factor I'll have to consider is this: if I choose to spend this money on the RV, the cost is the cost. Once it's done, it's done. In rebuilding a Pitts, buying the plane is just the beginning. There will be thousands to spend on fabric, paint, tools, and engine parts, if not a complete major overhaul. One other consideration, though, is that I can't stretch out the panel project like I could the Pitts because I can't go that long without a flyable airplane.
Chances are I'll end up doing neither. But at least I'm getting better with GIMP!
Later:
I'm not sure why I kept the King KLN-89b GPS in the panel. I don't use it now, so I'm not very likely to start using it when I have the second Garmin. I suppose I could sell it on eBay, but I don't think I'd get much for it. Getting it out of the panel would probably free up enough space to move the engine monitor over to the left a bit, and might even free enough room for a map box. That would solve yet another problem: there's very little room to carry maps and other stuff in the cockpit.
I also found a lower priced engine monitor:
It gives me everything I want, but for $1000 less.
A sloppy GIMP rendition of losing the King GPS, using the VM1000 instead of the GRT, and adding a map box:
Sunday, January 01, 2006
I bounce so much, I should buy a trampoline!
The weather cleared enough today to let me get out and make some practice takeoffs and landings. I flew down towards southwest Ohio first, just to take a look at some of the scenery. It's hilly down there, and mostly wooded. It's a nice change from the completely flat area around Columbus.
Nice sky!
My first landing at Madison Co. was an abomination. I flared it in from about 6' up, resulting in a series of very large bounces. These were the ones that are so high, you worry about letting the plane drop from up there. In cases like this, I give it a burst of power at the top of the bounce to flatten it out. This landing was a 3-burster: probably a new record. I wanted to buy gas while I was there, but didn't relish the idea of getting out of the plane in front of a group of guys that had at a minimum heard the commotion I was making out on the runway. I decided to taxi back, take off, and try another landing. On the way out, some character in a Cessna pulled out his hangar right in front of me. It's a terrible idea to get in front of a taildragger and expect the guy driving it to yield. Why? Because he probably can't see you!
The next landing was better, but still not good. The third was the charm. I think I was flaring too high on the first two, which is likely caused by the disparity in runway widths between MadCo and the more familar Bolton. Bolton's runway is twice as wide, so the narrower runway at MadCo makes it look like I'm lower (closer to the runway) than I actually am, so I flare high. The trick to not doing this is to look at the very end of the runway and gauge height from that, but that doesn't always work either. It was a bit windy with a gusty crosswind from the right, and I could feel little gusts in the flare, ti which I over-responded with the stick. Finally, back at Bolton I had one of those landings that are so smooth you can feel the wheels starting to roll as they brush across the concrete.
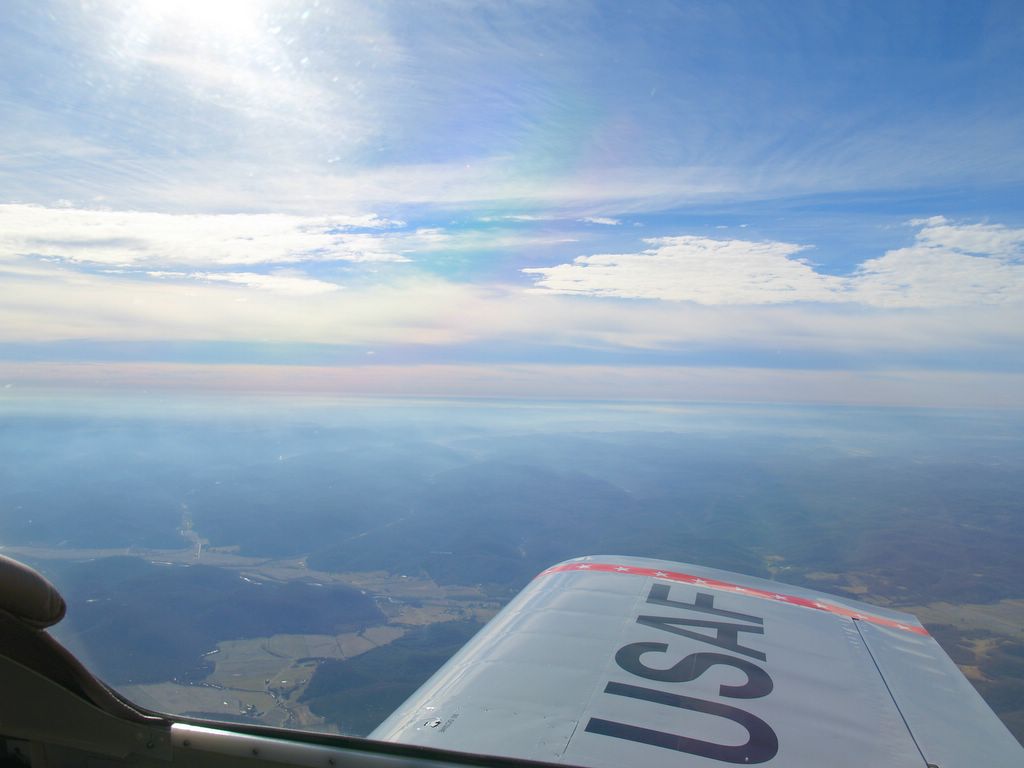
Nice sky!
My first landing at Madison Co. was an abomination. I flared it in from about 6' up, resulting in a series of very large bounces. These were the ones that are so high, you worry about letting the plane drop from up there. In cases like this, I give it a burst of power at the top of the bounce to flatten it out. This landing was a 3-burster: probably a new record. I wanted to buy gas while I was there, but didn't relish the idea of getting out of the plane in front of a group of guys that had at a minimum heard the commotion I was making out on the runway. I decided to taxi back, take off, and try another landing. On the way out, some character in a Cessna pulled out his hangar right in front of me. It's a terrible idea to get in front of a taildragger and expect the guy driving it to yield. Why? Because he probably can't see you!
The next landing was better, but still not good. The third was the charm. I think I was flaring too high on the first two, which is likely caused by the disparity in runway widths between MadCo and the more familar Bolton. Bolton's runway is twice as wide, so the narrower runway at MadCo makes it look like I'm lower (closer to the runway) than I actually am, so I flare high. The trick to not doing this is to look at the very end of the runway and gauge height from that, but that doesn't always work either. It was a bit windy with a gusty crosswind from the right, and I could feel little gusts in the flare, ti which I over-responded with the stick. Finally, back at Bolton I had one of those landings that are so smooth you can feel the wheels starting to roll as they brush across the concrete.
Subscribe to:
Posts (Atom)