Thursday, May 11, 2006

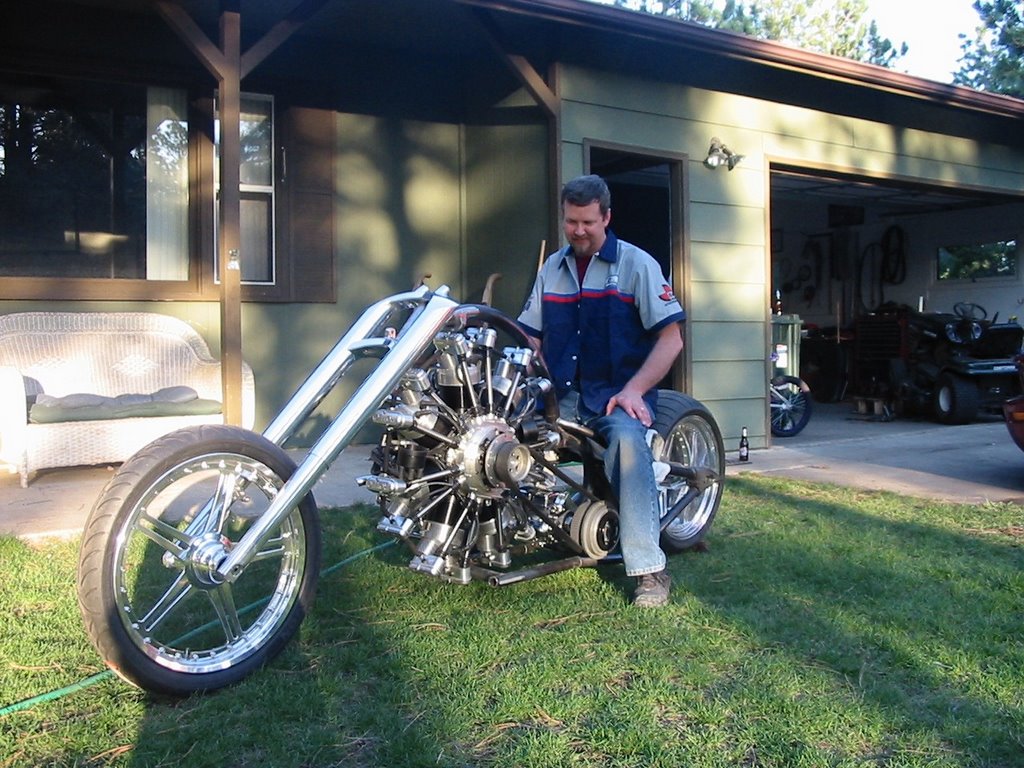
Speaking of F1 Rockets...

... here are a couple I saw at Oshkosh last year:


Annual unstalled, thoughts about the future

The screws I've been waiting for arrived via Pony Express from Oregon yesterday, so I can put all of the panels, etc. back on the plane tonight. I repaired the trim tab by fabricating a doubler in school Monday night, although I'm still awaiting the arrival of the rivets I need to attach it to the trim tab. Hopefully those will come today, assuming the pony isn't too tired from his cross-country jaunt in bringing the screws.

The idea for the doubler comes from the compendium of 24 years worth of newsletters from the Van's factory. This problem has been well known since the mid-90's, and in fact caused a change in the design of the trim tab. For me, though, the suggested fix is adequate: stop drill the crack, remove the control horn, fabricate a doubler from .032" or .040" 2024-T3 sheet metal, and rivet it all back together. I'm not thrilled with the look of the stop drill hole, but this plane has always been intended to be a weekend flyer, not a show plane. I'll stop seeing it within a week or two anyway once I get used to it being there.

I'm nearly done with my sheet metal class, and I think I'm going to miss it. There's something almost therapeutic about the work, and the feeling of accomplishment arising from creating a piece of airplane starting with a drawing and a flat piece of metal is going to be hard to substitute. This has gotten me to thinking about building again.

I had previously considered building an RV-8, but the more I think about it, that doesn't go far enough ahead of where I am today with my -6. All it would accomplish, other than the immense satisfaction of creating my very own airplane, would be a change in seating arrangements. I don't mean to discount the value of the building process, obviously, but co-goals in all of this MUST be to make a sound financial decision and to advance the capabilities of my airplane.

Thge sound financial decision aspect excludes building anything that doesn't have a vibrant and sustained resale value, and the run-away leader in that realm is clearly the Van's planes. Even today, with over 4,000 of them flying, it is possible to build for $80k and sell for $100k. I can't think of any other homebuilt that has that benefit. The combination of the immense and supportive user community and the reasonable insurance rates that result from the well-known safety history of the fleet combine to make a unique offering within the homebuilt community. The financial stability of the factory is important too.

I think about this a lot. A whole lot. I've narrowed it down to a couple of possible approaches, each having its own set of pros and cons. Approach 1 would be to find a 50% partner in building/owning the 4-seat RV-10, selling the RV-6 when the -10 is just about done, and buying my own single-seat "play" plane to address the non-travel, throw it around the sky kind of flying. Single-seat planes are very cheap because nearly everyone wants to carry at least one passenger now and then. The options run from a single-seat biplane such as an EAA biplane, up to an RV-3.

Here's an RV-10:

Not as sexy as the taildragging RVs, but great performance for 1/4 the cost of a similar store-bought plane.

Approach 2 goes the whole-hog into having a 2-seat airplane and no partner. In this case I would be building my dream plane: an F1 Rocket.


The Rocket is simlar in size to the RV-8, but uses a much larger engine, usually at least 260hp, compared to the 160-180 hp of the RV-8. Fun, fun, FUN to fly! It's a quick-build kit, which offers the benefit of faster completion but increases initial cost significantly. Still, one can be built for just under $100k, but easily sold at at least a 20% profit should I ever decide I'm not interested in having fun anymore. I have to say, though, that it's hard to see me ever getting tired of 190 knots and 3000fpm climb!

If neither of those works out, there's always this:


Well, probably not that.

Friday, May 05, 2006

Annual: chasing down a few oil leaks

"Leaks" is too strong a word, actually. A more appropriate term might be "seepage." It's just that every time I pull the cowls off, nearly every horizontal surface at the bottom of the engine or its attached accessories has a single drip of oil dangling from it, and the rest of the compartment is covered in a fine mist of oil. This is coming from various points around the engine where just enough oil seeps out to be caught in the whirlwind of cooling air that blows around in the engine compartment.

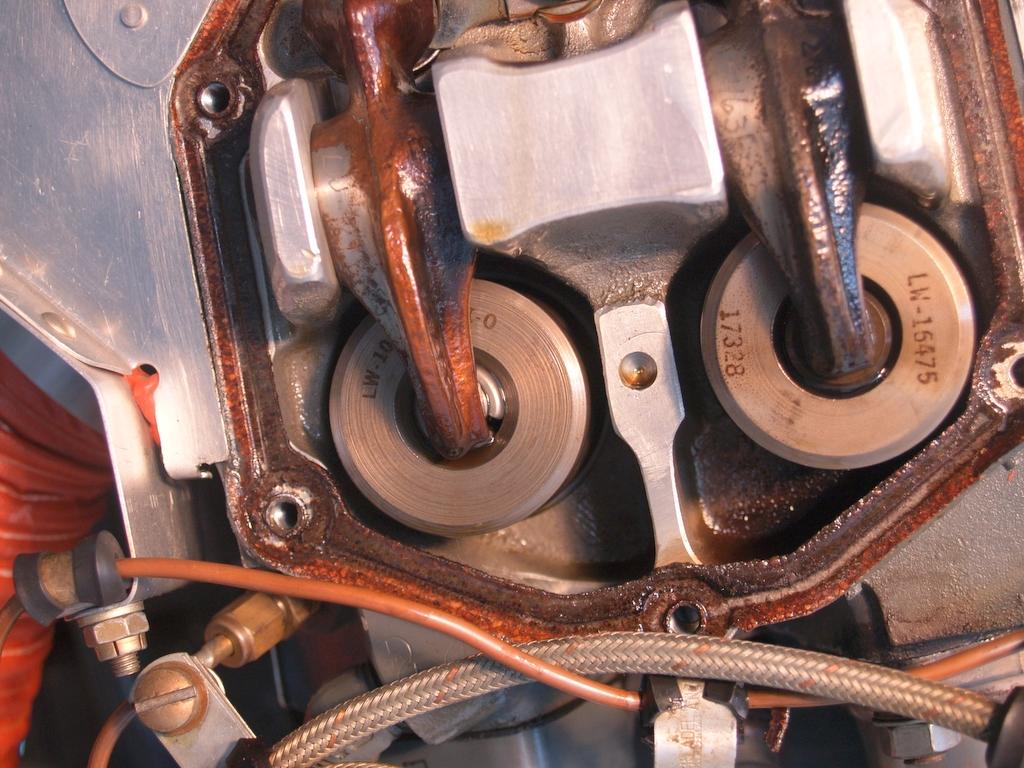
It's very hard to track down justg where the oil is seeping, but in some cases there is enough residue near the "leak" to indicate a spot as being part of the problem. ONe such spot was the valve cover over the number 4 cylinder. That's pretty easy to fix, requiring nothing more than replacing the valve cover gasket. I took the cover off to take a look at the state of the gasket and found it to be dry, brittle, and compressed to a thickness akin to piece of rice paper.


It was extremely obvious as to why this area was leaking! I naturally assumed that if this gasket was decayed to such a degree, it was highly likely that the other three were too. I pulled off the remainder of the valve covers and found that those three were actually worse than the first I had looked at. It's clear that as previous owners had noted the tell-tale oil seepage from the covers, they had taken the expedient approach of simply tightening the screws a bit tighter. That ended up doing nothing more than squeezing any remaining cork gasket material out abd leaving a metal-to-metal contact area where the valve cover meets the cylinder head. The old cork had been compressed to hard into the cylinder head that I had to (as gently as possible) scrape it off of there. Once that was done, I installed a newer type of silicone-based (silicone: it's not just for showcase breasts anymore!) gasket. Reportedly these new gaskets never harden or wear out.

Let's hope that's true.

Re-doin' it Old School

I had to start completely over on the node rib due to a rather glaring mistake. I drilled the huge 3 1/8" lightening hole exactly one inch to far forward. I didn't notice anything wrong until I went to install the stiffener that goes inside the rib and there was nothing but air to rivet it to.

I couldn't understand how I could possibly have mis-measured that horribly, but as I was building the new rib I almost made the exact same mistake. The cause turned out to be a mark that I placed on the chord line, which you may recall being the X-axis used to plot the points on the metal to give it the aerodynamic shape. I was using a 6 inch measure, and as the points got beyond six inches, I placed a small hash mark at the 6" point and used that as the basis of further measurements. The center of the lightening hole is seven inches from the start of the chord line, so I put another hash mark there. When I went to measure the vertical (Y-axis) location of the center, I caught myself using the 6" hash mark instead of the 7" mark. I musty have made the same mistake on the first piece, but at least I caught myself in the act this time and made the correction.

Everything goes easier the second time, and this was no exception from that rule. I had the new rib done by the end of class. It still needs some clean-up, bit it's done for the most part:


Normally the metal wouldn't be all scratched up like this, but the scrap pieces I start with are already distressed to a ridiculous degree. In other words, I didn't make those scratches. Well, at least not all of them. There are a couple of spots inside the flange where the air shears had trouble cutting through the fluted areas and left some marks on the inside skin. Those could be burnished out easily enough, and the primer that you'd use on a real part would provide corrosion protection to the areas that had lost their very thin pure aluminum coating through the process of cleaning up the scratches.

So, there it is. The last "official" project of the class. I'll finish it up Monday night and either go on to another project if there's anything left on the "optional" list, or I'll bring in the trim tab from the RV and build a strengthening doubler as per Van's advice to solve the cracking problem.

Wednesday, May 03, 2006

Oh drat, that's gonna have to be fixed

The annual condition inspection had been proceeding nicely, and for the most part there have been only minor problems found. A couple of oil seeps (they aren't significant enough to justify the moniker 'leaks') and a slightly slipping alternator belt looked to be the worst of it, until...


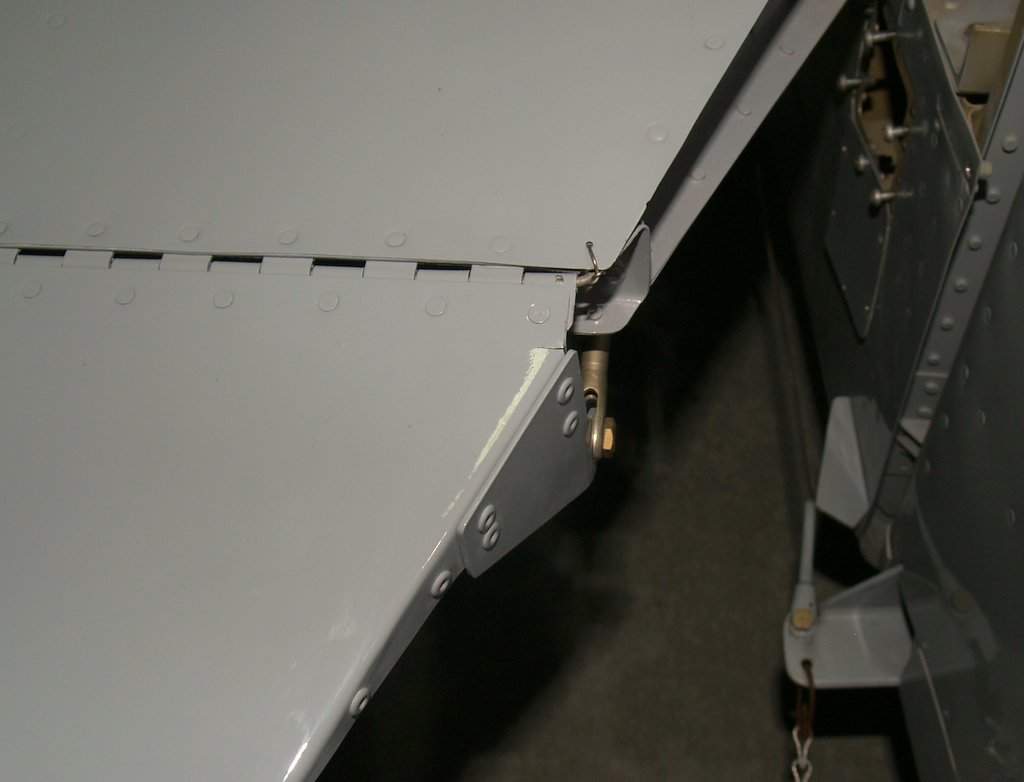
If you look closely at this picture of the elevator trim tab, you can see a small crack developing where the control arm is riveted to the side. Click on the picture for the full size view if you can't see it. The short-term fix is very easy: drill a stop hole at the very end of the crack. That should keep the crack from growing for awhile, but the long-term fix will be more involved, and will probably take the form of building a new trim tab. My concern is that the new tab would eventually break in exactly the same way - it's apparent from looking at it that the skin is stressed inappropriately with the current design. I solicited advice from the Van's internet forum (run by a fella named Doug Reeves, it's a peer-level support group) and the first respondant opined that the control arm should really be on the bottom of the trim tab, not on the side as mine is. I haven't looked at the plans yet to determine whether that is a recent change brought about by this existence of this very problem, or if for some reason the builder of my plane strayed from the plans in this case. It doesn't really matter, I think when I repair it I will move the control arm to a better, less stressful location.

Update:

This part of the plane was built according to the plans, which were later amended using a different mounting point because this very problem arose with a lot of the RV-6s built during the 90's.

Tuesday, May 02, 2006

Doin' it Old School

Back before the days of kits like the Van's RVs, where many parts are already fabricated for you, an experimental plane was build by buying a set of planes and a stack of sheet metal. Every part had to be hand crafted, and the investment in time and effort was monumental. This goes a long ways towards explaining the enormous success of the Van's kits: they were among the first that performed most of the difficult fabrication at the factory. It was still no mean feat to build an early Van's kit, but having parts like the ribs done at the factory removed hundreds of hours of painstaking work.

Last night in school I briefly visited the land of aircraft building past.

Starting with nothing but a drawing and a flat piece of .025" sheet metal, I built a nose rib.

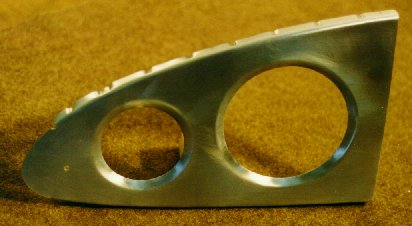
This isn't the one I made, but it's similar:


You might be able to tell by the shape of it that the nose rib is a piece of the wing. Actually, in any given wing there will be any number of nose ribs, depending on the span of the wing and the spacing of the ribs. It's function is to provide the aerodynamic shape of the wing from the leading edge back to the spar. There will be aanother rib that goes from the back of the spar to the trailing edge of the wing. The skin of the wing will be riveted to flanges (90 degree bends) at the top and bottom of the rib. Because they create the shape of the wing, each rib needs to be very near the size and shape of the other ribs. In other words, precision, consistentcy, and accuracy are vitally important.

Following the drawing was an interesting mental exercise. You start by drawing a "chord line," which is a horizontal line that will act as the X axis when plotting the points that will give the rib its shape. There is a table of points that get plotted the length of the chord line, which will provide the linear distance down the line (positive X) and Upper and Lower values (positive and negative Y) each point. I diligently plotted all of those points onto a nice, clean piece of sheet metal, and proudly showed the results to the teacher. "Nice work, but you needed to draw that onto a piece of wood." D'oh! The problem, you see, is that the flanges can't be bent in the big sheet metal bender-thingy because 1) they're curved, and 2) after the first bend, you can't get the part into the bending brake anymore. What you do instead is draw the outline on a piece of wood, cut it out with a band saw, and bend the flanges of the rib around the edges of the wood by whacking it with a rawhide mallet.

All was not lost, however, since hundreds and hundreds of these ribs have been build by students that preceeded me in the program. Interestingly, though, of the many wood forms in the bin there were equally as many different sizes. I sorted through them until I found one that more or less agreed with the lines I had drawn and used it instead of starting over with the time-consuming measurements.
The bending was not all that fun, truth be told. Because of the curvature of the shape, you have to "flute" the flanges. Strange alliterative lingo aside, all that means is taking a pair of pliers and creating bumps in the flange to absorb the unwanted length of the sheet metal. The picture above doesn't show any flutes - it was created using the alternative approach of cutting a lot of relief gaps. The planes I was following did that too, but only near the front where the curvature is greatest. I tried cutting those with snips, but it was too hard to get a clean cut, so I used a tool called a nibbler, which worked very well.
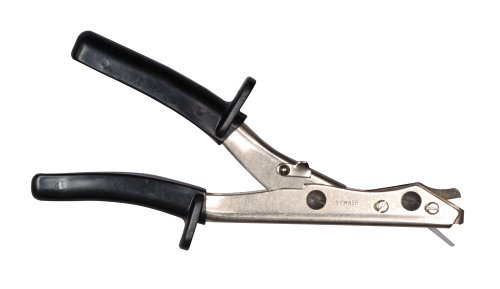


Instead of the thin cut (like scissors would make in paper) shears make, the nibbler cuts a 1/8" gap. It was far superior to the snips for making the relief cuts that would allow the metal to bend around for the flanges.

Drilling the lightening holes was fun. The lightening holes are the two large holes you can see in the rib, and the purpose of them is simply to remove unneeded material to save weight. The weight saved from one single rib is miniscule, but propogated across as many parts as possible it becomes significant. I cut them using holecutters in the drill press. Oonce cut, the edges of the circles need to be flanged too, in order to increase the rigidity of the rib. That's done with a special set of forming punches, although I don't know what they're called. They come in two pieces, one on one side, the other on the other side. I just put the whole assembly in a vise and squeezed them together, and bingo! there're your flanges. Easy as pie.

I'm not quite done with the rib yet - I still need to rivet a stiffener onto it, but that shouldn't take more than a few minutes. Once done, I'll have spent about four hours on this part. Multiply that by the 20+ that I'd have needed to built just that one part of the wing and you can see why building your own airplane out of metal was such a daunting prospect back before the modern kits we have today were available.

Monday, May 01, 2006

Pre-annual Prep Work

Now that I have an experimental class plane, I can do a lot more of the grunt work required in preparing the plane for anunal inspection (or, more accurately, "condition inspection") and save hundreds of dollars. Of course, now that I've spent a few Sunday afternoon hours removing rounded-out screws (and questioning the sanity of whichever of the previous owners/maintainers decided no screw was too ruined to not put right back into the plane), I'm remembering why I paid someone else $50/hr. to do this.

My newly found higher standards received via A&P training will drive me to pore through the plans an order all new screws for every panel I've removed. In addition to there being roughly 5% that I couldn't re-use even if I was daft enough to try, I also noticed a bit of a grab-bag mentality used by whomever replaced them last time. Rows that should have all the same type of screw head and length instead have a random selection of different types and sizes. It doesn't make any real difference structurally, but this is my first annual and I'm looking at it as an opportunity to really clean house. The plane has been flying for 8 years now, and in the course of normal maintenance this kind of thing creeps in. Every now and then you just have to bite the bullet and start over.

I pulled a few more panels than were actually needed, using the same "this is the first annual so we should really be thorough" mentality. I pulled the floor boards in order to get a good look at the mechanics of the control sticks, for example. That required pulling off side panels and removing the aileron trim and fuel tank selector handles. It took a total of about four hours to get all the pieces/parts removed, and I anticipate it will take even longer to get it all put back together again. All in all, though, the plane looks great inside and out. There are a couple of nutplates that might need to be replaced, but for the most part we're looking at a pretty easy (and inexpensive) annual this year.