It was pretty easy this year. The normal chore of de-paneling was made easy with the new cordless drill that I bought for building the RV-12. Only a couple of problems were found by the inspector, none of which took more than a few minutes to fix. A leaky brake caliper was repaired with an O-ring that I already had stashed away from the last time I had a leaky brake caliper. The secret is to by a lot of things that are really cheap, like O-rings, even though you only need one at the time. It's the shipping that's expensive, so always buy more than you need! I already had the new tires on hand too, since I had considered changing them a few months ago, but decided to wait until the annual when everything would be all disassembled anyway.
It will all get put back together tonight and be ready to go by the weekend.
The weekend is, of course, forecast to be rainy.
While I have been on my extended building and flying hiatus, I have been occupying myself in the virtual world by flying combat missions on a PC flight simulator. I just recently started flying the F-86 jet that was the inspiration for the paint job on Papa Golf. It's been fun to practice formation flying in a consequence free environment. Consider this brief flight, for example:
I got a little too close to my flight leader. Vertical stabilizer? Meh. Who needs it??
Note: I am amazed at the quality and depth of that simulator, but what is truly mind boggling is its cost. Are you ready for this? It cost $9.99. Less than $10! Simply astonishing.

Showing posts with label maintenance. Show all posts
Showing posts with label maintenance. Show all posts
Wednesday, March 10, 2010

Wednesday, December 23, 2009
Like the glacier said to his wife...
... "I made a lot of progress today! I was going so fast that I almost passed a snail trapped in a puddle of molasses!"
Well, it seems that way. I started this oil change on November 8th and as I sit here in the quiet solitude of December 23rd, enjoying the last smidgen of calm before the holiday storm, I can reflect back on the intervening days and weeks and honestly wonder just why this is taking so daggone long. What it comes down to is a series of distractions combined with unforeseen delaying events. Distractions arising from holiday preparations and the seductive Siren call of the RV-12 project have certainly played a role, but the fiasco of the broken Subaru has played a part as well. And, truth be told, there was a bit of decision making to be done too.
As it stands today, the Subaru is repaired, the cowls are repaired, albeit without the final finishing step of applying paint to the repaired areas, and the decision has been made regarding how (and keep in mind that 'if' was a player as well) to replace the faulty attitude indicator.
The Subaru needed a new head gasket, but for a couple of reasons actually received two new head gaskets, a new timing belt, new spark plugs, and a new thermostat for the radiator. Plus fluids. Those aren't exactly cheap either, you know. Geographical challenges and some minor maintenance delays stretched the job out for a couple of weeks, but it's all done now and other than a lingering scent of baked antifreeze, everything seems to be working just fine. The car has over 80,000 miles on it and this is the first real maintenance it has needed, so I can't really complain.
The cowls are primered on the affected areas, but final painting will have to wait for the more conducive temperatures of Spring for final painting. Having been once burned, though, I'm naturally twice shy on the topic of hauling them out to my brother for painting. A pretty clear Karmic message has been sent: perhaps I should bite the bullet and learn how to operate the painting equipment I own. I have an air compressor and a Harbor Freight HVLP spray gun - I ought to see if I can learn how to use it.
In the meanwhile, I bought myself some time on the issue of the attitude indicator by removing the vacuum pump. Following my inimitable method of making big decisions (which is to muddle about making small decisions until I have painted myself into a corner), I spent quite a bit of time working with my mechanic to make sure every delaying tactic was both safe and useless.
The decision to be made was, of course, whether to replace the broken vacuum-powered, mechanical attitude gyro with a similar item, thereby running the risk of breaking another $700 gyro, or to upgrade to a solid state electronic model and slightly more than twice the cost. The higher cost option would normally have been the obvious solution because of the improved reliability combined with equally improved utility, but I can't help spicing up the decision making process by adding in the question of how long I will own this plane. But... a nicer panel is definitely an eye catcher at resale time too.
The state of play was a removed attitude indicator with its vacuum lines dangling in open air. The directional gyro had also been removed to allow access to the AI, so it too was dangling behind the panel. My initial thought was to reinstall the DG and fly without the AI until such time as I could decide on the long term course of action. My intuition told me that leaving the AIs vacuum limes sucking unfiltered air was a bad idea, and this was confirmed by the mechanic. He suggested plugging the lines with some plastic caps. Easy, right?
As I was lying on my back putting the caps on the lines, I realized that I had no stomach for putting the DG and all of the other associated pneumatic plumbing back into place just to remove it again when it came time to replace the AI, so I went ahead and completely removed it too. That left me with a bit of an issue: I could plug the vacuum lines for the DG too, but then the vacuum pump would be sucking on a pair of plugged lines. That didn't seem like a good thing.
At that point, I decided that the only real answer was to just remove everything and consider the question of what to put in the panel to be decided in favor of the electronic unit. And by everything, I mean the engine-mounted vacuum pump, the filter, and the tangle of hoses that connected it all. This decision, naturally, required another consult with the mechanic. Removing the vacuum pump would leave gaping wounds in the back of the engine and in the firewall. And there was also the question of how to remove the vacuum pump. It's located on the back of the engine in a position that precludes easy access to one of the four nuts that hold it on. In fact, in this era of pop rock bands having numeric names like Third Eye Blind, Five for Fighting, Maroon Five, and Avenged Sevenfold, I thought Three Nuts Easy would make a good name for an emerging group. To resolve the question of how to remove Fourth Nut Difficult, I again pestered the local mechanic.
"Well, we have a fancy wrench for that, but you could just use a mallet and a screwdriver."
Now, it may have been my imagination, but I'd swear he then adopted the waiting pose one gets when one has thrown out an answer and is expecting a "Huh??" in response. Sorry, though: it was not forthcoming. I knew exactly what he meant. Back in the Good Ole Days of my military servitude, I actually spent quite a bit of time working on airplanes. There were various infamous areas on both of the airplanes (I worked on SR-71s and RF-4Cs) I helped maintain that were either designed by diabolically clever sadists or egregiously incompetent engineers. In a word, they were what can only be described as inaccessible. While it was frowned upon, we had a Don't Ask, Don't Tell maintenance technique that involved placing the end of a flat blade screwdriver on the face of a nut (or in a groove on a cannon plug, for those of you that know what a cannon plug is) and tapping (that's a liberal stretching of the word 'tap' - in many cases 'hammering' would have been more appropriate) until it was loose. So, instead of the-secretly-hoped-for "Huh??" the reply was, "Oh, ok."
That left the issue of the gaping hole on the back of the engine (the problem of the hole in the firewall having been solved through the simple expedient of not removing the vacuum regulator that now benignly sits in the hole enjoying its forced retirement) which was cured with the placement of a charitably gifted metal blocking plate:

If nothing else comes of all this, it will now be orders of magnitude easier to change the oil filter. There's some irony involved in that if you think about how all of this transpired.
Plus, the plane will be just a wee bit lighter. Here's all of the stuff that I don't have to carry around anymore:

And what do you do with a broken old attitude indicator? If you're the curious type, you do this:
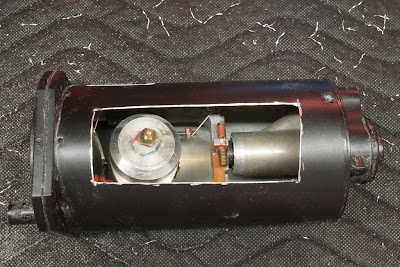
Oh, don't criticize me. You know you've always want to see the innards of one of these things. Besides, it will make a good desk-oration at work.
So, what's going to eventually go into the panel? One of these:

And why 'eventually'? Because the acquisition price of one of those little guys is right here:

That gasket is the one that was allowing pressurized gas from the combustion chamber(s) to over-pressurize the radiator, thus forcing coolant out of the radiator and onto the rest of the engine. The stuff in the box is all of the expensive junk that was protecting the corrupt gasket.
It'll take a little time to recover from that, Xmas, and the property tax bill that's due in January. Still, it's good to have the decision finally made.
Well, it seems that way. I started this oil change on November 8th and as I sit here in the quiet solitude of December 23rd, enjoying the last smidgen of calm before the holiday storm, I can reflect back on the intervening days and weeks and honestly wonder just why this is taking so daggone long. What it comes down to is a series of distractions combined with unforeseen delaying events. Distractions arising from holiday preparations and the seductive Siren call of the RV-12 project have certainly played a role, but the fiasco of the broken Subaru has played a part as well. And, truth be told, there was a bit of decision making to be done too.
As it stands today, the Subaru is repaired, the cowls are repaired, albeit without the final finishing step of applying paint to the repaired areas, and the decision has been made regarding how (and keep in mind that 'if' was a player as well) to replace the faulty attitude indicator.
The Subaru needed a new head gasket, but for a couple of reasons actually received two new head gaskets, a new timing belt, new spark plugs, and a new thermostat for the radiator. Plus fluids. Those aren't exactly cheap either, you know. Geographical challenges and some minor maintenance delays stretched the job out for a couple of weeks, but it's all done now and other than a lingering scent of baked antifreeze, everything seems to be working just fine. The car has over 80,000 miles on it and this is the first real maintenance it has needed, so I can't really complain.
The cowls are primered on the affected areas, but final painting will have to wait for the more conducive temperatures of Spring for final painting. Having been once burned, though, I'm naturally twice shy on the topic of hauling them out to my brother for painting. A pretty clear Karmic message has been sent: perhaps I should bite the bullet and learn how to operate the painting equipment I own. I have an air compressor and a Harbor Freight HVLP spray gun - I ought to see if I can learn how to use it.
In the meanwhile, I bought myself some time on the issue of the attitude indicator by removing the vacuum pump. Following my inimitable method of making big decisions (which is to muddle about making small decisions until I have painted myself into a corner), I spent quite a bit of time working with my mechanic to make sure every delaying tactic was both safe and useless.
The decision to be made was, of course, whether to replace the broken vacuum-powered, mechanical attitude gyro with a similar item, thereby running the risk of breaking another $700 gyro, or to upgrade to a solid state electronic model and slightly more than twice the cost. The higher cost option would normally have been the obvious solution because of the improved reliability combined with equally improved utility, but I can't help spicing up the decision making process by adding in the question of how long I will own this plane. But... a nicer panel is definitely an eye catcher at resale time too.
The state of play was a removed attitude indicator with its vacuum lines dangling in open air. The directional gyro had also been removed to allow access to the AI, so it too was dangling behind the panel. My initial thought was to reinstall the DG and fly without the AI until such time as I could decide on the long term course of action. My intuition told me that leaving the AIs vacuum limes sucking unfiltered air was a bad idea, and this was confirmed by the mechanic. He suggested plugging the lines with some plastic caps. Easy, right?
As I was lying on my back putting the caps on the lines, I realized that I had no stomach for putting the DG and all of the other associated pneumatic plumbing back into place just to remove it again when it came time to replace the AI, so I went ahead and completely removed it too. That left me with a bit of an issue: I could plug the vacuum lines for the DG too, but then the vacuum pump would be sucking on a pair of plugged lines. That didn't seem like a good thing.
At that point, I decided that the only real answer was to just remove everything and consider the question of what to put in the panel to be decided in favor of the electronic unit. And by everything, I mean the engine-mounted vacuum pump, the filter, and the tangle of hoses that connected it all. This decision, naturally, required another consult with the mechanic. Removing the vacuum pump would leave gaping wounds in the back of the engine and in the firewall. And there was also the question of how to remove the vacuum pump. It's located on the back of the engine in a position that precludes easy access to one of the four nuts that hold it on. In fact, in this era of pop rock bands having numeric names like Third Eye Blind, Five for Fighting, Maroon Five, and Avenged Sevenfold, I thought Three Nuts Easy would make a good name for an emerging group. To resolve the question of how to remove Fourth Nut Difficult, I again pestered the local mechanic.
"Well, we have a fancy wrench for that, but you could just use a mallet and a screwdriver."
Now, it may have been my imagination, but I'd swear he then adopted the waiting pose one gets when one has thrown out an answer and is expecting a "Huh??" in response. Sorry, though: it was not forthcoming. I knew exactly what he meant. Back in the Good Ole Days of my military servitude, I actually spent quite a bit of time working on airplanes. There were various infamous areas on both of the airplanes (I worked on SR-71s and RF-4Cs) I helped maintain that were either designed by diabolically clever sadists or egregiously incompetent engineers. In a word, they were what can only be described as inaccessible. While it was frowned upon, we had a Don't Ask, Don't Tell maintenance technique that involved placing the end of a flat blade screwdriver on the face of a nut (or in a groove on a cannon plug, for those of you that know what a cannon plug is) and tapping (that's a liberal stretching of the word 'tap' - in many cases 'hammering' would have been more appropriate) until it was loose. So, instead of the-secretly-hoped-for "Huh??" the reply was, "Oh, ok."

That left the issue of the gaping hole on the back of the engine (the problem of the hole in the firewall having been solved through the simple expedient of not removing the vacuum regulator that now benignly sits in the hole enjoying its forced retirement) which was cured with the placement of a charitably gifted metal blocking plate:

If nothing else comes of all this, it will now be orders of magnitude easier to change the oil filter. There's some irony involved in that if you think about how all of this transpired.
Plus, the plane will be just a wee bit lighter. Here's all of the stuff that I don't have to carry around anymore:

And what do you do with a broken old attitude indicator? If you're the curious type, you do this:

Oh, don't criticize me. You know you've always want to see the innards of one of these things. Besides, it will make a good desk-oration at work.
So, what's going to eventually go into the panel? One of these:

And why 'eventually'? Because the acquisition price of one of those little guys is right here:

That gasket is the one that was allowing pressurized gas from the combustion chamber(s) to over-pressurize the radiator, thus forcing coolant out of the radiator and onto the rest of the engine. The stuff in the box is all of the expensive junk that was protecting the corrupt gasket.
It'll take a little time to recover from that, Xmas, and the property tax bill that's due in January. Still, it's good to have the decision finally made.
Sunday, December 06, 2009
In a tight spot in the RV-6
Remember this?

That's my broken attitude indicator. I decided that since the weather today was offering a balmy 30F temperature to work in and the airplane is still broken while waiting for the cowls to return from the paint shop, I'd go ahead and remove the broken attitude indicator. I still don't know if I'm going to replace it, but I have a new argument in the "against" column: it took two and a half hours to remove it. And that's the easy part! I'm not proud of the language that it took to get the old one out (nor am I ashamed of it - I was provoked!) but I'm preemptively appalled at the colorful linguistics that will be surely be required to replace it.
That and the $500 for a new one.
Still, there's resale value to consider.
Decisions, decisions.
But I can't stress enough just how horrible it is to work behind the panel on an RV-6. Cramming myself into the tiny space down by the rudder pedals to reach up behind the panel makes even a small-ish guy like me feel as big as an NFL offensive lineman. That's not nearly as cool as I had thought it would be. In fact, it sucks.
Maybe I'll violate the code and hire someone to do it.
Decisions, decisions.

That's my broken attitude indicator. I decided that since the weather today was offering a balmy 30F temperature to work in and the airplane is still broken while waiting for the cowls to return from the paint shop, I'd go ahead and remove the broken attitude indicator. I still don't know if I'm going to replace it, but I have a new argument in the "against" column: it took two and a half hours to remove it. And that's the easy part! I'm not proud of the language that it took to get the old one out (nor am I ashamed of it - I was provoked!) but I'm preemptively appalled at the colorful linguistics that will be surely be required to replace it.
That and the $500 for a new one.
Still, there's resale value to consider.
Decisions, decisions.
But I can't stress enough just how horrible it is to work behind the panel on an RV-6. Cramming myself into the tiny space down by the rudder pedals to reach up behind the panel makes even a small-ish guy like me feel as big as an NFL offensive lineman. That's not nearly as cool as I had thought it would be. In fact, it sucks.
Maybe I'll violate the code and hire someone to do it.
Decisions, decisions.
Worst. Oil Change. Ever.
It felt like it should be the final stretch of getting the saga of the oil change completed. The cowls have been repaired, test fitted, and readied for painting. Once painted, we're finally only a 15 minute installation on the plane from being done. Bet here's the thing about the final stretch (and you pay very close attention to the next race you watch to test the veracity of this observation if you don't believe me): it's a horrible time to change drivers.
The thing is, I have neither the equipment nor the expertise to paint the cowls. Nor the wheel pants, which is why they've been painted with rattle can primer for the last three years. Fortunately, I'm related to the Chief Mechanic at the 8105 Repair Shop and he knows how to paint. I figured I'd just drive the cowls out to his shop and have him paint them up. How hard could that be? For me, I mean. Drive 'em out, drop 'em off, and pick them up when they're done. Piece of cake!
The cowls and wheel pants took up every cubic inch of free space in my suited-more-for-hauling-groceries Subaru Forester, leaving room only for a single pilot. No problem - this was an out and back trip and not necessarily an opportunity to get some road miles for co-pilot Egg. Going solo lets me set the schedule, so I pulled chocks little before 0800. It's an easy drive that early in the morning and the Across the Universe CDs (highly recommended) made for a relaxed trip.
Well, until I got there, anyway.
As I pulled to a stop in the visitor parking at the Schmetterling Aviation World Headquarters (which is conveniently adjacent to one of their other holdings, the 8105 Racing shop, which is itself co-located with the 8105 Repair Shop that was going to do the cowl painting), the overbearingly rancid sweet smell of antifreeze emanating from the front regions of the normally ultra-reliable Subie hinted that there may be something amiss in the Department of Automotive Propulsive Force, or "the engine" as it's called in the vernacular. More specifically, in the Thermal Protection Unit.
There is an age old ritual for situations like this that we've all inherited through either or both of parental example or aging Hollywood movies: we raise the hood. Which ritual has become increasingly difficult to perform over the intervening years with the introduction of multiple release latches located (hidden?) both inside and outside of the passenger compartment. Needlessly complex, in my considered opinion. And deliberate besides. It's the automotive designer's way of telling us that we ought just stay the hell outta there and leave it all to the specialists. Always the contrarion and as diabolically clever as a monkey, I defeated their defenses and opened the door to the vault.
It was ugly. The overflow bucket from the radiator was frothing like a rabid Pit Bull and the rest of the engine was covered in spots of flung Pit Bull spittle. Your name doesn't have to be Shelby to figure out that it really isn't supposed to look like that. Or smell like it, for that matter. It smelled like a gallon of Log Cabin faux-syrup had exploded onto a burned skunk. Trust me, that's not a taste sensation we're going to be seeing in the snack aisle at the 7-11 anytime soon. Peee-yooooo.
Well, I was headed to the shop anyway, right?
The news at the shop? Pretty good, but only in aspects unrelated to the car. That particular piece of news was pretty bad. Ten Bills O' Bad:
"Blown head gasket. Might was well replace both while we're in there. And the timing belt, too. When can I start?"
Well, there's the whole question of transportation home, right? I had always thought this kind of thing would happen with the airplane. Fly somewhere, land, find out that we're not flying back. Rent a car, drive home. Sell airplane where it sits. Well, no, probably not that last part, although I can easily imagine being tempted at this point in the never-ending oil change. In this case, I was able to borrow the CEO's personal sports car for the week. I gotta tell you, it's a very nice ride. I still have to look at the owners manual to verify this, but I'd swear that the CD player automatically reduces its volume when you slow from highway speeds (which are limited only by the speed rating of the tires) to a stop at the exit. Incredible!
While at the shop I also retrieved my Walther P-38 that I had asked the Chief Mechanic to take a look at. It was jamming on every second or third round, and that takes a lot of the fun out of shooting it. Although... it probably helps control ammunition expenses. Either way, the gun needed some work.
It looked like a brand new gun. I don't think it has been that clean since it rolled off of the assembly line 50+ years ago. And the jamming problem had reportedly been resolved. I was anxious to finally shoot it with it functioning correctly, so I asked if there was a target handy that I could toss a few shots at.
"No, not that mangy cat, please. An inanimate target would serve better. Not through any love of cats, mind you. I just figure a stationary target will better suit my limited aiming abilities."
Because, you see, I'm a horrible shot. Not so with the Chief Mechanic, who's quite good at it. Once again pointing out the vagaries of genetics. This is the nature of the normal love/hate relationship between siblongs, I imagine.
"Here, I'll take this brick down to the field. You stay up here on the driveway and take a few shots at it," was his suggestion.
Thinking that surely (stop calling me Shirley) he was yanking my chain, I follwed him halfway down the hill.
"What are you doing down here??"
"I thought I might like to shoot at it from somewhere where I could actually see it," I replied. Quite truthfully, too.
Five shots, five misses.
Great glee from the audience.
A "you do it" challenge from me.
One shot. Nothing left of the brick but red dust. Roughly the same left of my self esteem. Oh, and from the top of the hill, naturally.
Like I said: love, hate.
The thing is, I have neither the equipment nor the expertise to paint the cowls. Nor the wheel pants, which is why they've been painted with rattle can primer for the last three years. Fortunately, I'm related to the Chief Mechanic at the 8105 Repair Shop and he knows how to paint. I figured I'd just drive the cowls out to his shop and have him paint them up. How hard could that be? For me, I mean. Drive 'em out, drop 'em off, and pick them up when they're done. Piece of cake!
The cowls and wheel pants took up every cubic inch of free space in my suited-more-for-hauling-groceries Subaru Forester, leaving room only for a single pilot. No problem - this was an out and back trip and not necessarily an opportunity to get some road miles for co-pilot Egg. Going solo lets me set the schedule, so I pulled chocks little before 0800. It's an easy drive that early in the morning and the Across the Universe CDs (highly recommended) made for a relaxed trip.
Well, until I got there, anyway.
As I pulled to a stop in the visitor parking at the Schmetterling Aviation World Headquarters (which is conveniently adjacent to one of their other holdings, the 8105 Racing shop, which is itself co-located with the 8105 Repair Shop that was going to do the cowl painting), the overbearingly rancid sweet smell of antifreeze emanating from the front regions of the normally ultra-reliable Subie hinted that there may be something amiss in the Department of Automotive Propulsive Force, or "the engine" as it's called in the vernacular. More specifically, in the Thermal Protection Unit.
There is an age old ritual for situations like this that we've all inherited through either or both of parental example or aging Hollywood movies: we raise the hood. Which ritual has become increasingly difficult to perform over the intervening years with the introduction of multiple release latches located (hidden?) both inside and outside of the passenger compartment. Needlessly complex, in my considered opinion. And deliberate besides. It's the automotive designer's way of telling us that we ought just stay the hell outta there and leave it all to the specialists. Always the contrarion and as diabolically clever as a monkey, I defeated their defenses and opened the door to the vault.
It was ugly. The overflow bucket from the radiator was frothing like a rabid Pit Bull and the rest of the engine was covered in spots of flung Pit Bull spittle. Your name doesn't have to be Shelby to figure out that it really isn't supposed to look like that. Or smell like it, for that matter. It smelled like a gallon of Log Cabin faux-syrup had exploded onto a burned skunk. Trust me, that's not a taste sensation we're going to be seeing in the snack aisle at the 7-11 anytime soon. Peee-yooooo.
Well, I was headed to the shop anyway, right?
The news at the shop? Pretty good, but only in aspects unrelated to the car. That particular piece of news was pretty bad. Ten Bills O' Bad:
"Blown head gasket. Might was well replace both while we're in there. And the timing belt, too. When can I start?"
Well, there's the whole question of transportation home, right? I had always thought this kind of thing would happen with the airplane. Fly somewhere, land, find out that we're not flying back. Rent a car, drive home. Sell airplane where it sits. Well, no, probably not that last part, although I can easily imagine being tempted at this point in the never-ending oil change. In this case, I was able to borrow the CEO's personal sports car for the week. I gotta tell you, it's a very nice ride. I still have to look at the owners manual to verify this, but I'd swear that the CD player automatically reduces its volume when you slow from highway speeds (which are limited only by the speed rating of the tires) to a stop at the exit. Incredible!
While at the shop I also retrieved my Walther P-38 that I had asked the Chief Mechanic to take a look at. It was jamming on every second or third round, and that takes a lot of the fun out of shooting it. Although... it probably helps control ammunition expenses. Either way, the gun needed some work.
It looked like a brand new gun. I don't think it has been that clean since it rolled off of the assembly line 50+ years ago. And the jamming problem had reportedly been resolved. I was anxious to finally shoot it with it functioning correctly, so I asked if there was a target handy that I could toss a few shots at.
"No, not that mangy cat, please. An inanimate target would serve better. Not through any love of cats, mind you. I just figure a stationary target will better suit my limited aiming abilities."
Because, you see, I'm a horrible shot. Not so with the Chief Mechanic, who's quite good at it. Once again pointing out the vagaries of genetics. This is the nature of the normal love/hate relationship between siblongs, I imagine.
"Here, I'll take this brick down to the field. You stay up here on the driveway and take a few shots at it," was his suggestion.
Thinking that surely (stop calling me Shirley) he was yanking my chain, I follwed him halfway down the hill.
"What are you doing down here??"
"I thought I might like to shoot at it from somewhere where I could actually see it," I replied. Quite truthfully, too.
Five shots, five misses.
Great glee from the audience.
A "you do it" challenge from me.
One shot. Nothing left of the brick but red dust. Roughly the same left of my self esteem. Oh, and from the top of the hill, naturally.
Like I said: love, hate.
Wednesday, December 02, 2009
The month long oil change...
... still is not done. But as of tonight it is just a little bit closer. Tonight I test fit the repaired cowls and they fit!
Over the last few days, I've been working on finishing the refill of the previous rivet holes. That involved grinding off excess epoxy with a Dremel tool, adding a fill layer of epoxy thickened with filler, and sanding off most of that layer to leave a smooth finish. It actually looked pretty good:

Yesterday I countersunk the rivet holes for the flush rivets that would be used to hold the new hinge strip in place. That turned out to be surprisingly easy to do, but even more surprisingly hard to do well. The problem turned out to be that it is so easy to cut the countersink hole in the fiberglass even by manually turning the bit that it is also disconcertingly easy to drill too deep. I didn't know that, of course, until I had squeezed in all of the new rivets and sprayed on a coat of primer.
Primer is like the mean mother-in-law of paint: it revels in ostentatiously demonstrating your weaknesses. I swear, that row of rivets looked so bad that it was almost like a satirical parodization* of British dental work. Having had a night to get over the initial chagrin, though, I think a little bondo or a few thick coats of paint will serve to hide my shame. Which, after all, is all you can ever really ask for from life, right?
My biggest worry was that nothing would line up when it came time to mount the cowls to the plane. Co-pilot Rick drove down to the airport in the crappy wet weather we're currently having (the weather can sense that I might soon have a flyable airplane and wants to get a few early kicks in) to help me to do the test install. Everything fit just fine, and in certain aspects the cowls went on easier than ever before. That was a huge relief!
The cowls are back off of the airplane now, awaiting a trip to the paint shop.
* not a real word, at least according to Google, but it ought to be!
Over the last few days, I've been working on finishing the refill of the previous rivet holes. That involved grinding off excess epoxy with a Dremel tool, adding a fill layer of epoxy thickened with filler, and sanding off most of that layer to leave a smooth finish. It actually looked pretty good:

Yesterday I countersunk the rivet holes for the flush rivets that would be used to hold the new hinge strip in place. That turned out to be surprisingly easy to do, but even more surprisingly hard to do well. The problem turned out to be that it is so easy to cut the countersink hole in the fiberglass even by manually turning the bit that it is also disconcertingly easy to drill too deep. I didn't know that, of course, until I had squeezed in all of the new rivets and sprayed on a coat of primer.
Primer is like the mean mother-in-law of paint: it revels in ostentatiously demonstrating your weaknesses. I swear, that row of rivets looked so bad that it was almost like a satirical parodization* of British dental work. Having had a night to get over the initial chagrin, though, I think a little bondo or a few thick coats of paint will serve to hide my shame. Which, after all, is all you can ever really ask for from life, right?
My biggest worry was that nothing would line up when it came time to mount the cowls to the plane. Co-pilot Rick drove down to the airport in the crappy wet weather we're currently having (the weather can sense that I might soon have a flyable airplane and wants to get a few early kicks in) to help me to do the test install. Everything fit just fine, and in certain aspects the cowls went on easier than ever before. That was a huge relief!
The cowls are back off of the airplane now, awaiting a trip to the paint shop.
* not a real word, at least according to Google, but it ought to be!
Saturday, November 28, 2009
Sunny and 50 today
Thus proving that my weather talisman is still demonstrating a preternatural efficacy in preventing the type of weather that wouldn't frustrate me. I'm still waiting for the rivets I need to attach the new hinge piece. There was still a little prep work to do, so I knocked that out this morning. I borrowed Co-pilot Rick's Dremel tool to grind down the bumps left by my overly zealous application of epoxy to fill the old holes. The worked great, but there was no way I was going to get a nice, smooth finish after doing that. I still have quite a bit of epoxy filler left over from filling the pinholes on the new wheel pants I installed four years ago, so I mixed up a batch of paste and smoothed it along the edge. Was that later cures, I'll sand it smooth and put a skim coat of unadulterated epoxy on top of it to protect it.
Then it should just be a matter of countersinking the holes for the rivets and putting it all together. For now it will have to get by with a coat of rattle can enamel paint. It will never look as good as it used to, I'm afraid.

Then it should just be a matter of countersinking the holes for the rivets and putting it all together. For now it will have to get by with a coat of rattle can enamel paint. It will never look as good as it used to, I'm afraid.

Sunday, November 22, 2009
This drilling from the inside out thing?
It isn't necessarily going to end well:

Just call it a hunch.

Just call it a hunch.
Cowl Update
The halves are joined!

Now I have to let the epoxy that I used to fill the holes cure for a few more hours, then figure out a way to drill the new holes. I want to drill from the inside out, but that will make it hard to hot the old holes. There's no requirement to do so, of course, but it seems like it would be cleaner looking. I don't want to go from the outside in because it will push the hinge away and make it next to impossible to drill a round, accurately placed hold. Maybe I could do just a few inside outs and count on clecos to hold the hinge in place for the outside in drilling, but I'm dubious on a favorable prognosis.

There also quite a bit of epoxy that needs to be cleaned up on the holes, and the original installation of the hinge had 1/4" or so holes drilled in it and epoxy used to help the rivets hold it in place. So.... good progress, but plenty more to do yet.

Now I have to let the epoxy that I used to fill the holes cure for a few more hours, then figure out a way to drill the new holes. I want to drill from the inside out, but that will make it hard to hot the old holes. There's no requirement to do so, of course, but it seems like it would be cleaner looking. I don't want to go from the outside in because it will push the hinge away and make it next to impossible to drill a round, accurately placed hold. Maybe I could do just a few inside outs and count on clecos to hold the hinge in place for the outside in drilling, but I'm dubious on a favorable prognosis.

There also quite a bit of epoxy that needs to be cleaned up on the holes, and the original installation of the hinge had 1/4" or so holes drilled in it and epoxy used to help the rivets hold it in place. So.... good progress, but plenty more to do yet.
Saturday, November 21, 2009
Taunted by the weather
It would have been a great day to fly. That's all I can say about it; any more than that will require to think about how unseasonably beautiful our weather was today and likely will also be tomorrow. It's like getting a two day reprieve from being sent to a Siberian gulag but having to spend it fixing your plumbing. In may case, it is still the cowl that's keeping me grounded.
I started working on it this morning, though. The first thing that had to be done was the grinding away of the old epoxy that had apparently been used to aid the rivets in holding the hinge strip to the cowl. This step was quite easy, mostly due to a convenient tool crossover. I used the orbital sander that played such an integral role in the building of the kayak:

I also had to drill out the rivets holding in the remaining piece of yet another broken hinge. It's bad enough that I have no idea how this one got broken, but I also have no idea how it got broken this badly:

On the plus side, it was far easier to drill out the rivets from the inside out than it had been to do it from the outside in like I had to do with the other hinge:

Not that it matters because they're going to get filled with epoxy anyway, but the holes got far less elongated:

In yet another beneficent crossover, leftover materials from the kayak were already on hand for the filling of the old holes with new epoxy:

The pumps on the epoxy containers hadn't been exercised for a couple of years so I had to purge them, clean them, and re-prime them before dosing out a bit of epoxy to suck into a syringe. My first idea was to clamp the new hinge in place and use it to hold the epoxy in the holes:

That didn't work as well as I had hoped it would so I had to remove the hinge and try masking tape instead:

That seemed to work a lot better. Now it all needs to sit overnight curing.
I'll check on it second thing in the morning. What will I do first thing in the morning? Well, more than likely I'll be outside shaking my fist at a tauntingly blue sky.
I started working on it this morning, though. The first thing that had to be done was the grinding away of the old epoxy that had apparently been used to aid the rivets in holding the hinge strip to the cowl. This step was quite easy, mostly due to a convenient tool crossover. I used the orbital sander that played such an integral role in the building of the kayak:

I also had to drill out the rivets holding in the remaining piece of yet another broken hinge. It's bad enough that I have no idea how this one got broken, but I also have no idea how it got broken this badly:

On the plus side, it was far easier to drill out the rivets from the inside out than it had been to do it from the outside in like I had to do with the other hinge:

Not that it matters because they're going to get filled with epoxy anyway, but the holes got far less elongated:

In yet another beneficent crossover, leftover materials from the kayak were already on hand for the filling of the old holes with new epoxy:

The pumps on the epoxy containers hadn't been exercised for a couple of years so I had to purge them, clean them, and re-prime them before dosing out a bit of epoxy to suck into a syringe. My first idea was to clamp the new hinge in place and use it to hold the epoxy in the holes:

That didn't work as well as I had hoped it would so I had to remove the hinge and try masking tape instead:

That seemed to work a lot better. Now it all needs to sit overnight curing.
I'll check on it second thing in the morning. What will I do first thing in the morning? Well, more than likely I'll be outside shaking my fist at a tauntingly blue sky.
Monday, November 16, 2009
At least the oil is drained
It was a beautiful weekend with weather as foreign to an Ohio November as parrot meat to a polar bear. Temps hovering near 70 and clear, calm skies. So where was I? Still waiting for new hinge strip material to fix Papa's cowls.
With weather that nice, though, any time spent at the hangar is good time. I went out and finished draining the oil out of the oil filter. That's typically a messy job, but with time to spare I was able to devote sufficient time to the task to get it done without spilling a single drop. That's not as easy as it may sound. To remove the filter without spilling any oil down the back of the engine or the front of the firewall is a tightly choreographed effort involving an electric drill, a modified water bottle, and a lot of rags. It's worth the effort, though, because any oil spilled will eventually end up spread down the belly of the airplane. It is NO fun at all cleaning the belly, no matter what the weather.
While waiting for the oil to drain, I removed the wheel pants. That too is a persnickety job that I try to avoid whenever possible, but the tires are soon (assuming I ever fly again) going to be showing thread, at which point they will have to be replaced. Besides that, the annual inspection will be due in just a couple of months, so I figured I pull the wheel pants off while the hangar floor was at least somewhat warm and just leave them off until after the annual.
The rest of the weekend was spent doing various winter preparation chores and working on the RV-12. It's funny that the RV-12 project was intended to fill the time in the gawd-awful winter months when it's too cold and/or nasty to go outside, but I enjoy the "work" so much that I spent most of a beautiful weekend in the basement building a stabilator. I only went outside long enough to go to Lowes to buy a snow blower. With the weather being what it was, there wasn't much competition to buy a snow blower; those procrastinators will find that I got there before them.
Naturally, they will get the last laugh when it doesn't snow at all this year.
With weather that nice, though, any time spent at the hangar is good time. I went out and finished draining the oil out of the oil filter. That's typically a messy job, but with time to spare I was able to devote sufficient time to the task to get it done without spilling a single drop. That's not as easy as it may sound. To remove the filter without spilling any oil down the back of the engine or the front of the firewall is a tightly choreographed effort involving an electric drill, a modified water bottle, and a lot of rags. It's worth the effort, though, because any oil spilled will eventually end up spread down the belly of the airplane. It is NO fun at all cleaning the belly, no matter what the weather.
While waiting for the oil to drain, I removed the wheel pants. That too is a persnickety job that I try to avoid whenever possible, but the tires are soon (assuming I ever fly again) going to be showing thread, at which point they will have to be replaced. Besides that, the annual inspection will be due in just a couple of months, so I figured I pull the wheel pants off while the hangar floor was at least somewhat warm and just leave them off until after the annual.
The rest of the weekend was spent doing various winter preparation chores and working on the RV-12. It's funny that the RV-12 project was intended to fill the time in the gawd-awful winter months when it's too cold and/or nasty to go outside, but I enjoy the "work" so much that I spent most of a beautiful weekend in the basement building a stabilator. I only went outside long enough to go to Lowes to buy a snow blower. With the weather being what it was, there wasn't much competition to buy a snow blower; those procrastinators will find that I got there before them.
Naturally, they will get the last laugh when it doesn't snow at all this year.
Wednesday, November 11, 2009
Nothing ever gets easier, either
After stressing about it for a few days and gathering opinions as to what to do from other RV owners, it came down to the fact that the only way to get the cowl off of Papa would be to drill out the rivets that hold the hinge in place. Naturally, as this would be the most destructive and invasive way to do it, I was very reluctant to do it. After a period of energetic loin girding, I grabbed the drill and a #41 bit and went at it. An hour (and a few choice cuts on my fingers) later, the cowl was off. And, I'm sorry to say, somewhat maimed. I knew that was a very real possibility, though, so selected the top cowl to be sacrificed since it's easier to transport to a more comfortable location to be worked on.
It turns out that it's harder to drill a rivet out of fiberglass than it is to drill one out of aluminum. I'm sure this is almost universally true, but it becomes even more true if you can't really see exactly where the rivet is. If it was under a thick coat of paint, like. Adds to the challenge, that. Some of the rivets came out peacefully, others barricaded themselves in and hoped I wouldn't call in the SWAT team. They underestimated my resolve, probably unaware of the girded loins that I was bringing to the battle. And a #41 drill bit.
The difficulty in drilling out the rivets in fiberglass is that they are surrounded by a much softer, pliant material. If the bit got even the least bit off the center of the rivet, it would take the path of lesser resistance and slice off into the fiberglass. There is no silver lining in that cloud. Not only does it create a messy, large hole in the fiberglass that will have to be fixed (somehow - not quite sure how yet, and my loins are at this point quite ungirded), it also leaves enough rivet in place to maintain a strangle hold on the hinge. Oh, and it also leaves a very sharp edge, perfect for lacerating fingertips if one was careless enough to try to wipe away what looked like paint and/or metal shavings. Let's just say that if one were to do that, one would later realize just how deep those cuts were when one was slicing onions for dinner. Or trying to type a blog post, for that matter.
As it stands today, the cowl has bigger holes in it than our national budget and the hinge strip is as ruined as Congressional credibility. (Sorry, I had the radio news on - it has the effect on me) I think the cowl can be repaired by filling the holes with epoxy thickened with microballoons, but the hinge will have to be replaced. The hinge material is not expensive, but the job of matching and drilling new holes so that the top cowl will line up with the bottom has me worried. I'll stew on that for a few days; something will come to me. It always does.
It turns out that it's harder to drill a rivet out of fiberglass than it is to drill one out of aluminum. I'm sure this is almost universally true, but it becomes even more true if you can't really see exactly where the rivet is. If it was under a thick coat of paint, like. Adds to the challenge, that. Some of the rivets came out peacefully, others barricaded themselves in and hoped I wouldn't call in the SWAT team. They underestimated my resolve, probably unaware of the girded loins that I was bringing to the battle. And a #41 drill bit.
The difficulty in drilling out the rivets in fiberglass is that they are surrounded by a much softer, pliant material. If the bit got even the least bit off the center of the rivet, it would take the path of lesser resistance and slice off into the fiberglass. There is no silver lining in that cloud. Not only does it create a messy, large hole in the fiberglass that will have to be fixed (somehow - not quite sure how yet, and my loins are at this point quite ungirded), it also leaves enough rivet in place to maintain a strangle hold on the hinge. Oh, and it also leaves a very sharp edge, perfect for lacerating fingertips if one was careless enough to try to wipe away what looked like paint and/or metal shavings. Let's just say that if one were to do that, one would later realize just how deep those cuts were when one was slicing onions for dinner. Or trying to type a blog post, for that matter.
As it stands today, the cowl has bigger holes in it than our national budget and the hinge strip is as ruined as Congressional credibility. (Sorry, I had the radio news on - it has the effect on me) I think the cowl can be repaired by filling the holes with epoxy thickened with microballoons, but the hinge will have to be replaced. The hinge material is not expensive, but the job of matching and drilling new holes so that the top cowl will line up with the bottom has me worried. I'll stew on that for a few days; something will come to me. It always does.
Sunday, November 08, 2009
Nothing is ever easy
The weather is fantastic, particularly considering that we're into November and there's no longer any point in living in denial as to what's just around the corner.
I thought it would be a good day to take Co-pilot Egg for a short plane ride out to MadCo and environs for a breath of fresh air and a load of new fuel for Papa, then drain the oil for the last oil change of the year.
There's nothing like a plane ride to bring out the natural beauty of a teen aged girl:

Or, you know.... not.
The winds at MadCo were 13 gusting 17, straight out of the south. The only way to have gotten that cross wind any crosser would have been to insult its mother. The landing went OK - I held a bunch of left bank into it and a boot full of right rudder to keep us on the straight and narrow. I thought for a second in the flare that we were going to smack the runway like a spoiled 3 year old at Wal-Mart, but I timed it perfectly and rubbed it on with an unexpected greaser.
I bounced it back at Bolton. Just to keep my streak going, of course.
The Co-pilot was of great assistance when it came time to push the fuel-bloated plane back into the hangar:

While she relaxed, I started to remove the cowls. I didn't, however, finish removing the cowls. If you could pick the absolutely worst place for the long hinge wire that runs along the seam where the top and bottom cowls meet to break, it would be right at the point where the wire would be flush with the first hoop. If that were to happen, you'd have no way in the world short of drilling out all of the rivets that hold the hinge in place on the cowl to get the cowls apart.
Here's what it would look like:

Ask me how I know.
Oh well, it's just one more thing on the to-do list. To date the list is as follows:
- replace tires
- change oil and filter
- replace Artificial Horizon ($$$s!!!)
- remove broken hinge wire, replace
It's doubtful that the Native American Summer we're enjoying right now will last long enough to allow that work to be done in relative comfort. But it sure was a nice day to fly!
I thought it would be a good day to take Co-pilot Egg for a short plane ride out to MadCo and environs for a breath of fresh air and a load of new fuel for Papa, then drain the oil for the last oil change of the year.
There's nothing like a plane ride to bring out the natural beauty of a teen aged girl:

Or, you know.... not.
The winds at MadCo were 13 gusting 17, straight out of the south. The only way to have gotten that cross wind any crosser would have been to insult its mother. The landing went OK - I held a bunch of left bank into it and a boot full of right rudder to keep us on the straight and narrow. I thought for a second in the flare that we were going to smack the runway like a spoiled 3 year old at Wal-Mart, but I timed it perfectly and rubbed it on with an unexpected greaser.
I bounced it back at Bolton. Just to keep my streak going, of course.
The Co-pilot was of great assistance when it came time to push the fuel-bloated plane back into the hangar:

While she relaxed, I started to remove the cowls. I didn't, however, finish removing the cowls. If you could pick the absolutely worst place for the long hinge wire that runs along the seam where the top and bottom cowls meet to break, it would be right at the point where the wire would be flush with the first hoop. If that were to happen, you'd have no way in the world short of drilling out all of the rivets that hold the hinge in place on the cowl to get the cowls apart.
Here's what it would look like:

Ask me how I know.
Oh well, it's just one more thing on the to-do list. To date the list is as follows:
- replace tires
- change oil and filter
- replace Artificial Horizon ($$$s!!!)
- remove broken hinge wire, replace
It's doubtful that the Native American Summer we're enjoying right now will last long enough to allow that work to be done in relative comfort. But it sure was a nice day to fly!
Friday, August 07, 2009
FCF
'FCF' is an acronym (ok, you probably recognized that part on your own) for Functional Check Flight. It's exactly what it sounds like: you perform some maintenance on the airplane, then you go flying to make sure all of the parts stay attached.
Yesterday's FCF was intended to test two things. First, I replace the broken tach cable. If I was keeping a list of "Things That Are Easier to Remove Than They Are to Replace," tach cables would now be added. It took a few minutes to wrestle it into place, a few more minutes to wrestle it out of place, and yet more minutes to wrestle it into the correct place. There's some routing to be done to correctly wind the cable through some of the other stuff hanging around at the back of the engine. Once the cable is correctly positioned, there's nothing left to do but screw the ferrule caps (Warning: non-technical, just-made-up part description) into place. That would be easy of not for the aforementioned other engine bits being in the way. Seriously, I don't know why I don't just yank out the vacuum pump and gyros - I don't use them.
Once the tach cable was done, I removed the temporary cigarette lighter power cord that I had been using to deliver pure 12 VDC to the Garmin 396 and replaced it with a cord that I could wire directly to ship's power. That was a very simple task. In fact, both of these jobs were very easy and very low risk, but I would not have been able to do either of them myself if I didn't have an Experimental certificate for the plane. Total cost was $26.50 for the tach cable, and an unconscionable $28.95 for the Garmin power cord. Had I required an A&P to do the work, the price of the cables would have had a mark-up and labor costs would have added at least $150.
Just saying.
Airnav.com indicated that the lowest price fuel within a reasonable distance was at Urbana. I was able to convince the snooty, high-fallutin' new GPS to point me in that general direction after a few minutes of fumbling around with the slightly different button/menu stuff on the 396. Once we had been in the air for a few minutes, the GPS started displaying METAR and TAF weather information. Without even being asked! And without prolonged messing around with recalcitrant equipment. I am VERY happy with the Garmin 396!
I was also very happy with both of my landings. They were both CAG (made up acronym alert!) landings: Calm Air Greasers. That was a bit of a relief after my last flight where everything just felt wrong. Confidence now restored in both aircraft and pilot, I'm looking forward to some good flying this weekend.
Yesterday's FCF was intended to test two things. First, I replace the broken tach cable. If I was keeping a list of "Things That Are Easier to Remove Than They Are to Replace," tach cables would now be added. It took a few minutes to wrestle it into place, a few more minutes to wrestle it out of place, and yet more minutes to wrestle it into the correct place. There's some routing to be done to correctly wind the cable through some of the other stuff hanging around at the back of the engine. Once the cable is correctly positioned, there's nothing left to do but screw the ferrule caps (Warning: non-technical, just-made-up part description) into place. That would be easy of not for the aforementioned other engine bits being in the way. Seriously, I don't know why I don't just yank out the vacuum pump and gyros - I don't use them.
Once the tach cable was done, I removed the temporary cigarette lighter power cord that I had been using to deliver pure 12 VDC to the Garmin 396 and replaced it with a cord that I could wire directly to ship's power. That was a very simple task. In fact, both of these jobs were very easy and very low risk, but I would not have been able to do either of them myself if I didn't have an Experimental certificate for the plane. Total cost was $26.50 for the tach cable, and an unconscionable $28.95 for the Garmin power cord. Had I required an A&P to do the work, the price of the cables would have had a mark-up and labor costs would have added at least $150.
Just saying.
Airnav.com indicated that the lowest price fuel within a reasonable distance was at Urbana. I was able to convince the snooty, high-fallutin' new GPS to point me in that general direction after a few minutes of fumbling around with the slightly different button/menu stuff on the 396. Once we had been in the air for a few minutes, the GPS started displaying METAR and TAF weather information. Without even being asked! And without prolonged messing around with recalcitrant equipment. I am VERY happy with the Garmin 396!
I was also very happy with both of my landings. They were both CAG (made up acronym alert!) landings: Calm Air Greasers. That was a bit of a relief after my last flight where everything just felt wrong. Confidence now restored in both aircraft and pilot, I'm looking forward to some good flying this weekend.
Sunday, March 29, 2009
March Madness: Replacing the Brake Pads
I don't get a lot of exercise. Sure, I play tennis, but only on the Wii. The same applies to golf and bowling: only the electronic variants meet both my inherent apathy and repulsive reaction to anything requiring physical effort. One thing I do like to do now and then, however, is to reach around and pat myself on the back when I benefit from my own often stunning prescience. After suitable stretching to limber up the atrophied muscles, of course. I've had plenty of occasion to celebrate my astuteness lately, what with the Rasmussen polls confirming everything that I believed we would see out of DC in the next four years, all compressed into less than 100 days. But, alas, this is a blog semi-devoted to my relationship with my RV-6, not my opinions on contemporaneous political shenanigans, no matter their import to the health and well-being of us all.
So, what exactly am I patting myself on the back for this weekend? Well, it is in response to my incredibly astute (if not financially efficacious) decision to keep Papa's annual inspection in the month of March, rather than move it two months further downstream to May as I legally could have. As in just about anything related to flying, it really comes down to weather management. There's nothing worse than a disassembled airplane right in the heart of flying season. As we all know, March comes in like a lion and out like a lamb, except when it doesn't. There's nothing lamb-like about the weather on this, the last weekend of March. In fact, this is the first time I think I've ever heard a weather phenomenon referred to as a "vigorous cold front." Cold fronts are never that fun, but "vigorous??" Oh my! That can't be good!
You may remember that one of the things I found during the inspection last week was a worn pair of brake pads on the right side. The left side was not as worn, but I decided to replace both sides this weekend. The aforementioned weather having left me no options other than to either stay home and make a nuisance of myself or go the hangar and do something productive, the choice was obvious. But, finding that making a nuisance of myself was not nearly as gratifying as I had hoped it would be, I ended up invoking option two.
Changing the brake pads is actually a very simple job, and I'm surprised that it isn't included in the list of things that store-bought airplane owners are permitted to do to their own airplanes as listed in Appendix A of Part 43 of the Federal Aviation Regulations. According to the regs, they're allowed to remove and replace safety wire and cotter pins, replace tires, and repack wheel bearings. Nothing is mentioned about the brakes. You have to remove at least one side of the brake calipers to get the wheel off to perform any of the allowable things listed above, so I'm not clear on the reasoning behind prohibiting the replacement of the pads as long as the calipers are off. It's really a quite simple operation, and interestingly does not even require the removal of the wheels.
With regards to safety wire and cotter pins, I should mention that the regulation specifically states the an airplane owner is permitted to "replace defective safety wire or cotter keys," so this may introduce a little bit of a Catch-22 unless there is no stipulation against the owner, you know, being the entity that rendered the safety wire or cotter pin defective in the first place. So as is usual with the FARs, the real rule is determined by enforcement cases rather than clear, unambiguous writing. Ambiguously crafted FARs are one of the crosses we bear as owners and pilots.
In any event, that kind of thing is moot for me since my airplane falls under the auspices of a much friendlier set of regulations. Section 1 of Part 43, paragraph (b) states that "This part does not apply to any aircraft for which an experimental airworthiness certificate has been issued, unless a different kind of airworthiness certificate had previously been issued for that aircraft." While that's not entirely a get-out-jail-free card, it is a get-out-of-paying-for-simple-work clause. And one of the simplest jobs on the airplane is replacing brake pads.
 The first step in replacing the brake pads is to spend 10 minutes rifling through the toolbox looking for the special brake pad replacing tool. You see, the pads on an airplane brake are fastened to the calipers with rivets. It takes a special (but not overly expensive) tool to remove and replace the pads without incurring the risk of damage to the pads that you would have if you tried to manage the rivets with a hammer or other unsuitable blunt instrument. The problem with finding the tool is that there are a handful of removable pieces/parts that have a frustrating tendency to get separated from each other.
 If you're clever, you stow the tool with all of those parts attached. As of today, I am clever. Last year? Not so much. It wasn't until this time, the fourth or fifth consecutive time that I've had to search for all of the parts, that I came across the brilliant (yet now, in retrospect, oh so obvious) idea of storing the tool as one unit. Better late than never, I suppose. Still, thinking back on all of those years of senseless, infuriating effort... Sigh.
If you follow that advice, the first step should be easy. You'll be happy to know that the second step is just as easy, albeit maybe a little bit shady in a strictly legal sense as detailed in my in-depth legal analysis above. Let you conscience be your guide. The second step is to willingly and deliberately cause the safety wire securing the brake caliper to become defective. This is accomplished by cutting it with a pair of wire cutters. Those are (or should be, anyway) easy to find, what with them being a single-piece tool. Just clip away the loops by the bolt heads and remove the wire. Just throw it away once you get it off of there since, from a legal point-of-view, it is now defective. Once the safety wire is gone, you can remove the two bolts that the wire was securing.
As you are removing the bolts, you will notice that the caliper feels loose, and you may be tempted to get all panicky and try to tighten it up. Don't panic; it's supposed to feel like that. The caliper slides on a pair of pins to allow it to snug up to the brake disk as the pads wear down. If the caliper wasn't sliding in the manner it's supposed to, you would have already had a mechanic look at your brakes because you would have been experiencing more pedal travel that you were used to. Note that you needn't remove the bolts entirely; they are threaded into the outside caliper half. You will want to make sure you're ready for the outside half to fall off when you remove the bolts. It's not the greatest picture, but you should be able to see the gap as the pad is moving away from the brake disk. I just leave the bolt heads flush and let the screw action push the pad away. If you choose to do that, though, you might have to alternate between loosening the top and bottom bolts every few turns so you don't put a lot of bending torque on the pad. You'll see what I mean.
Once the outside pad is removed, you can slide the remaining part of the caliper assembly off of the slide pins to remove the other pad. This should be done with great delicacy if your airplane, like mine, has rigid brake fluid lines. There are two very preferable things at play here: you would prefer not to break the brake fluid line, and you would also prefer to not remove the fitting. The ramifications of breaking the line should be obvious. The consequences of removing the fitting may be the need to later bleed any air introduced into the brake system back out of the system. If possible, it is best to just carefully move the caliper off of the pins and slide the inside pad off.
Once both of the pads are off, it is time to use the brake pad removal tool that you spent so much time looking for in the first step. In preparation for the rivet removal, take off all three of the pieces/parts that you installed if you are using my patented storage method. If you are still insisting on storing the parts separately in support of some kind of masochistic "thrill of the search" fetish, you are ready to move on to the next step. Find the pointy part and attach it to the end of the threaded rod. Leave the bottom hole open.
Put the tool in a vise and clamp it down. Place the brake pad into the 'C' part of the tool with the smushed up part of the rivets facing up. Slowly screw down the threaded rod until the pointy bit is nicely centered and seated on the rivet. Slowly screw down the threaded rod while holding the pad in place. The idea is to use the pointy part to push the old rivet out. As the rivet pushes out, you will feel a notable lessening of the resistance to the turning of the handle. You may also hear the old rivet fall out and hit the ground or workbench, but if not you can just reach up under there and remove it. You can keep screwing the threaded rod through after the rivet has popped out if you want to, but it's a bit of a waste of time. Now me, I was looking for an excuse to be out in the hangar for as long as possible, so a little wasted time was just fine by me. But even with that being the case, I thought it a silly thing to do, so I just backed out the rod and moved onto the next rivet. Again, if you aren't trying to kill time, go ahead and remove the pad from the other part of the caliper right away since you already have the tool configured for it.
Once both pads are removed, or if you are a linear thinker and prefer to dress in a one-sock-one-shoe process rather than a two-socks-then-two-shoes manner, you need to reconfigure the tool for putting the new rivets in the new pads. Just pull off the pointy bit and replace it with the conical thingy. The other part just drops down into the open hole at the bottom of the 'C'.
Line up the new pads on the caliper halves and drop new rivets down into the recessed holes in the pads. I put all three rivets in rather that doing them one at a time to ensure that I don't rivet a pad in crooked and find that I can't get the other rivets in. This is a bit tricky, though, because the pad has to be turned over to fit it into the tool. This can (and often does) result in anywhere between one and three rivets falling out. As you can surely imagine, this is not a desirable turn of events since rivets, much like the disparate parts of the brake tool, are absolute masters of camouflage. They look all bright and shiny and you'd think they'd be easy to find, but take my word for this: you do not want to drop them.

I usually start with pressing the center rivet. This lets me contort my fingers such that they are holding the other two rivets in place. What you're trying to do is get the bottom part of the tool to fit up into the recessed hole at the bottom of the pad while you screw down the conical thingy to press the rivet into place. I could write a thousand words about this, but I think these pictures might show it better:


Voilá! Snug them down tight, but not too tight. (Hey, I know that's ambiguous and arbitrary guidance, but I was reading Federal Regs just a few paragraphs ago - it's contagious!):

Now it's simply a matter of replacing the brake pieces back to where you found them.

And, of course, replacing the defective safety wire:

See? This was a lot easier than jacking the plane, rendering safety wire and cotter pins defective, removing the wheel, deflating the tire, splitting the wheel, removing, cleaning, and repacking the wheel bearings, and reassembling the whole mess. (In other words, the very things that the FAA has deigned to allow store-bought airplane owners to legally do by themselves.)
I know this to be true because I did all of that other stuff yesterday too. The brake work takes about half an hour per side. The removal and repacking of the bearings took at least an hour per side. I simply cannot understand why Part 43 allows one but not the other.


See what I mean?
So, what exactly am I patting myself on the back for this weekend? Well, it is in response to my incredibly astute (if not financially efficacious) decision to keep Papa's annual inspection in the month of March, rather than move it two months further downstream to May as I legally could have. As in just about anything related to flying, it really comes down to weather management. There's nothing worse than a disassembled airplane right in the heart of flying season. As we all know, March comes in like a lion and out like a lamb, except when it doesn't. There's nothing lamb-like about the weather on this, the last weekend of March. In fact, this is the first time I think I've ever heard a weather phenomenon referred to as a "vigorous cold front." Cold fronts are never that fun, but "vigorous??" Oh my! That can't be good!
You may remember that one of the things I found during the inspection last week was a worn pair of brake pads on the right side. The left side was not as worn, but I decided to replace both sides this weekend. The aforementioned weather having left me no options other than to either stay home and make a nuisance of myself or go the hangar and do something productive, the choice was obvious. But, finding that making a nuisance of myself was not nearly as gratifying as I had hoped it would be, I ended up invoking option two.
Changing the brake pads is actually a very simple job, and I'm surprised that it isn't included in the list of things that store-bought airplane owners are permitted to do to their own airplanes as listed in Appendix A of Part 43 of the Federal Aviation Regulations. According to the regs, they're allowed to remove and replace safety wire and cotter pins, replace tires, and repack wheel bearings. Nothing is mentioned about the brakes. You have to remove at least one side of the brake calipers to get the wheel off to perform any of the allowable things listed above, so I'm not clear on the reasoning behind prohibiting the replacement of the pads as long as the calipers are off. It's really a quite simple operation, and interestingly does not even require the removal of the wheels.
With regards to safety wire and cotter pins, I should mention that the regulation specifically states the an airplane owner is permitted to "replace defective safety wire or cotter keys," so this may introduce a little bit of a Catch-22 unless there is no stipulation against the owner, you know, being the entity that rendered the safety wire or cotter pin defective in the first place. So as is usual with the FARs, the real rule is determined by enforcement cases rather than clear, unambiguous writing. Ambiguously crafted FARs are one of the crosses we bear as owners and pilots.
In any event, that kind of thing is moot for me since my airplane falls under the auspices of a much friendlier set of regulations. Section 1 of Part 43, paragraph (b) states that "This part does not apply to any aircraft for which an experimental airworthiness certificate has been issued, unless a different kind of airworthiness certificate had previously been issued for that aircraft." While that's not entirely a get-out-jail-free card, it is a get-out-of-paying-for-simple-work clause. And one of the simplest jobs on the airplane is replacing brake pads.
 The first step in replacing the brake pads is to spend 10 minutes rifling through the toolbox looking for the special brake pad replacing tool. You see, the pads on an airplane brake are fastened to the calipers with rivets. It takes a special (but not overly expensive) tool to remove and replace the pads without incurring the risk of damage to the pads that you would have if you tried to manage the rivets with a hammer or other unsuitable blunt instrument. The problem with finding the tool is that there are a handful of removable pieces/parts that have a frustrating tendency to get separated from each other.
 If you're clever, you stow the tool with all of those parts attached. As of today, I am clever. Last year? Not so much. It wasn't until this time, the fourth or fifth consecutive time that I've had to search for all of the parts, that I came across the brilliant (yet now, in retrospect, oh so obvious) idea of storing the tool as one unit. Better late than never, I suppose. Still, thinking back on all of those years of senseless, infuriating effort... Sigh.
If you follow that advice, the first step should be easy. You'll be happy to know that the second step is just as easy, albeit maybe a little bit shady in a strictly legal sense as detailed in my in-depth legal analysis above.
 Let you conscience be your guide. The second step is to willingly and deliberately cause the safety wire securing the brake caliper to become defective. This is accomplished by cutting it with a pair of wire cutters. Those are (or should be, anyway) easy to find, what with them being a single-piece tool. Just clip away the loops by the bolt heads and remove the wire. Just throw it away once you get it off of there since, from a legal point-of-view, it is now defective. Once the safety wire is gone, you can remove the two bolts that the wire was securing.
As you are removing the bolts, you will notice that the caliper feels loose, and you may be tempted to get all panicky and try to tighten it up. Don't panic; it's supposed to feel like that.
 The caliper slides on a pair of pins to allow it to snug up to the brake disk as the pads wear down. If the caliper wasn't sliding in the manner it's supposed to, you would have already had a mechanic look at your brakes because you would have been experiencing more pedal travel that you were used to. Note that you needn't remove the bolts entirely; they are threaded into the outside caliper half. You will want to make sure you're ready for the outside half to fall off when you remove the bolts. It's not the greatest picture, but you should be able to see the gap as the pad is moving away from the brake disk. I just leave the bolt heads flush and let the screw action push the pad away. If you choose to do that, though, you might have to alternate between loosening the top and bottom bolts every few turns so you don't put a lot of bending torque on the pad. You'll see what I mean.
Once the outside pad is removed, you can slide the remaining part of the caliper assembly off of the slide pins to remove the other pad. This should be done with great delicacy if your airplane, like mine, has rigid brake fluid lines.
 There are two very preferable things at play here: you would prefer not to break the brake fluid line, and you would also prefer to not remove the fitting. The ramifications of breaking the line should be obvious. The consequences of removing the fitting may be the need to later bleed any air introduced into the brake system back out of the system. If possible, it is best to just carefully move the caliper off of the pins and slide the inside pad off.
Once both of the pads are off, it is time to use the brake pad removal tool that you spent so much time looking for in the first step. In preparation for the rivet removal, take off all three of the pieces/parts that you installed if you are using my patented storage method.
 If you are still insisting on storing the parts separately in support of some kind of masochistic "thrill of the search" fetish, you are ready to move on to the next step. Find the pointy part and attach it to the end of the threaded rod. Leave the bottom hole open.
Put the tool in a vise and clamp it down. Place the brake pad into the 'C' part of the tool with the smushed up part of the rivets facing up. Slowly screw down the threaded rod until the pointy bit is nicely centered and seated on the rivet. Slowly screw down the threaded rod while holding the pad in place. The idea is to use the pointy part to push the old rivet out.
 As the rivet pushes out, you will feel a notable lessening of the resistance to the turning of the handle. You may also hear the old rivet fall out and hit the ground or workbench, but if not you can just reach up under there and remove it. You can keep screwing the threaded rod through after the rivet has popped out if you want to, but it's a bit of a waste of time. Now me, I was looking for an excuse to be out in the hangar for as long as possible, so a little wasted time was just fine by me. But even with that being the case, I thought it a silly thing to do, so I just backed out the rod and moved onto the next rivet. Again, if you aren't trying to kill time, go ahead and remove the pad from the other part of the caliper right away since you already have the tool configured for it.
Once both pads are removed, or if you are a linear thinker and prefer to dress in a one-sock-one-shoe process rather than a two-socks-then-two-shoes manner, you need to reconfigure the tool for putting the new rivets in the new pads.
 Just pull off the pointy bit and replace it with the conical thingy. The other part just drops down into the open hole at the bottom of the 'C'.
Line up the new pads on the caliper halves and drop new rivets down into the recessed holes in the pads. I put all three rivets in rather that doing them one at a time to ensure that I don't rivet a pad in crooked and find that I can't get the other rivets in. This is a bit tricky, though, because the pad has to be turned over to fit it into the tool. This can (and often does) result in anywhere between one and three rivets falling out. As you can surely imagine, this is not a desirable turn of events since rivets, much like the disparate parts of the brake tool, are absolute masters of camouflage. They look all bright and shiny and you'd think they'd be easy to find, but take my word for this: you do not want to drop them.

I usually start with pressing the center rivet. This lets me contort my fingers such that they are holding the other two rivets in place. What you're trying to do is get the bottom part of the tool to fit up into the recessed hole at the bottom of the pad while you screw down the conical thingy to press the rivet into place. I could write a thousand words about this, but I think these pictures might show it better:


Voilá! Snug them down tight, but not too tight. (Hey, I know that's ambiguous and arbitrary guidance, but I was reading Federal Regs just a few paragraphs ago - it's contagious!):

Now it's simply a matter of replacing the brake pieces back to where you found them.

And, of course, replacing the defective safety wire:

See? This was a lot easier than jacking the plane, rendering safety wire and cotter pins defective, removing the wheel, deflating the tire, splitting the wheel, removing, cleaning, and repacking the wheel bearings, and reassembling the whole mess. (In other words, the very things that the FAA has deigned to allow store-bought airplane owners to legally do by themselves.)
I know this to be true because I did all of that other stuff yesterday too. The brake work takes about half an hour per side. The removal and repacking of the bearings took at least an hour per side. I simply cannot understand why Part 43 allows one but not the other.


See what I mean?
Friday, September 19, 2008
Plane back together, Brave Sir Hogarth doing fine
Co-pilot Rick and I got the newly corrosion-free aileron back on the plane a couple of nights ago. Piece of cake, mostly, with the only wrinkle being the incompleteness of one of the diagrams that I drew to make sure I remembered where everything went. Rick brought along a tool that I had never heard of, and turned out to be worth more that its weight in gold: a washer wrench.

It's a very clever idea, the washer wrench. It holds washers in place while you install the bolt and nut. That sounds like a simple operation that shouldn't require a special tool, but some of the washers were slid into very tight confines and even with the washer wrench to hold them it can be quite difficult to keep them in place long enough to get the bolt properly aligned. I don't have much recurring need for a tool like this, but when you do need one, you really need one.
Regarding Brave Sir Hogarth, I recently discovered a lump the size of a golf ball under the skin near his left shoulder. Mako, one of the dogs the preceded Hogarth, died at a relatively young age from canine lymphoma, which exhibited itself with large tennis ball sized lumps in her belly. Once bitten, twice shy. Even though the all-knowing Google told me that Hogarth's lump was different and quite routine in dogs his age, I decided to take him to the Vet for a check-up.
We waited a good 45 minutes past our appointment time before the Vet got around to seeing us, a delay for which he was profusely apologetic. I told him not to worry since Hogarth is "a patient boy." 'A patient' - get it? Well, don't feel bad. Neither did the Vet. Not my best effort. Banter Amp(tm) only set to level three due to stress over Best Friend's condition. Not to worry, though. An aspiration of the lumps (there turned out to be two of them - one down by his groin. Gee, how'd I miss finding that one??) showed that it was just a pocket of fat. Still, "was it diet that caused that?" Nope, not at all. That's good news for Brave Sir, because he really, really likes his weekend treat of bacon grease poured over his kibble. Heck, I'd probably eat kibble too if it had bacon grease on it! Me and my boy, we love our bacon!

It's a very clever idea, the washer wrench. It holds washers in place while you install the bolt and nut. That sounds like a simple operation that shouldn't require a special tool, but some of the washers were slid into very tight confines and even with the washer wrench to hold them it can be quite difficult to keep them in place long enough to get the bolt properly aligned. I don't have much recurring need for a tool like this, but when you do need one, you really need one.
Regarding Brave Sir Hogarth, I recently discovered a lump the size of a golf ball under the skin near his left shoulder. Mako, one of the dogs the preceded Hogarth, died at a relatively young age from canine lymphoma, which exhibited itself with large tennis ball sized lumps in her belly. Once bitten, twice shy. Even though the all-knowing Google told me that Hogarth's lump was different and quite routine in dogs his age, I decided to take him to the Vet for a check-up.
We waited a good 45 minutes past our appointment time before the Vet got around to seeing us, a delay for which he was profusely apologetic. I told him not to worry since Hogarth is "a patient boy." 'A patient' - get it? Well, don't feel bad. Neither did the Vet. Not my best effort. Banter Amp(tm) only set to level three due to stress over Best Friend's condition. Not to worry, though. An aspiration of the lumps (there turned out to be two of them - one down by his groin. Gee, how'd I miss finding that one??) showed that it was just a pocket of fat. Still, "was it diet that caused that?" Nope, not at all. That's good news for Brave Sir, because he really, really likes his weekend treat of bacon grease poured over his kibble. Heck, I'd probably eat kibble too if it had bacon grease on it! Me and my boy, we love our bacon!
Sunday, September 14, 2008
A "Rainy Day" project, without the rain
The forecast for the weekend was dismal: rain, rain, and then... more rain. A pretty dismal outlook, but hard to gripe about when compared to others further south. With that in mind, perhaps it was incumbent on me to enjoy the far-better-than-forecast weather we actually got as much as possible.
Last night was Co-Pilot Egg's first band competition. She is a freshman clarinet player in the Central Crossing High School band. The band competed in the nearby "33rd Annual Hilliard Band Invitational" last night, and came home with a complete sweep. 1st place in every category of their class, and Grand Champion too!
Here's a moment ofMarching Dancing Band eZen(tm) for you to enjoy:
This morning arrived bright and sunny, a veritable slap in the face to meteorologists everywhere. With an encouraging Weather-out-the-Window(tm) forecast in hand, I then consulted a higher authority, DUATS.
Ah, well. That's it then. 24 gusting 36. I wouldn't ride a bicycle in that kind of wind.
Too nice to stay in, though, and the yard got mowed yesterday. A perfect day to pull a job from the deferred maintenance list, and as the airplane is likely to be of use to me sooner than the gas fireplace with the absent pilot light will be, I thought I'd take the opportunity to fix one of the problems my eagle-eyed AP/IA found during the condition inspection. To wit, this wee Bit O' Corrosion:

Co-pilot Rick was one his way down to the hangar to assist, but I thought I could at least get started. The first step was to remove the inspection panel under the right wing to expose the bellcrank to which the aileron control arm is attached. Easy as pie. Removing the nut, bolt, and washers that hold it onto the bellcrank should have been as well, but it ended up requiring some contortions. One of which seems to have irritated something in my neck, much to my chagrin. Sore neck for the next few days. Ugh. With the pushrod detached, the aileron dropped down far enough to allow the removal of the washers, bolts, nuts, and spacers (and lions and tigers and bears) that attach the aileron to the rest of the airplane:

I'm one of the king's men when it comes to putting everything back together again, so I took some notes to help me get all of the pieces-parts back where they came from:

The whole operation was much easier than I had expected. I have no illusions, however, that putting the thing back on isn't going to be a helluva lot harder.
By the time the Co-pilot arrived, the aileron was off and I was cleaning up the corrosion on the aileron and pushrod:


I used the MEK to clean the places that I had abraded with the Scotchbrite pad. I managed to splash a little MEK onto my face, right where I had a little shaving incident. The burn reminded me of those dandruff shampoo commercials:
Out-or-work-actor-getting-by-on-low-budget-TV-commercials #1: "It's tingling!"
Out-or-work-actor-getting-by-on-low-budget-TV-commercials #2: "That means it's working!"

Now this is how a pilot masks for painting:

Those old sectionals aren't entirely useless after all.
The cover coat of gray enamel has been applied and will sit and cure for a couple of days before I try to put the assembly back onto the airplane. Some of the areas where the corrosion was occurring were where the socket used to install some of the bolts had scraped off the paint, leaving the surface exposed and vulnerable to corrosion. I don't want to create the exact same problem by rushing the airplane back into service, particularly since it's so damn windy that I can't go anywhere anyway. Funny how that worked out.
Oh, and how windy was it? Well, 24G36 was just the start. We had sustained 60+ mph winds all afternoon. The power got knocked out mid-afternoon, and was still out Monday morning.
Bonus eZen:
Last night was Co-Pilot Egg's first band competition. She is a freshman clarinet player in the Central Crossing High School band. The band competed in the nearby "33rd Annual Hilliard Band Invitational" last night, and came home with a complete sweep. 1st place in every category of their class, and Grand Champion too!
Here's a moment of
This morning arrived bright and sunny, a veritable slap in the face to meteorologists everywhere. With an encouraging Weather-out-the-Window(tm) forecast in hand, I then consulted a higher authority, DUATS.
Ah, well. That's it then. 24 gusting 36. I wouldn't ride a bicycle in that kind of wind.
Too nice to stay in, though, and the yard got mowed yesterday. A perfect day to pull a job from the deferred maintenance list, and as the airplane is likely to be of use to me sooner than the gas fireplace with the absent pilot light will be, I thought I'd take the opportunity to fix one of the problems my eagle-eyed AP/IA found during the condition inspection. To wit, this wee Bit O' Corrosion:

Co-pilot Rick was one his way down to the hangar to assist, but I thought I could at least get started. The first step was to remove the inspection panel under the right wing to expose the bellcrank to which the aileron control arm is attached. Easy as pie. Removing the nut, bolt, and washers that hold it onto the bellcrank should have been as well, but it ended up requiring some contortions. One of which seems to have irritated something in my neck, much to my chagrin. Sore neck for the next few days. Ugh. With the pushrod detached, the aileron dropped down far enough to allow the removal of the washers, bolts, nuts, and spacers (and lions and tigers and bears) that attach the aileron to the rest of the airplane:

I'm one of the king's men when it comes to putting everything back together again, so I took some notes to help me get all of the pieces-parts back where they came from:

The whole operation was much easier than I had expected. I have no illusions, however, that putting the thing back on isn't going to be a helluva lot harder.
By the time the Co-pilot arrived, the aileron was off and I was cleaning up the corrosion on the aileron and pushrod:


I used the MEK to clean the places that I had abraded with the Scotchbrite pad. I managed to splash a little MEK onto my face, right where I had a little shaving incident. The burn reminded me of those dandruff shampoo commercials:
Out-or-work-actor-getting-by-on-low-budget-TV-commercials #1: "It's tingling!"
Out-or-work-actor-getting-by-on-low-budget-TV-commercials #2: "That means it's working!"

Now this is how a pilot masks for painting:

Those old sectionals aren't entirely useless after all.
The cover coat of gray enamel has been applied and will sit and cure for a couple of days before I try to put the assembly back onto the airplane. Some of the areas where the corrosion was occurring were where the socket used to install some of the bolts had scraped off the paint, leaving the surface exposed and vulnerable to corrosion. I don't want to create the exact same problem by rushing the airplane back into service, particularly since it's so damn windy that I can't go anywhere anyway. Funny how that worked out.
Oh, and how windy was it? Well, 24G36 was just the start. We had sustained 60+ mph winds all afternoon. The power got knocked out mid-afternoon, and was still out Monday morning.
Bonus eZen:
Subscribe to:
Posts (Atom)