The weather just hasn't been kind to me. No flying for nearly two weeks!
In the meantime, I learned how to record flights in Microsoft Flight Sim 2004 and use the recorded flight as a leader in formation flying. I also learned how to capture video from the flight sim and get it on YouTube:
That's a very short clip, but I can't go much longer than that without paying $38 for the VidCap software.
Here's a longer clip at higher resolution:
Even at the higher resolution, it doesn't do justice to the far clearer presentation I get from within the flight sim. It gives a pretty good idea of the responsiveness of the controls, and the utility of the TrackIR system, though.

Thursday, August 31, 2006
Tuesday, August 29, 2006
Business Cards
I love the internet. While I enjoy having people visit this site, I tire of the "do you have a pen so I can write down the web address" routine. So where does the internet come in? Well, I just ordered 100 custom business cards:

Ain't that just the coolest thing? It took 5 minutes and I could have had them in hand tomorrow morning had it been important enough to me to spring for the more expensive shipping. Total cost: $21.44 for 100 cards, including shipping by mule train. They're due to arrive no later than Sept. 8, I believe.
Update:
I was just looking at the prototype above and realized what a geek I am! Only a software devloper would include the "http://" on his web address!!
Wednesday, August 23, 2006
That's the way these things go...
I just checked tomorrow's forecast for the trip I have planned. It's been great weather all week, but as it goes with these things, my luck didn't hold. The forecast for Burke-Lakefront tomorrow is IFR, with 2 miles visibility and thunderstorms. Rats. I'll check again in the morning with hopes for a better forecast, but the chances are pretty slim.
Sunday, August 20, 2006
AnywhereMap Saga: Part 2
After finally convincing myself that the AnywhereMap is working fine, I decided to go ahead and try to mount it in the airplane in a manner that would get some of the wires and the Wx Works box out of the way. After looking around the airplane for a spot to put the Wx Works box where I'd be able to see the status LEDs on top of it, I decided to mount it to the passenger side kick panel.
That panel turned out to be a real bugger to remove, and in the end turned out to be an even bigger bugger to put back. It's a pretty good location, though. I was able to coil up the extra 3000' (or so it seemed) of antenna wire and tuck it back there, and I was also able to mount the 12V power adapter I picked up at Wal-Mart for $5. The cigarette lighter power plug that comes with the AM package retails for nearly $200, so I was loath to decapitate it and try to figure out a way to get power to all three of the power cords it provides, so the 12V port solved that problem for the price of a fast-food lunch. I removed the automotive grade wiring that came with it and replaced it with aviation grade Tefzil wire, however.
Here you can see the Wx Works box, and just above it you can see the power port. The power plug is hanging loose with just enough slack to let it reach the in panel power plug, which is what I will be using until I run the wires from the new power port to a circuit served by the Avionics Master switch.
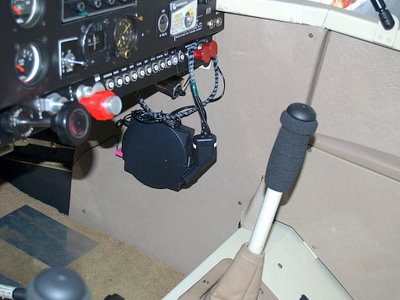
The three power cords that come from the power plug are a tangling nightmare that compares pretty well to the tangled mess of cheap necklaces from Co-pilot Egg's pre-teen jewelry box, so I got a length of spiral cable wrap from Aircraft Spruce and spent a somewhat tedious half hour using it to tie together the two cables that need to go up to the glareshield. That cable was then Adel clamped to the GPS power cord.

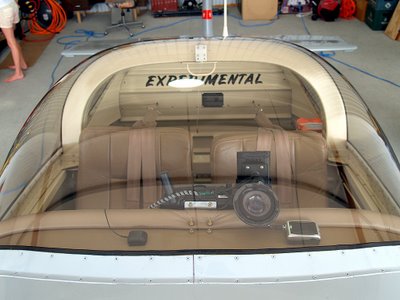
The GPS unit (right) and XM Wx antenna (left) are velcroed to the glareshield:
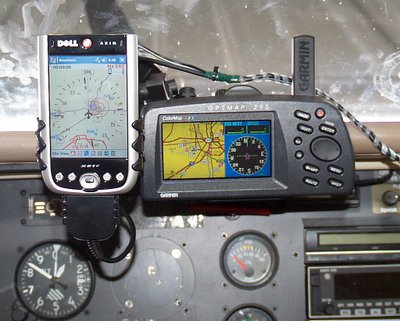
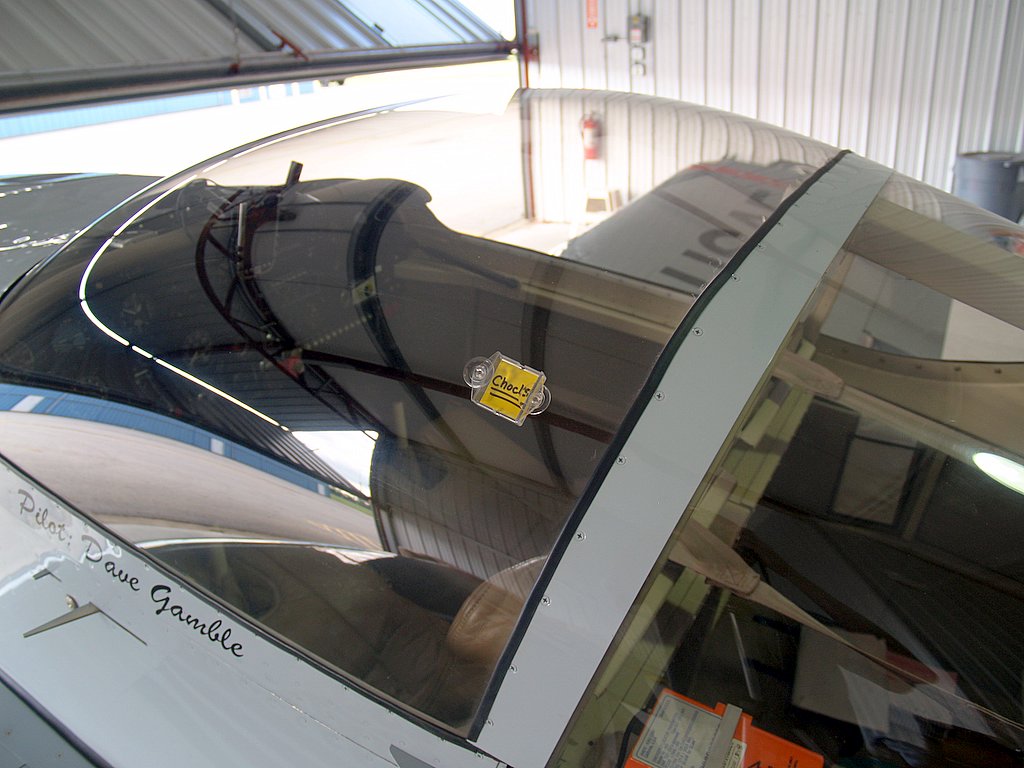
Here's how the installation looks from the Pilot's point-of-view:
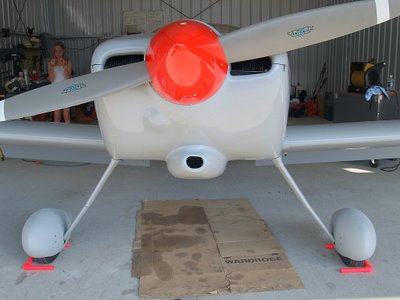
I had bought a little suction cup mount for the XM antenna, but with this installation I no longer need it. No sense letting it go to waste, though. While I was doing all of the wiring work, Co-pilot Egg was busy fabricating a new set of chocks out of 3/4" PVC pipe and some 90 degree couplers. The old chocks that we s[spent an afternoon carving out of a 4x4 fence post won't fit under the new wheel pants, so we had to build a new set. Given my recent "forgot to remove the chocks" incident, I thought a good use for the now unneeded antenna mount would be to make myself a little reminder for removing the chocks:
The new chocks look great! Egg chose the paint, and I think she made a good choice for high visibility:
That panel turned out to be a real bugger to remove, and in the end turned out to be an even bigger bugger to put back. It's a pretty good location, though. I was able to coil up the extra 3000' (or so it seemed) of antenna wire and tuck it back there, and I was also able to mount the 12V power adapter I picked up at Wal-Mart for $5. The cigarette lighter power plug that comes with the AM package retails for nearly $200, so I was loath to decapitate it and try to figure out a way to get power to all three of the power cords it provides, so the 12V port solved that problem for the price of a fast-food lunch. I removed the automotive grade wiring that came with it and replaced it with aviation grade Tefzil wire, however.
Here you can see the Wx Works box, and just above it you can see the power port. The power plug is hanging loose with just enough slack to let it reach the in panel power plug, which is what I will be using until I run the wires from the new power port to a circuit served by the Avionics Master switch.

The three power cords that come from the power plug are a tangling nightmare that compares pretty well to the tangled mess of cheap necklaces from Co-pilot Egg's pre-teen jewelry box, so I got a length of spiral cable wrap from Aircraft Spruce and spent a somewhat tedious half hour using it to tie together the two cables that need to go up to the glareshield. That cable was then Adel clamped to the GPS power cord.
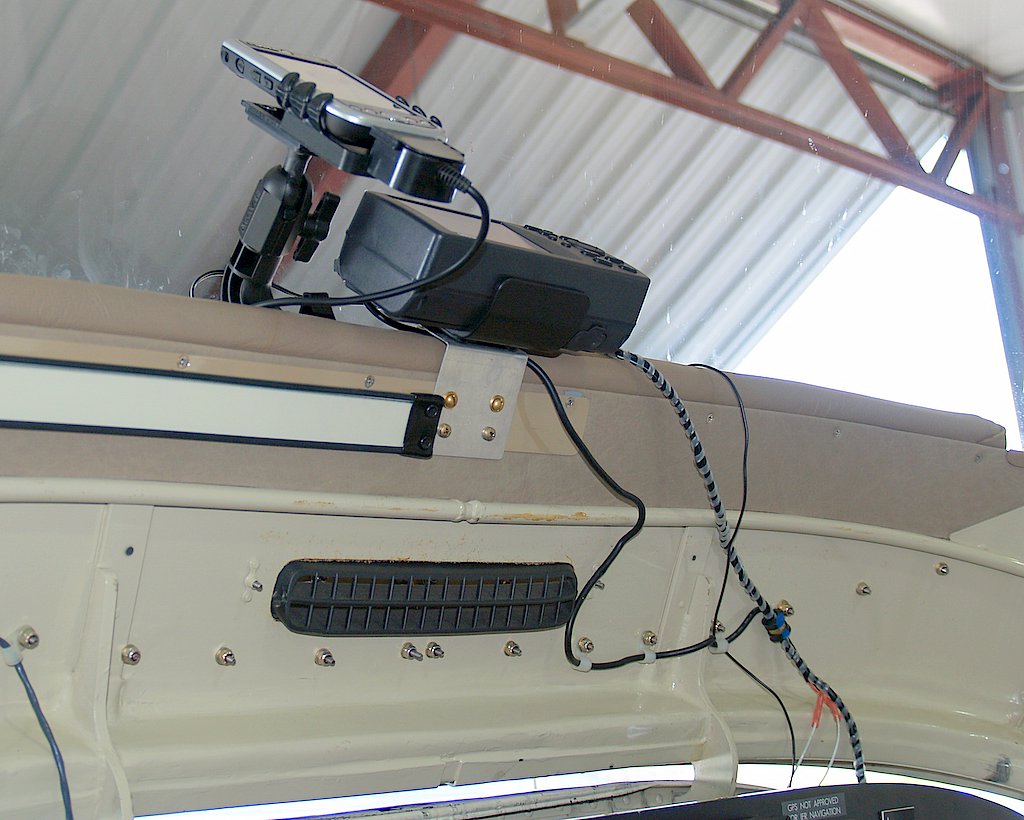
The GPS unit (right) and XM Wx antenna (left) are velcroed to the glareshield:

Here's how the installation looks from the Pilot's point-of-view:

I had bought a little suction cup mount for the XM antenna, but with this installation I no longer need it. No sense letting it go to waste, though. While I was doing all of the wiring work, Co-pilot Egg was busy fabricating a new set of chocks out of 3/4" PVC pipe and some 90 degree couplers. The old chocks that we s[spent an afternoon carving out of a 4x4 fence post won't fit under the new wheel pants, so we had to build a new set. Given my recent "forgot to remove the chocks" incident, I thought a good use for the now unneeded antenna mount would be to make myself a little reminder for removing the chocks:
The new chocks look great! Egg chose the paint, and I think she made a good choice for high visibility:

Friday, August 18, 2006
Mission Planning: Burke-Lakefront
I'm planning a flight that is intended to meet the followig criteria:
- no more than one day in length
- less than 2 hours flying each way
- near big water and photogenic scenery
- something nice for lunch
- something I haven't done before
That last item rules out the Bass islands, even if the second to last didn't rule out all of them but Put-in-Bay. The third item means either north, north west, or southeast. The second requirement rules out southeast, though.
That left two areas: the Benton Harbor/Muskegie area of Michigan, or Ohio's Lake Erie coast. Theorectically, Niagara Falls would fail the 2 hour leg limit by a mere 3 minutes, but to achieve that time would require extensive flight over the lake. Routing so as to remain over land for the majority of the trip only adds a few miles, though, so I could see it as an option.
That said, one thing I immediately noticed when I looked at the direct route from VES to Niagara Falls (KIAG) was that it flew directly over Burke-Lakefront in Cleveland. That reminded me of something I learned in July when I was up there for HarborFest: there are three new things I want to do there, and one that I've done before that I would like to do again. With that in mind, I decided that there was no reason to go the extra distance to Niagara when a trip to Burke-Lakefront meets all five criteria.
Here's the plan:
- Arrive at Burke-Lakefront near 10am.
- tour the USS COD from 10am - 11am. This is my re-do.
- Take the noon tour on the Goodtime III.
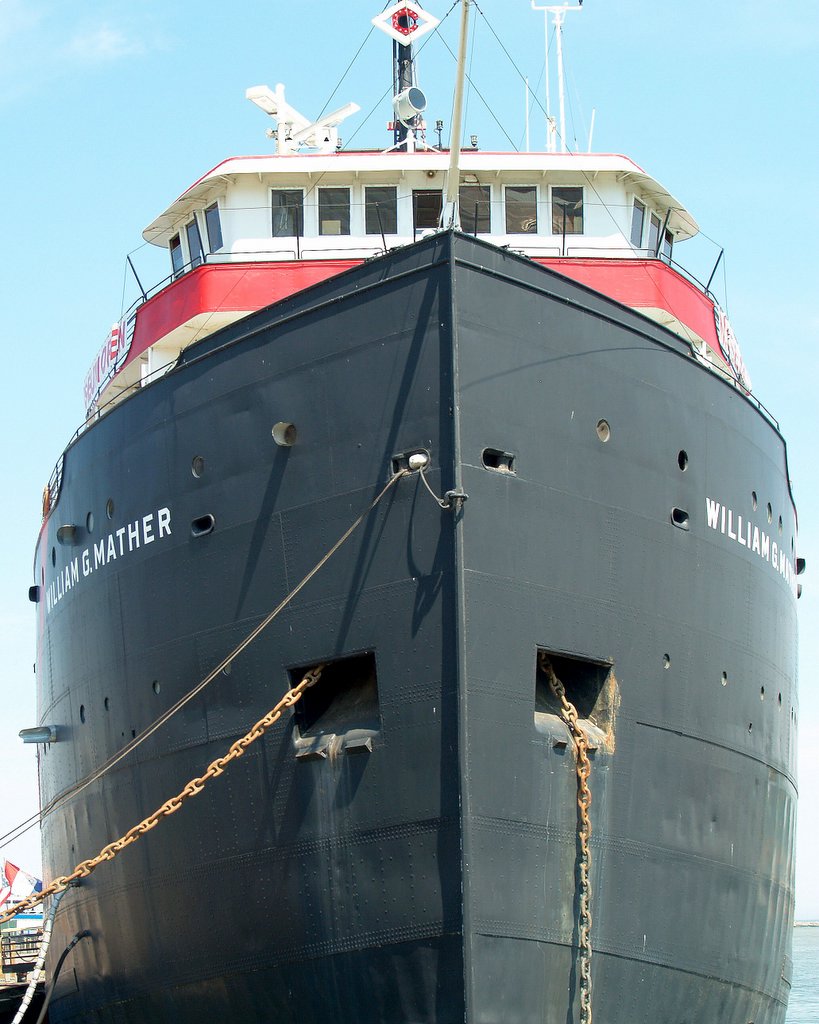
- Upon return, take a tour of the William Mather Museum.

- late lunch at Hornblower's Barge & Grill
- Depart
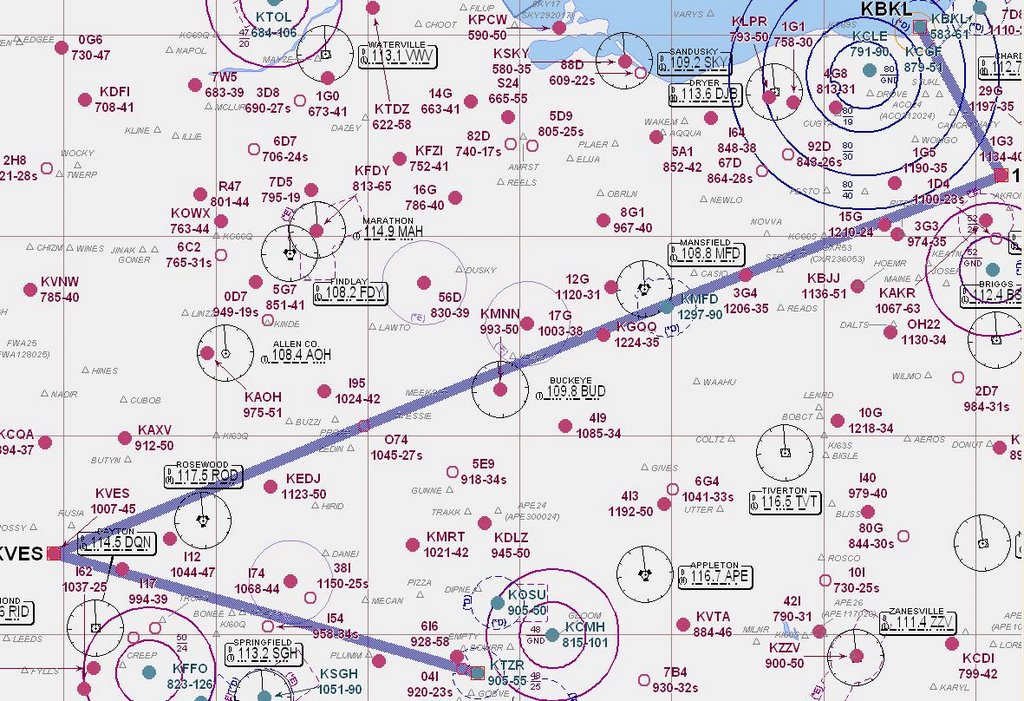
The currently planned routing:
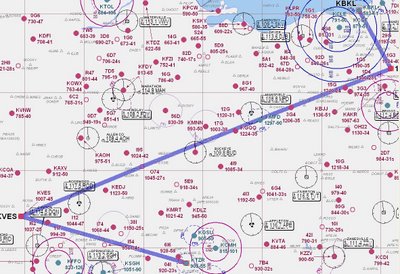
Note that I will be remaining under the Class B, so I'm taking the easterly path around Hopkins. I don't want to get stuck out over the lake again.
The problem I have with going up to Michigan is that I have no idea what that region is like, or where the nice coastal touristy towns are. I need to research that because I do want to go up that way eventually, but for now the Burke trip looks pretty appealing.
- no more than one day in length
- less than 2 hours flying each way
- near big water and photogenic scenery
- something nice for lunch
- something I haven't done before
That last item rules out the Bass islands, even if the second to last didn't rule out all of them but Put-in-Bay. The third item means either north, north west, or southeast. The second requirement rules out southeast, though.
That left two areas: the Benton Harbor/Muskegie area of Michigan, or Ohio's Lake Erie coast. Theorectically, Niagara Falls would fail the 2 hour leg limit by a mere 3 minutes, but to achieve that time would require extensive flight over the lake. Routing so as to remain over land for the majority of the trip only adds a few miles, though, so I could see it as an option.
That said, one thing I immediately noticed when I looked at the direct route from VES to Niagara Falls (KIAG) was that it flew directly over Burke-Lakefront in Cleveland. That reminded me of something I learned in July when I was up there for HarborFest: there are three new things I want to do there, and one that I've done before that I would like to do again. With that in mind, I decided that there was no reason to go the extra distance to Niagara when a trip to Burke-Lakefront meets all five criteria.
Here's the plan:
- Arrive at Burke-Lakefront near 10am.
- tour the USS COD from 10am - 11am. This is my re-do.
- Take the noon tour on the Goodtime III.
- Upon return, take a tour of the William Mather Museum.
- late lunch at Hornblower's Barge & Grill
- Depart
The currently planned routing:
Note that I will be remaining under the Class B, so I'm taking the easterly path around Hopkins. I don't want to get stuck out over the lake again.
The problem I have with going up to Michigan is that I have no idea what that region is like, or where the nice coastal touristy towns are. I need to research that because I do want to go up that way eventually, but for now the Burke trip looks pretty appealing.
Outsmarted again
I wish I was half as smart as the guy that keeps outsmarting me, who ironically turns out to be... me.
The latest incident of applying either way too much thought, or not quite enough, to a task came up last night with my oil change. For years I've been trying to come up with a process for changing the oil (more specifically, the oil filter) that doesn't involve spilling black, nasty smelling oil down the back of the engine and/or the firewall. Once that happens, no matter how much of it I wipe off with towels and rags, I'm guaranteed to be cleaning that nasty gunk off of the airplane belly for the next 10 - 15 flying hours.
Here's the process I attempted this time around:
- raise the tail of the airplane so the majority of the oil trapped in the filter will drain out along with the sump oil through the quick drain valve.
- lower the tail so the remainder of the oil in the filter will move towards the back closed end of the filter, then carefully remove the filter using a cut-in-half plastic milk jug to catch whatever leaks out.
Lifting the tail was no big deal, other than the aching back (for those of you that haven't met me, I'm somewhat slight of stature and the single-handed lifting of the tail plays havoc on my lower back). I left the oil to drain overnight a couple of days ago, and went back last night to finish the job. After setting the tail down, I started to remove the filter. When I got it to the point where it could start to leak, I grabbed the catch can fabricated from an old plastic milk jug. The jug was too large to fit back behind the engine because of all of the wires, cables, and other obstructions, but no worries: it was thin and flimsy enough that I could scrunch it up and get it back where I needed it to be. I removed the filter and let the ensuing oily mess drain into the milk jug.
Ok, does anyone see this coming? If you think far enough ahead, you'll realize that a milk jug that needed to be scrunched up to fit into the spot behind the engine is more than likely going to require an equal amount of scrunching to get back out. Now what do you suppose happens to all of that oil when the container gets scrunched up? Well, you're right. It comes out of the container and spills all over the back of the engine, the cables, accessories, wires, and firewall.
Of course, there was no way of keeping the old filter in the container during all of that, so I quickly removed it and set it aside on the hangar floor. Upon finally removing the container sans oil, I carried it over to the trash can, where I found the old filter had tipped over and expunged itself of all of the oil that didn't drain out before. Sigh. Pressing on despite my now pretty foul mood, I added the required 7 quarts of new oil, carelessly tossing the emptied plastic oil vessels into the cardboard box they came in.
That box was equally carelessly placed in the back of the Subie for later disposal. In retrospect, it should have been obvious that oil bottles enjoying an ambient temperature of 90+ degrees were likely to drip a substantial quantity of residual oil into the cardboard box, which was unlikely to be able to contain fluid of such minimal viscosity. Bad things come in threes - the mess of oil in the back of the Subie was the third big clean-up job of the night.
In the immortal words of Curly Stooge, "I'm tryin' to think but nuthin's happening!"
Tuesday, August 15, 2006
The AnywhereMap saga - Part 1
A quick quiz: what’s the biggest flying challenge when moving from a 100 knot trainer to a 160 knot speed machine like an RV-6? To me, the answer is simple: weather. At 160 knots, weather just happens faster. You’re making longer trips, spending more time at the destination, and in general dealing with a lot more weather systems on any given trip. I’ve always been a weather sissy, and more often than not stayed home or restricted my flying to the local area if there was any forecast at all of adverse weather later in the day. The weather may look great in the morning, but an afternoon forecast showing possible rain or other aviation unfriendly weather phenomena was enough to either keep me on the ground, or change my destination.
That plan works fine if you’re planning the outbound leg of a trip, but eventually you’re bound to find yourself hundreds of miles from home looking for a way to get back. One of those days happened to me last year at Oshkosh. I had checked out of the dorm room, and even if I could have arranged for another night there, I really didn’t want to. The Oshkosh weather was fine, but a look at the enroute forecasts indicated that there might be some messy stuff as I got near Indiana. Sure enough, a few short hours later I was on the ground at a desolate country airport calling home on the cell phone to get a weather-out-the-window observation. I had run into a huge wall of cloud that I couldn’t fly under, and was reluctant to fly over without knowing how far it would be before I could see the ground again. Arriving over Columbus with nearly dry tanks and nothing to see below me for hundreds of square miles but solid undercast was obviously not desirable, so I made a quick 180 and landed at the nearest runway the GPS could find.
All of that turned out well, but it would have been a lot less stressful if I could have checked the weather while still in flight. I certainly could have used the comm radio and received a weather briefing from a Flight Service Station, but there are times when a verbal description of weather conditions that references a bunch of ground-based locations I’ve never heard of proves the adage that a picture is worth 1000 words. Until relatively recently, though, the verbal description was all that was available to little planes like mine. Jets and high-end piston twins have the ability to carry the weight of weather radar, and the owner/operators of that type of plane usually have the financial wherewithal to afford such expensive gadgetry. That said, even airborne weather radar has limitations. Most weather radars do a pretty good job of showing what’s out there in front of the plane, but can’t tell much beyond that. They simply can’t provide the “big picture” that allows for a complete view of the weather situation.
All of that started changing with the advent of XM satellite-based radio. Some clever marketroid or engineer realized that more than audio data can be transmitted by the satellites, and came across the brilliant idea of sending weather information through one of the channels. As is usual with new technologies like this, the early adopters paid a princely sum for the privilege of receiving national NEXRAD radar data and other extremely useful tidbits of information. The big price breakthrough for small airplane pilots came with the Garmin GPS 396, a moving-map GPS that displayed weather data received from the XM satellites. At a list price of $2,495, though, it was still out of reach for quite a few people, myself included. Fortunately, the enormous demand for the Garmin 396 did not go unnoticed by Garmin’s competitors, and lower cost solutions followed accordingly.
One of my goals at Oshkosh this year was to evaluate and possibly purchase a lower-cost alternative to the Garmin 396. Cost was not the only driver of this goal, however. My RV-6 is relatively space constrained when it comes to adding gadgets to the panel, and I didn’t want to remove anything that I already had to make room for the new display. I have a Garmin 295 GPS mounted to the canopy glare shield and it could have been removed and replaced with a 396, but after visualizing the way I intended to use the weather reporting box I decided against that. I typically use the 295 for close in navigation, usually at a range of 10 – 15 miles. At that close range, I’d be right in the weather before I saw it coming. Shifting back and forth between ranges is a distraction, so my idea was to have two displays: the 295 handling the close in navigation duties, and the weather display set to a 50 – 75 mile range to allow for a bigger picture view of the weather surrounding me. Mounting a 396 anywhere else in the cockpit without having it obstruct my view of other instruments or being too far out of reach to use conveniently just wasn’t possible.
Enter the AnywhereMap. To be 100% accurate, AnywhereMap is a piece of software that runs on a variety of platforms. With Garmin, there is certainly software involved, but it is indistinguishable and inseparable from the hardware platform. It’s all included in one box. With AnywhereMap, you have a choice of hardware ranging from a small Personal Digital Assistant (PDA) to a tablet computer the size of a sheet of 8.5 x 11” paper. Given the space limitations of the RV-6 and my aversion to high dollar cost, my choice was obvious – I elected to buy a PDA-based system. The PDA hardware, of course, does not have built-in GPS or XM Wx capability like the Garmin does, so those are separate components. That’s a huge benefit to the space-constrained buyer in that it allows the system components to be spread out as needed. With the AnywhereMap package, there are three major components: the PDA, the GPS receiver, and the XM Wx receiver.
The PDA is the display unit, and is small enough that I could find room for it in the already crowded airplane. In square inches, it’s not much larger than a dollar bill. The GPS receiver is also quite small, being about the size of a fortune cookie. The Wx box is itself comprised to two components: a very small antenna and a circular box with a diameter similar to a compact disk, and a height of about an inch. The Wx box can be mounted anywhere and is attached to its antenna with a very thin wire.
All three components require power, but only two of them have internal batteries. The Wx box does not come with its own battery, but one is available as an option. If all three components were running from their own batteries, the only wire in the entire system would be the one that goes from the Wx box to its antenna. This arrangement would be perfect for pilots that have to share an airplane; they could set the entire system up in any airplane in just a few minutes. I plan on wiring my system to aircraft power, though, so I didn’t purchase the optional battery pack for the Wx box. The system comes with a 12V power adapter that fits into a cigarette lighter plug and provides power for all three components. It can accept DC voltage from 12 V to 28 V, so there’s no requirement to choose one or the other flavor of electricity, which is again a boon to those that can’t easily predict which voltage they will be using.
The components communicate with each other using the Bluetooth wireless technology which helps to reduce the number of wires running back and forth in the cockpit. This was my first exposure to Bluetooth, and I’m here to tell ya, it’s very, very cool. Without the need to run wires between all of the components, it’s much easier to find places to put them all. In my case, though, I don’t fully benefit from that since I want to wire the power cords into the airplane. Still, two or three less cables is a good thing and it will reduce the effort involved in routing the wires.
Naturally, I couldn’t wait to power up the system and see how it works. As luck would have it, I was faced with a 9 hour car ride home from Oshkosh, so I had plenty of time to fiddle with it. I’d like to say it worked right out of the box, but it didn’t. I powered everything up as per the included directions but succeeded only in receiving weather data. The GPS wouldn’t establish communications with the PDA.
Once I got home and was able to access AnywhereMap’s web site, the cause of the issue became obvious. Because of the ability of the software to run on any compliant PDA and the normal capability growth of newer PDAs over time, a switch had been made to the PDA included with the system from a Hewlitt-Packard PDA to a Dell PDA. The requirements for configuring the Bluetooth devices and PDA had subtly changed as a result, and it was a simple matter to make the required changes. New printed documentation will almost assuredly soon be included in the new Dell based packages to alleviate the start-up issues I had.
This first interaction with the support web site was very positive, and further exploration of the documentation available on the site further increased my positive feelings towards AnywhereMap’s customer support and documentation. There is a collection of multimedia “how-to” topics available free to anyone that’s interested, and I found them very useful in getting to learn the somewhat complex software. Note that I mean “complex” in a good way – since I was primarily interested in the weather aspects I didn’t pay much attention to the rest of the package. I was quickly impressed by the depth of the flight planning and management aspects of the package and started to wonder if I might end up using this system for far more than simple weather reporting. That’s for later, though, since I still hadn’t used the system in the airplane.
Before going to the trouble of permanently mounting the system in the airplane, I decided to try it out with the temporary installation that would be used by someone that shared an airplane. It’s a very simple thing to do: stick the hefty suction-cup mount to something nice and flat, put the power plug in the socket, turn on the GPS unit, and start the PDA. Well, I should say it should have been a very simple thing to do, but as is usual (for me, anyway) with these kinds of things, my efforts to save later frustration led to early frustration. I found that I just couldn’t get the Wx box to communicate with the PDA when everything was installed in the airplane. I took it all out, installed it in the car, and everything worked fine. I put it all back in the plane, and it still couldn’t connect with the Wx box. “Uh-oh,” I thought, “I’ve gotten myself into a $1,500 lemon.”
I immediately checked on the return policy and found that as per the AnywhereMap web site, I had 30 days to return the unit but I’d have to pay a 10% restocking fee. With that in mind, I contacted AnywhereMap customer service via their web-based chat feature, fully intending to threaten the representative with reams of negative publicity if they couldn’t get the system working but still insisted on hammering me with what amounted to a $150 fine. Fortunately that proved unnecessary. The service rep was able to explain what the problem was after asking a series of simple questions. It turns out that the Wx box is very susceptible to power spikes, and by connecting it to the cigarette lighter power port, which gets power as soon as the master switch is turned on, I was slamming the Wx box with the power spikes incumbent with starting the engine. By the time I got around to starting the PDA, the Wx box’s brains were scrambled to such a degree that it couldn’t communicate with the PDA. With that in mind, I tried starting the engine and then plugging in the weather box. Within minutes I was looking at a great big green and yellow weather blob just 25 miles south of the airport. Wow, is that ever cool! Lesson learned - when I wire the unit into the airplane bus, I will select a circuit that is switched by the avionics master switch so the Wx box doesn’t see power until after the engine is running.
It's also important to note that AnywhereMap also provides an internet forum for support issues. Prior to contacting the "offical" customer service, I posted a description of the problems I was having to the forum, and had three replies within an hour. The replies I received tracked very closely with the information provided by the customer service rep, so I actually had two very good support options. I can't help but contrast this with my experience with Garmin tech support, which was essentially "send us the unit and $250 dollars." The problem I had with the Garmin unit was resolved by a Google search that revealed the apparently top-secret reboot code for the unit, and I was left wondering how people would react if they had to pay Microsoft $250 to receive the "CTRL-ALT-DEL" code. I know how I reacted - I was pissed off! To be honest, this was the other reason that my search for in-airplane weather reporting units drove me to look for a non-Garmin option.
I have not yet used the system in flight, so that will be the topic of a later posting. For now, excitement is running high, and I can already see how having the capability of seeing the weather picture in flight is going to make a substantial change in the way I fly.
Sunday, August 13, 2006
The Shop
Another great day to fly today, so I made the half hour hop over to Darke Co. - Versailles (KVES) to visit my family. I made an easy 160 knots at 2450 rpm and the air was glass smooth at 3500'. Visibility was good, but we're getting to the point in a nice lingering high pressure area when it starts getting hazy. I give it a 50-50 chance that we get reduced visibility over the next few days, and I am convinced that my forecast is at least as reliable as what you can get on TV given that their forecasts are only right about half the time, as conventional wisdom has it anyway.
The first task of the fly-in visits is to take my gal pal Faygo for a walk. You may remember her from a previous posting:

The weeds are in full bloom, and I could feel the pollen making an assault on the back of my throat, but you have to admit that they grow some pretty fine looking weeds out in the country:


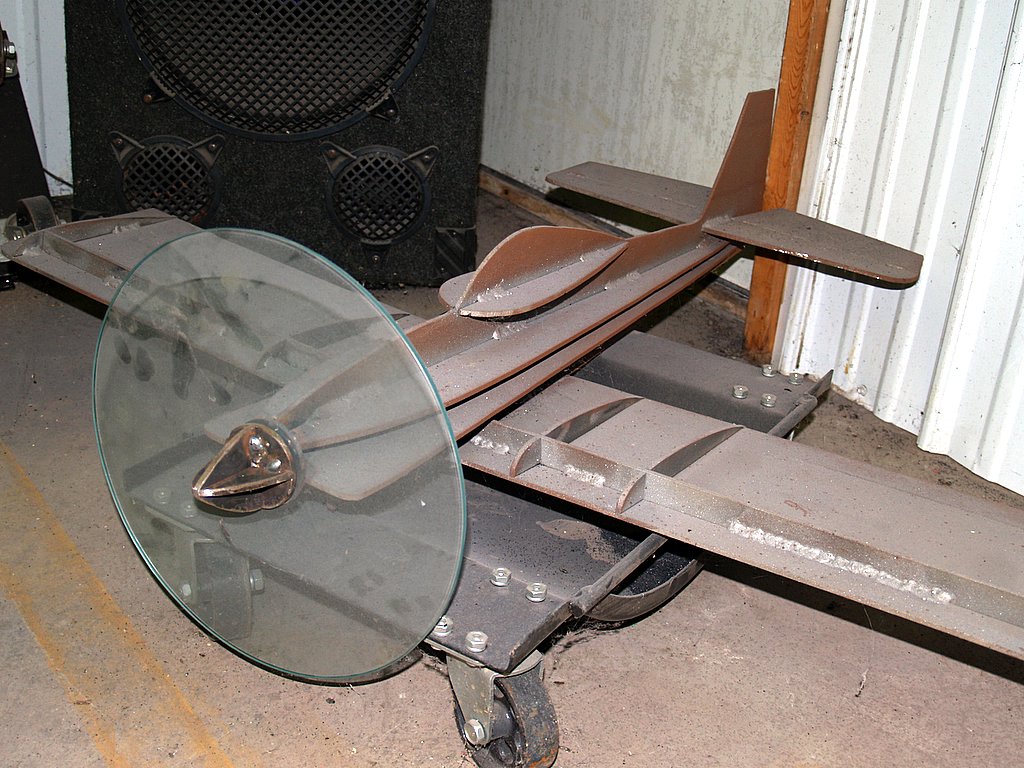
After lunch, I went to visit my brother's shop. It's always interesting to see what he's working on, but I'm particularly interested in the status of the lawn statue he's been making for me. He's always been both mechanically and artistically talented, but this thing just blows me away:
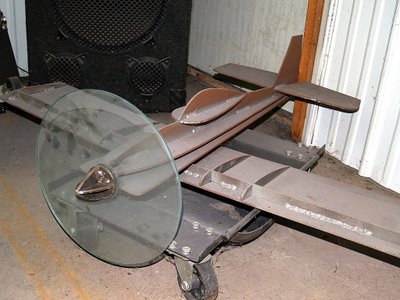
It's made out of 3/16" or 1/4" steel plate, and it weighs at least 35 or 40 pounds. I'd guess the wing span to be about a yard. The propeller is cut out of tempered glass. He had a stand, also steel, done for it that stood around eight feet high and positioned the airplane as if it were in the second quarter of a loop, but he's decided to change that and replace it with something different. Once that's done, the statue will be installed in my front yard for all to see. I can't wait!
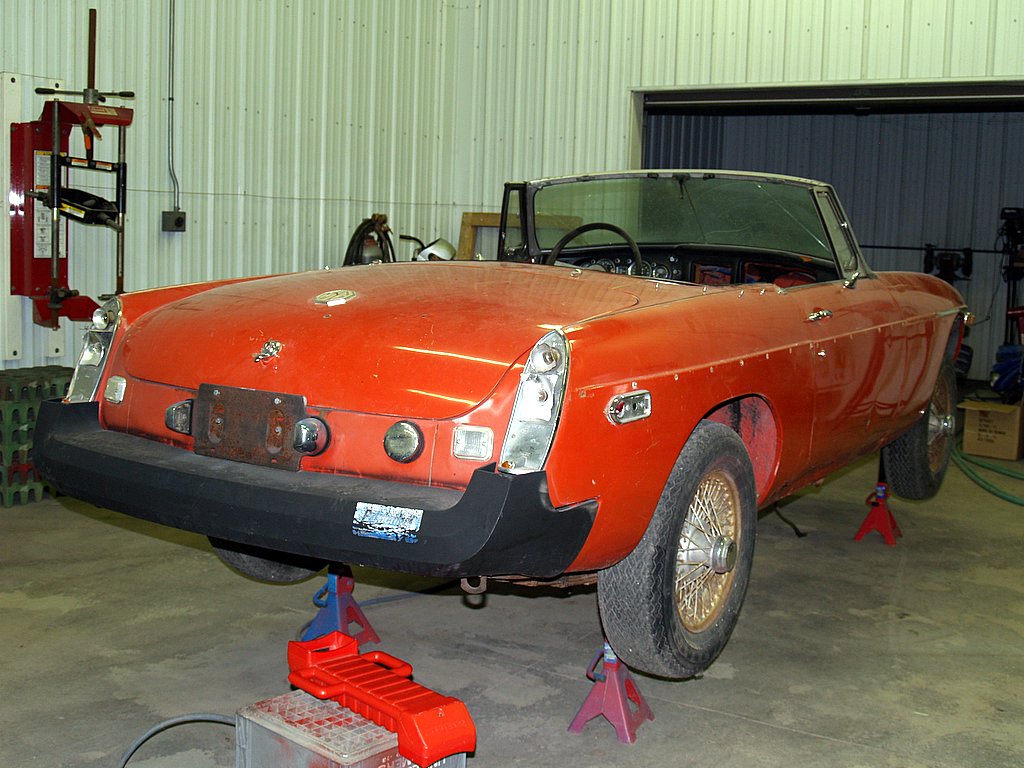
A couple of other neat things were going on, including another addition to the MG collection, which now is up to three cars:

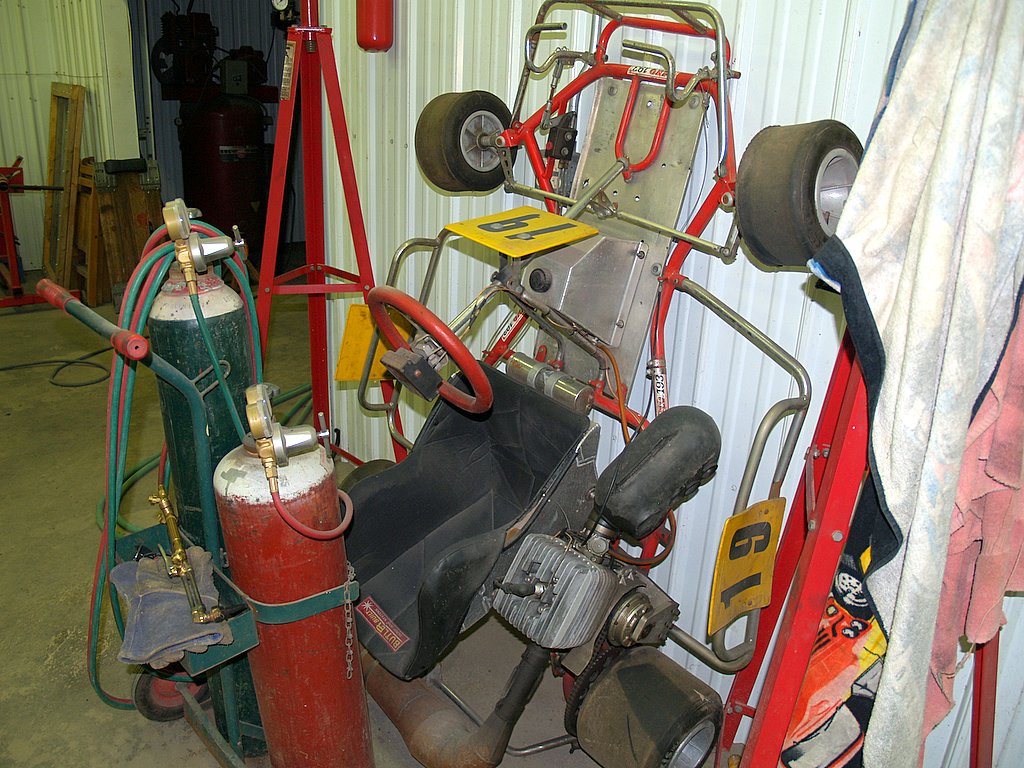
Propped against a wall was my old racing kart:

I ought to dust that thing off and see if I can get a few bucks for it on eBay. The engine might still be worth something, but I doubt if a chassis that old would be competitive. I could drive it around in my neighborhood, but it's a fair bet someone would complain about the noise or the fact that I was ripping around at 70mph. I know I would!
This was old Harley was another new arrival:
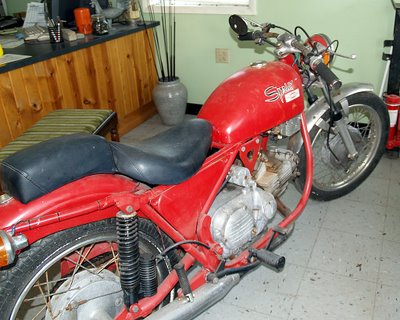
It's apparently a 350cc Italian-built model from back in Harley's difficult years in the mid-70s.
The flight back was a bit bumpier, as was the landing for a MadCo fuel stop. I'm having a real problem with the narrower runways at the county airports, but I'm making terrific wheel landings back at Bolton. I think I'm flaring high over the narrower runways, but if it were the width of the runway causing problems with my height perception (which can happen according to the pilot training books) I would expect to be flaring too late, not too early. The narrower runway would make me think I was higher than I actually was, not lower. Well, for whatever reason a large portion of my landings at anyplace but Bolton have been pretty far below standards. Not that little things like that detract for another great day in the RV, though, because they most certainly don't. It's just a personal score card kind of thing and I've been in a bit of a slump lately.
The first task of the fly-in visits is to take my gal pal Faygo for a walk. You may remember her from a previous posting:

The weeds are in full bloom, and I could feel the pollen making an assault on the back of my throat, but you have to admit that they grow some pretty fine looking weeds out in the country:


After lunch, I went to visit my brother's shop. It's always interesting to see what he's working on, but I'm particularly interested in the status of the lawn statue he's been making for me. He's always been both mechanically and artistically talented, but this thing just blows me away:
It's made out of 3/16" or 1/4" steel plate, and it weighs at least 35 or 40 pounds. I'd guess the wing span to be about a yard. The propeller is cut out of tempered glass. He had a stand, also steel, done for it that stood around eight feet high and positioned the airplane as if it were in the second quarter of a loop, but he's decided to change that and replace it with something different. Once that's done, the statue will be installed in my front yard for all to see. I can't wait!
A couple of other neat things were going on, including another addition to the MG collection, which now is up to three cars:
Propped against a wall was my old racing kart:
I ought to dust that thing off and see if I can get a few bucks for it on eBay. The engine might still be worth something, but I doubt if a chassis that old would be competitive. I could drive it around in my neighborhood, but it's a fair bet someone would complain about the noise or the fact that I was ripping around at 70mph. I know I would!
This was old Harley was another new arrival:

It's apparently a 350cc Italian-built model from back in Harley's difficult years in the mid-70s.
The flight back was a bit bumpier, as was the landing for a MadCo fuel stop. I'm having a real problem with the narrower runways at the county airports, but I'm making terrific wheel landings back at Bolton. I think I'm flaring high over the narrower runways, but if it were the width of the runway causing problems with my height perception (which can happen according to the pilot training books) I would expect to be flaring too late, not too early. The narrower runway would make me think I was higher than I actually was, not lower. Well, for whatever reason a large portion of my landings at anyplace but Bolton have been pretty far below standards. Not that little things like that detract for another great day in the RV, though, because they most certainly don't. It's just a personal score card kind of thing and I've been in a bit of a slump lately.
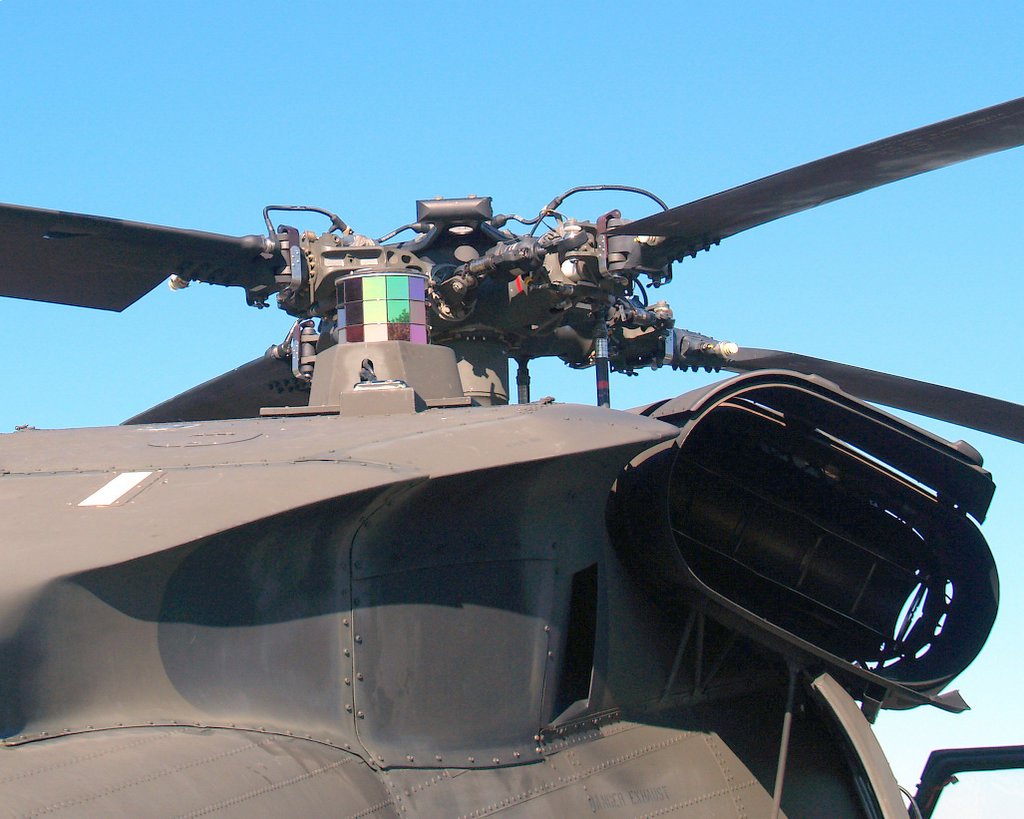
A few more Blackhawk pix from Heritage Days @ DLZ
I mentioned in the postr below that I took a few detail shots of the Blackhawk.
The most interesting part of this panel picture, or at least the most surprising, is that it takes a key to start one of these things:

I wouldn't want to be the guy that got scrambled for a mission and had to run back to Ops to get the key because he forgot to bring it!

The disco mirror ball is intended to confuse missiles aimed at the chopper. The white rectangle there on the left, flush to the skin, is a night light for formation flight:

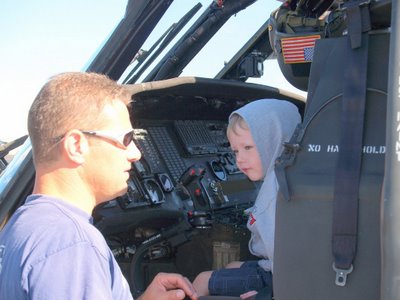
I tried brainwashing Co-pilot Egg too (I worked pretty darn hard to make sure her first words were "me want airplane") when she was this young - it didn't take. Maybe this guy will have better luck:
The most interesting part of this panel picture, or at least the most surprising, is that it takes a key to start one of these things:

I wouldn't want to be the guy that got scrambled for a mission and had to run back to Ops to get the key because he forgot to bring it!

The disco mirror ball is intended to confuse missiles aimed at the chopper. The white rectangle there on the left, flush to the skin, is a night light for formation flight:
I tried brainwashing Co-pilot Egg too (I worked pretty darn hard to make sure her first words were "me want airplane") when she was this young - it didn't take. Maybe this guy will have better luck:

Saturday, August 12, 2006
Heritage Days 2006
The only thing better than a near-by fly-in is a distant fly-in when you have weather like we did today: high 70's and CFB. That's "clear as a, um, uh, fantastic bell" for those of you that aren't in the know. But, with gas prices, etc. etc., I decided to stay in the area and make a quick up to Delaware Co. (KDLZ) for the Heritage Days fly-in. Of course, there would be lots and lots of observers there, both well-informed and novice, mentally grading the quality of both landings and airplanes. One always would like to make the best impression possible at these events, so I decided to head over to the airplane barn last night and re-install the new wheel pants. They're on their second coat of Rust-O-Leum rattle can primer and still show a few flaws that need to be filled and sanded, but they actually still look pretty good on the plane.
The fly-in was on the larger side of small fly-ins as far as landing and departing traffic, but I was lucky enough to arrive in one of the lulls. I also was lucky in getting there before the number of witnesses (wasn't I calling them "observers just a few sentences ago? I guess it's situationally dependent) grew to where my landing would have been excrutiatingly embarrassing rather than just mildly humiliating. A three-bouncer (and they were pretty healthy bounces, not the little chattery chipmunk bounces) in front of all the folks that showed up later would have devastated my self-esteem. On the bright side, the pants didn't even notice! No scuffs or any kind of other damage at all.
It's always a question where to park at these things, but I was met at the taxiway by a volunteer that pointed to a spot for me to park. Once the ramp started getting really busy later in the morning, a more high-tech approach was used:
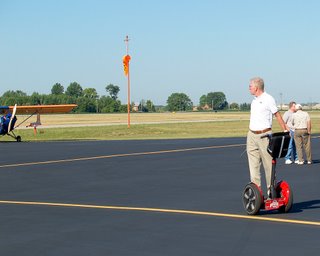
It's somewhat intriguing to compare the levels of technology required to build the plane with those used in the Segway. I also wonder how the Segway will fare through the next 60 years; will it survive the test the way the airplane did?
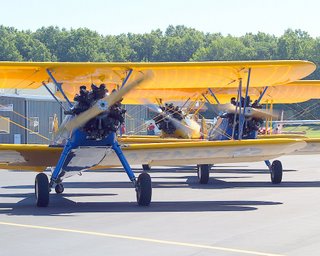
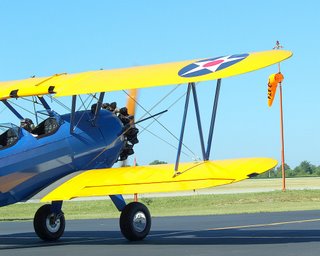
While there was a pretty good RV turn out, there were also a lot of other interesting things to see. There was a WWII B-25 medium bomber, but surprisingly it wasn't one I saw sitting over at Urbana Grimes. I don't know how many B-25s are still flying, but having two within just a few miles of each other at someplace other than Oshkosh or a CAF air show is quite a coincidence. There was a nice collection of three Stearmans, too. Stearmans interest me quite a bit. They are engineered like a tank, built by the same company that build the B-17 Flying Fortress, and are still available to such a degree that the asking price is no more than that of a nice RV. They look like they would be a blast to fly (in the warmer months, anyway), but all of that has to be balanced against the cost of maintaining and operating a classic airplane. They go through gas and oil at a prodigious rate, but turn it into far more noise than airspeed.
This is a new entry in my "Fly Ohio" collection:
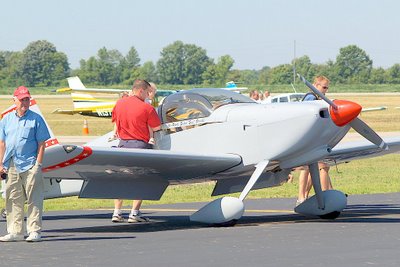
There was a Blackhawk helicopter in attendance, and the crew were very generous in allowing kids (including the heavily cliched "kids of all ages") to climb into the pilots seat. Feeling it undignified (actually, I just didn't want to stand in line) I passed on climbing aboard, but I did make a walk-about taking close up photos.

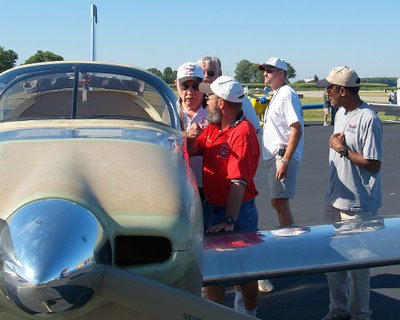
One of the highlights of these fly-ins for me is the chance to spend some time talking with the folks that gather around my plane. I clearly remember many, many situations where I was on "their side of the fence." I remember thinking how incredibly lucky the owner of whatever my current object of desire was, and today I spent a few moments reflecting on how exactly true that was. I'm incredibly lucky to live in a time where we can fly when and where we choose, using whatever means of conveyance we want. Just consider for a moment how rare that is. Less than 100 years ago, someone like me would travel for quite a distance just to see an airplane. More materially, I'm also just tickled pink to glance across the ramp and see a crowd of admirers around my plane:
This is one of the things I think must be even better for someone that built their plane. I can fly like them, I can (almost) maintain like them, but I don't think I can ever feel the deep sense of pride a builder must feel when he sees a group admiring, and I'm sure to an appreciable degree envying, his creation. As it is, I don't seem to tire of answering questions about the plane. There was a guy today that was actually more interested in talking to me since I didn't build the plane. He felt intuitively that buying an already-built plane, like I did, might be a good way to get a very capable airplane for much less money than a store-bought would cost. I was very happy to share the details of owning and maintaining an RV built by someone else - he may well end up being my second conversion from store-bought to homebuilt buyer. A lot of folks were curious as to what "Experimental" meant, so I got a lot of chances to use my "Well, with these Vans airplanes having over 4,000 flying, the 'Experiment' was successfully concluded a decade ago" line.
Of course, as a builder you do have to endure the "final inspection" the first time the RV gang comes to visit your home base. Here's Tom's new RV-7A getting the once-, twice-, thrice-over inspection:
Rick has gone through another RV-4 (he's gone through more RV's in the last few months than I've had haircuts, and each new one is an excuse for me to try out very loose formation. Unfortunately, I made a bad lens decision and kept the long lens on rather than trade back to the small. I don't think any of these pictures are particularly good, so we're going to have to try again.


Back at Bolton, I made a fairly decent 2-wheel landing (I'm practicing those a lot lately), but demonstrated pretty poor crosswind awareness. I had a bit of wind from the right, and I didn't hold enough aileron into the wind to get the upwind wheel down first - it was actually exactly the opposite wheel that I used as a unicycle for a few feet. Nothing very hairy or scary, but still poor technique and a point I will concentrate a bit better on next time.
The fly-in was on the larger side of small fly-ins as far as landing and departing traffic, but I was lucky enough to arrive in one of the lulls. I also was lucky in getting there before the number of witnesses (wasn't I calling them "observers just a few sentences ago? I guess it's situationally dependent) grew to where my landing would have been excrutiatingly embarrassing rather than just mildly humiliating. A three-bouncer (and they were pretty healthy bounces, not the little chattery chipmunk bounces) in front of all the folks that showed up later would have devastated my self-esteem. On the bright side, the pants didn't even notice! No scuffs or any kind of other damage at all.
It's always a question where to park at these things, but I was met at the taxiway by a volunteer that pointed to a spot for me to park. Once the ramp started getting really busy later in the morning, a more high-tech approach was used:

It's somewhat intriguing to compare the levels of technology required to build the plane with those used in the Segway. I also wonder how the Segway will fare through the next 60 years; will it survive the test the way the airplane did?
While there was a pretty good RV turn out, there were also a lot of other interesting things to see. There was a WWII B-25 medium bomber, but surprisingly it wasn't one I saw sitting over at Urbana Grimes. I don't know how many B-25s are still flying, but having two within just a few miles of each other at someplace other than Oshkosh or a CAF air show is quite a coincidence. There was a nice collection of three Stearmans, too. Stearmans interest me quite a bit. They are engineered like a tank, built by the same company that build the B-17 Flying Fortress, and are still available to such a degree that the asking price is no more than that of a nice RV. They look like they would be a blast to fly (in the warmer months, anyway), but all of that has to be balanced against the cost of maintaining and operating a classic airplane. They go through gas and oil at a prodigious rate, but turn it into far more noise than airspeed.

This is a new entry in my "Fly Ohio" collection:

There was a Blackhawk helicopter in attendance, and the crew were very generous in allowing kids (including the heavily cliched "kids of all ages") to climb into the pilots seat. Feeling it undignified (actually, I just didn't want to stand in line) I passed on climbing aboard, but I did make a walk-about taking close up photos.

One of the highlights of these fly-ins for me is the chance to spend some time talking with the folks that gather around my plane. I clearly remember many, many situations where I was on "their side of the fence." I remember thinking how incredibly lucky the owner of whatever my current object of desire was, and today I spent a few moments reflecting on how exactly true that was. I'm incredibly lucky to live in a time where we can fly when and where we choose, using whatever means of conveyance we want. Just consider for a moment how rare that is. Less than 100 years ago, someone like me would travel for quite a distance just to see an airplane. More materially, I'm also just tickled pink to glance across the ramp and see a crowd of admirers around my plane:

This is one of the things I think must be even better for someone that built their plane. I can fly like them, I can (almost) maintain like them, but I don't think I can ever feel the deep sense of pride a builder must feel when he sees a group admiring, and I'm sure to an appreciable degree envying, his creation. As it is, I don't seem to tire of answering questions about the plane. There was a guy today that was actually more interested in talking to me since I didn't build the plane. He felt intuitively that buying an already-built plane, like I did, might be a good way to get a very capable airplane for much less money than a store-bought would cost. I was very happy to share the details of owning and maintaining an RV built by someone else - he may well end up being my second conversion from store-bought to homebuilt buyer. A lot of folks were curious as to what "Experimental" meant, so I got a lot of chances to use my "Well, with these Vans airplanes having over 4,000 flying, the 'Experiment' was successfully concluded a decade ago" line.
Of course, as a builder you do have to endure the "final inspection" the first time the RV gang comes to visit your home base. Here's Tom's new RV-7A getting the once-, twice-, thrice-over inspection:

Rick has gone through another RV-4 (he's gone through more RV's in the last few months than I've had haircuts, and each new one is an excuse for me to try out very loose formation. Unfortunately, I made a bad lens decision and kept the long lens on rather than trade back to the small. I don't think any of these pictures are particularly good, so we're going to have to try again.


Back at Bolton, I made a fairly decent 2-wheel landing (I'm practicing those a lot lately), but demonstrated pretty poor crosswind awareness. I had a bit of wind from the right, and I didn't hold enough aileron into the wind to get the upwind wheel down first - it was actually exactly the opposite wheel that I used as a unicycle for a few feet. Nothing very hairy or scary, but still poor technique and a point I will concentrate a bit better on next time.
Thursday, August 10, 2006
An RV ride for another first-timer
Although to me, it seemed like his second time. That's because I also gave a ride to his twin brother last month! I was off work yesterday and itching for an excuse to fly; lucky me to find that he was off too. The weather down south around Cincy was forecast to be mildly yucky, with periodic bouts of 4 miles visibility and ceilings down to roughly 3000'. A look at the radar returns echoed (get it?) that prognosis. Odd as it sounds, it was just the weather I was looking for! I've been hoping to find some non-threatening yet not appealing weather near-by in order to try out the weather reporting functions of the new Anywhere Map. The last time I flew with it, the weather was severe clear for hundreds of miles around Ohio. Everything appeared to be working, though, with the moving map moving and the weather system showing clear reports for all of the surrounding airports. The only problem I had that day was that the little stylus used for prodding the Anywhere Map PDA into life fell out of its slot on the top of the PDA, probably as a direct result of the airplane being briefly upside down. That happens a lot in RVs, you know. Hours of searching through the cockpit failed to find the little bugger, so I've been forced to try to use the tip of my finger for interacting with the PDA, which is a situation rife with possibilities for eliciting creative and colorful swear words. Who knew I had such fat fingers?
Local Columbus weather was pretty good yesterday and the still winds offered me a golden opportunity to give the passenger a nice, smooth ride. Take-off was a non-event, with what little wind there was favoring the runway that allows a low pass over our neighborhood so he could get a good look at his house. He pointed out how well his and his twin brother's in-ground pools stand out, a fact with which I was intimately familiar after having flown over them after many hot & sweaty flights, dreaming of a nice, cool dip in the deep blue water, kept clean and sparkly in its benign captivity.
It was soon after takeoff that I realized that a couple of things weren't quite right with the Anywhere Map (hereafter referred to as 'AM'): the screen was darker than usual and barely perceptible in the bright cockpit, and the GPS hadn't scored a connection with the AM software. Oh, bother. The screen brightness issue was easily resolved by re-seating the power plug (the PDA reduces screen brightness when it senses that it is running on the internal battery to preserve battery capacity), but the GPS belligerently refused to connect. As we got closer to Cincy, I could see the low scuddy weather I was expecting, but since the GPS wasn't working I was unable to see it depicted on the PDA. Since there was no real destination in mind, although we had planned on a stop at Clermont Co. to visit Sporty's, I made a quick 180 and headed back towards the blue skies up north.
As long as we were headed back up towards the north, I decided to head into Grimes-Urbana and pick up a slice of black raspberry pie for the wife. I thought the B-25 that was parked there last weekend might still be sitting there, too, and that might be a cool thing for the passenger to see. Our course took us directly towards Springfield, which is an airport I try to give a wide berth due to the presence of my old Ohio National Guard unit. They fly F-16s now, and they fly them a lot. I had no sooner mentioned that to the passenger when a pair of 16s flew right over us, albeit a couple of thousand feet higher than we were. The B-25 was, in fact, still at Urbana, and I was able to procure the single remaining slice of raspberry pie. The landing was a bit off - it was one of those landings where I hold the plane in the flare just a second too long and we arrive tail wheel first. It's not a horrible way to land, but it does cause a wee bit of bouncing when the mains are slapped down onto the runway.
The landing back at Bolton, however, was a greaser. As with his twin brother, the passenger had a great time and couldn't wait until his next 24 hour shift at the firehouse since "now he'd have something to talk about!"
Tuesday, August 08, 2006
Leaky brake fixed, and I'm flying with my pants off again
I may have mentioned before that I noticed a bit of brake fluid on the inside of the left wheel fairing after a recent flight. Last week, I decided to fix that as long as I had the fairings off for finishing. It was really a pretty simple operation. Removing the caliper is something of a habit these days considering how many times they had to be removed and replaced while fitting the fairings, so the only new wrinkle this time was that I had to also remove the brake line. That's a simple matter of removing the AN fitting, and having a cap handy to plug the line before a significant amount of fluid can escape. Allowing the fluid to drain out would not only create a kitty-litter clean-up job on the hangar floor, but it would also introduce a bunch of highly compressible air into the line, and that would require that the brakes be bled. There's apparently a way to do that solo, but I've never done it and given that avoidance is the easier path, that's what I did.
Once the caliper was off the plane and cleaned up, I walked it down to the FBO to have the A&P glance at it. The caliper is actually a very simple piece, and pretty much the only thing that can cause it to leak is a age hardened or damaged O-ring. The A&P had the appropriate part in bench stock, and even with his mark-up and sales tax, it was only $1.09. I gotta tell ya, I'm getting used to this "fix a problem for a dollar" maintenance plan I've been on ever since selling the store-bought Tampico!
The A&P showed me another little trick that would hopefully negate the need for brake bleeding: he filled the reservoir behind the caliper puck (the only moving part on the caliper) with brake fluid, then put the puck in just far enough to hold it in place. I took it back down to the hangar and re-installed it on the plane. I then tightened up the brake line AN fitting just enough to hold it on the caliper fitting but not so tight that it would hold the fluid, and pushed the puck back in. That forced the fluid in the well behind it to squeeze out of the AN fitting and keep the brake line free of air. It's not guaranteed to work, but it did for me. I jumped into the cockpit and worked the left brake pedal. After a little excessive movement as the caliper puck moved back out into contact with the brake pad, the pedal firmed right up. No bleeding required!
The pants are both off now, and have a coat of gray primer on them. This first coat of primer seems to be primarily intended to show all of the pinholes and faults in the fiberglass that need to be filled. I mixed up a batch of epoxy and thickened it with micro balloons to give it enough consistency to stay put in some of the larger areas that needed filled. If it was just pinholes I had to fill, I think I might have gone in the opposite direction and thinned the epoxy rather than thickened it. That way I could have more or less just poured it into the pinholes or relied on capillary action to "suck" the epoxy in. As it is, I suspect I covered the pinholes more than I filled them. Hopefully that won't make much of a difference to the final finish. Tonight I need to go back and sand all of the epoxy and primer off, and get ready for the second coat of primer.
UPDATE: Well, after a couple of hours of hard sanding, the wheel pants have been successfully transitioned from having annoying, unsightly low spots to having annoying, unsightly high spots. Ok, just kidding. It worked out pretty well, actually. I was able to sand away the micro-balloon epoxy without sanding into the harder epoxy/glass of the pants, and it looks at first glance like the filling worked pretty well. I won't know for sure until I spray on another coat of primer, but any depressions that show up then will be very small and easily filled.
Tuesday, August 01, 2006
Oshkosh Ghost Squadron
This is a picture of Oshkosh as I've never seen it, after the crowds are gone. This is the area where the Van's tents were set up, and I remember it as one of the most crowded displays of the entire show. You can see where the planes were as the grass beneath them remained untrampled:
Photo by Jeff Point, Milwaukee, WI.

Photo by Jeff Point, Milwaukee, WI.
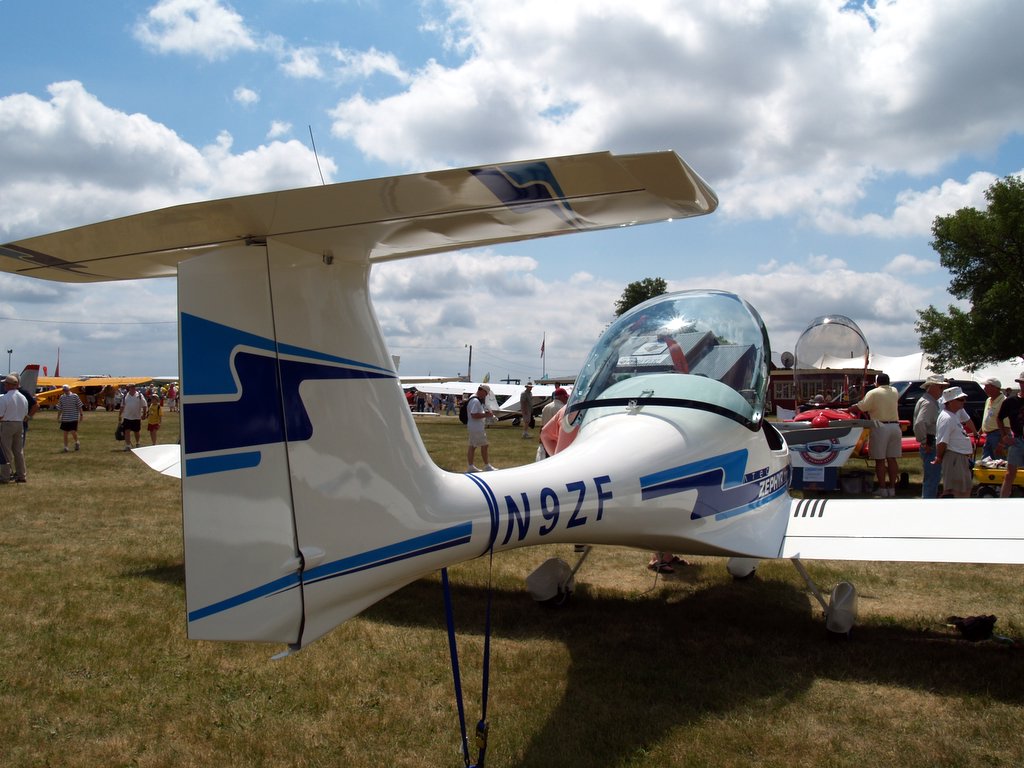
Light Sport Aircraft at OSH
Last year, when I first noticed the new Light Sport Aircraft, I was pretty underwhelmed. They looked like a rag-tag collection of antiques and overweight ultralights, and I predicted that they wouldn't be successful, at least not to the degree that they would have a positive impact in attracting new pilots to General Aviation. Well, that was last year. This year's crop of new LSAs has made me far more optimistic that these new planes can make a significant difference to the health of GA. They are state-of-the-art, and the certification standards allow for the use of newer equipment normally allowed only in experimentals. With the addition of composite construction, affordable glass panels (Dynon in particular), and more owner-friendly maintenance options, the LSAs are poised to make a real contribution. Plus, they're darn nice looking!


More pix below - keep scrolling!


More pix below - keep scrolling!
Time to get back to work on the plane, but....
Back from Oshkosh and more or less caught up on my to-do list, which was rudely increased by one task when the local gang of vandal-thugs destroyed my mailbox late Saturday night. It took the police three attempts at the doorbell to rouse my faithful watch dog Hogarth, who likely only got up because he caught a whiff of doughnuts. They had reports of shots fired at my house, which should give you some idea as to the state of the mailbox. Those guys must really, really hate mailboxes! They flattened it! A quick trip to Lowe's to purchase the Main Battle Tank(tm) Vandal-Resistant mailbox and a hot, sweaty couple of hours in the baking sun and sweltering humidity were all it took to replace the old, flimsy box. I hope these punks come back - I'm not responsible for broken fingers or other extremities if they try to pound on this one:

So, what do I need to do on the plane? Well, the pants need to come back off for final trim and paint. As long as I have them off, I need to put a new O-ring in the left side brake caliper as it has developed a bit of a weepy leak. With the new pants unpainted, I was able to detect the leak via a stain on the inside of the left pant. It seems to be oil, and the only place I can think of for that to be coming from is the brake caliper. It's an easy job (since the pants have to come off anyway) to get the caliper off and carry it down to the maintenance hangar to have an A&P take a look at it, but it's so doggone hot this week I can't get up the energy to do it. It will hit 95 today, which means it will be well over 100 in the hangar. This job is going to have to wait for a couple of days!
I'm also still trying to get the Anywhere Map installed. I did get a little done - I found a spot on the panel for it. That spot wasn't empty, though. The magnetic compass was in it. There's another empty 2 1/4" hole that can hold the compass, so I took it out (easy access from the top since I have a tip-up canopy) and tried to install it in the other position. No go. I can't get behind it with a tool to hold the nuts while I tighten the screws from the front. I ordered a neat little nutplate that will solve that problem, but now I'm waiting for the slow pony express delivery that is the most I'm willing to pay for on a $13 part.

Now that the mag compass is out of the way, I can mount the cradle for the PDA directly to the panel. This will position it for right hand usage, and will put it up nice and high where I can see it without looking too far down. The antennas are both very small and will easily fit on top of the glare shield. There is a box for the XM Wx that will have to be mounted somewhere, but since it doesn't need to be able to see the sky and has no control switches on it, I can put it up behind the panel somewhere.
This ability to spread things around in the somewhat space-constrained cockpit was one of the reasons I chose the Anywhere Map over another big-box Garmin like the 396. If I had spent the extra $1,000 for the Garmin, I would have had to replace my Garmin 295. I didn't want to do that since I anticipate using the 295 for my low-range HSI navigation (I usually keep the 295 on a 5 - 10 mile range) and using the Wx GPS on a far higher range setting of 50 - 100 miles. Navigate locally, avoid weather globally, I always say. Well, that's actually the first time I've said it, but I'm always going to say it from here on out.
It's actually somewhat fortuitous that the nutplate for the compass will take another couple of days to arrive dusty and tired from its long journey across the desert on the back of a mule - I can wait for a break in this heat wave to get back to the installation job.
Subscribe to:
Posts (Atom)