Wednesday, May 31, 2006

A nice August weekend

Well, yes, I do know that it's still May, but the thermometer doesn't! We had a string of hot, humid, hazy 90 degree days for the long Memorial Day weekend, and while the weather was adequate for flying, it wasn't exactly comfortable. Van's will sell you on the "RV Grin," but they don't mention its antonym: the RV Grimace. Fortunately, you'll get the RV Grin year-round, and the RV Grimace is reserved for those days when you return to a plane that has been parked in the baking (I guess broiling is more accurate) sun and jump in wearing shorts, forgetting that the seats are at roughly the temperature at which eggs cook and titanium melts.

Still, three days in a row flying is pretty darn nice. I started out pretty easy on Saturday with a quick hop to Urbana Grimes for breakfast. I was joined by an RV-9A builder, and over breakfast I think I managed to find a way to get more experience with actual building than could be offered by the A&P program. You see, there comes a time in the build process where two people are required. It's a matter of riveting parts that don't offer the opportunity for the guy riveting to also be the guy holding the bucking bar, and that's where this particular project is. I figure I'm already budgeted for a couple evenings a week since I've been doing that for school for the last six months, so I can re-purpose that time (until Fall, anyway) to helping out with the -9A.

Sunday I made one of my more routine trips to Darke Co./Versailles airport. This is a nice little airport, seldom used and therefore never crowded, but it does have one problem: I can't get a good landing there. Saturday was no different, except in the severity of my landing. As I remember it, I picked up a huge lift on very short final as I passed over a dark field that had already been heated by the sun. It was as if someone had pushed the Penthouse button in an express elevator - my nice established glide fell apart as I was thrown 50 ft. or so higher than I wanted to be. Of course, once past the dark field I picked up a nice sinkhole and ended up dropping back down to below where I wanted to be. Couple this with the perennial crosswind bubbling over a stand of trees off to the left of the runway, and you might be able to imagine the uncommanded rolls and pitch excursions I had to wrestle with. It all culminated in me floating along about 8 - 10 ft. above the runway, with a quick glance at the airspeed indicator showing that I was at the speed referred to as "fall like a brick speed." An RV does not have the overly robust landing gear that a family hauler, renter-friendly Cessna would have, so it is a very poor idea to just let it drop in from that height. A Cessna would absorb that kind of impact with nary a complaint, but an RV would be very likely to splay the gear out and slam the prop blades into the runway. A very expensive proposition indeed! The correct response in this situation is a quick blast of power sufficient to stretch the glide a wee bit and soften the arrival. Fortunately, there were no witnesses to this debacle. I wouldn't be nearly as lucky back at Bolton where I got another big balloon in the flare over the very hot runway and had the same inglorious result, fully in view of the critical observer in the control tower. But again, it was an enjoyable visit and the flying conditions only marginally affect the overall fun. That said, after rushing home in time to get my yard mowed, only to wreck my mower within the first 5 minutes of a two hour mow didn't really make my day. I'm sure I'm going to be even more upset when I find out how much an entirely new 48", 3 blade mower deck costs. Ugh.

Sunday I was flying up to Allen Co. to give a ride to the CFO of a guy that's considering buying an RV-6 or similar. Same muggy weather, so on the way out the door I decided to ignore the never-fly-without-a-camera rule, figuring that the haze would negate any viable photographic opportunities. Sigh. When will I learn? I landed at Allen Co (reasonably well, to my vast relief!) and taxied in to park right next to a Mig 17! Yes, a Russian fighter jet! Gee, why would I want a picture of that? Sigh, again. The ride went well with a very willing (and brave!) passenger, and culminated in a greasy of a landing. If you only have a specific allotment of really good landings in your life, it's nice to spend them when accompanied by a passenger. You even get to make comments like "Whoa, that one really sucked" if you want to really show off, which of course I did. The flight back to Bolton was ok, although still muggy. At least it was too early for the bumps to really develop, so even though I stayed down at 3500', low enough to smell the hog farms as you fly over, I didn't have to suffer like a piece of granite in a rock tumbler.

Back in the barn I cleaned off the thick film of bugs, grabbed a cold one out of the fridge, and headed home to enjoy the remainder of a nice August weekend, in May.

Well, there actually was a camera at Allen Co., but it wasn't mine, so there are actually pictures of me and the RV:


Friday, May 26, 2006

Oh NO!!!

Now I need to talk myself out of this:


It's called a Radial Rocket. I saw it at Oshkosh last year and thought it one of the most beautiful planes there, but thought it was a one-off custom build. Nope, it's a kit, and it's priced simliar to the F1 Rocket. It uses a 360hp Russian-built M-14P 9 cylinder radial that costs less than the 260hp Lycoming used by the F1 Rocket and the RV-10.


It's a glass kit (as opposed to sheet metal) and I am not at all familiar with working with glass, so that's one reason I can use to get this thing out of my head (although it means that I will have to religously avoid gaining any knowledge whatsoever about glass plane construction) and get back to something more practical.

Still, it's one fine looking plane!

Saturday, May 20, 2006

A quick test flight

The weather this morning was pretty good for a first flight after the annual. The forecast called for winds at 8 knots all day, but a possible layer of scattered clouds at 5,000'. Good enough.

Even though I ran up the engine to check for leaks just a few days ago, and both my A&P and I have both looked over everything on the plane, I approach the first flight after an annual with a higher degree of pessimism than usual for a more routine flight. On take-off, for example, I make a steeper than normal climb, clawing for a few extra feet of altitude to have in the bank in case something goes wrong with the engine. And as the winds were out of the north today, I'd be using runway 4. Runway 4 is a bit more congested on the departure end than 22 is, so just after takeoff I'm faced with a Lowe's, a string of restaurants, condos, and car dealerships. I try to get to 1,000' as quickly as I can and get myself turned towards the west where there's still a lot of open land.

My first flight after annual is nearly always to MadCo. It's only 20 miles away, so if any problems become apparent after takeoff I'll be close to at least one airport. Darby Dan is out there too, and there's a nice grass runway 2.5 miles west, so there are plenty of options should I need to land quickly. The annual trip to MadCo is just long enough for anything that's going to work itself loose gets a good start and makes itself easier to find. This was particularly true with the Tampico. It seemed to be impossible to get the bottom cowl screws tight enough to keep them from backing out. By the time I landed at MadCo, 3 or 4 would have started their escape, so I always brought a screwdriver with me, and in fact ended up keeping a screwdriver in the plane all the time.

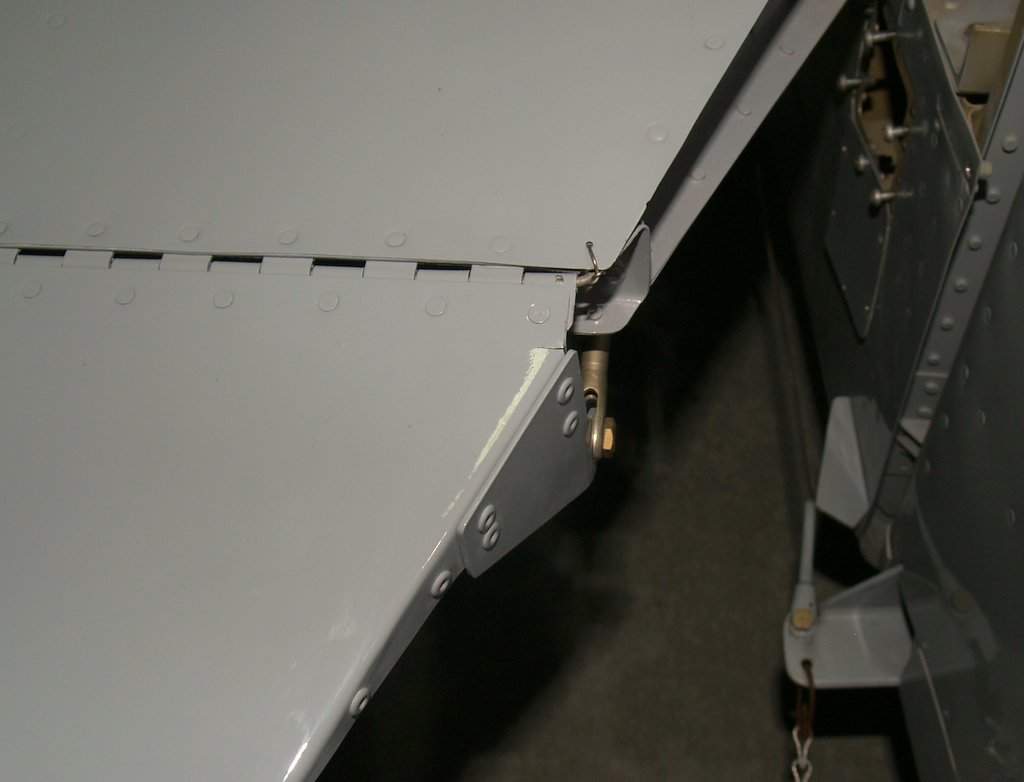
This time, though, I didn't find anything loose at all. I paid extra attention to the trim tab but it hung on just fine. There was a little more oil on the belly than usual, but that's normal after an oil change. It's a challenge to complete an oil change without spilling at least a little oil, and I use 7 quarts when I replace the oil and some of that vents out in flight until the oil level gets down to 6 or so quarts. From there it remains steady until the next oil change. Had I had a belly dripping with oil today, I would have had to get the cowls off and try to find out where the leak was coming from.

After gassing up at $3.79/gal. (GASP!) I headed east towards Lancaster Fairfield Co, where they were having an EAA open house and fly-in pancake breakfast. I had already breakfasted on scrapple (do yourself two favors: try scrapple, but don't EVER read the ingredients) so the pancakes had no appeal, but Lancaster is where Papa Golf used to live. I haven't gone in there in the 6 yet, so I thought it would be a neat time to have a little homecoming.

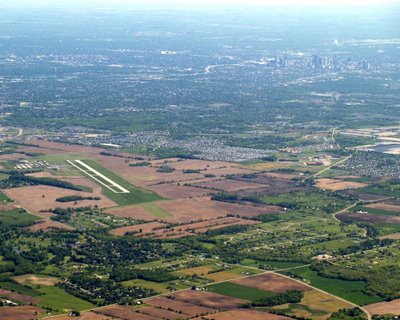
On the way from MadCo to Lancaster, I had a great view of my Central-Ohio neighborhood and my home field neighborhood:


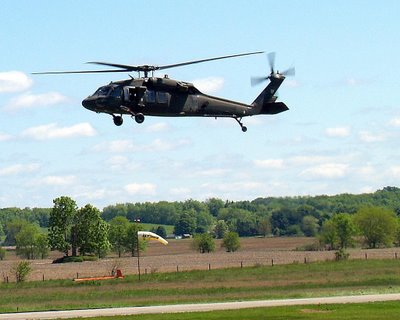
The ride over was bumpy below 5,500' but really smooth above that. I monitored the radio most of the way there, trying to gauge the traffic level. One of the problems with fly-ins is that a lot of people fly in to them, so the traffic can sometimes be fairly heavy. It didn't sound very busy, but I noted a recurring helicopter departure (I assume they were selling sightseeing rides) heading to the south and returning a few minutes later heading north, and then landing directly onto the ramp. I'd have to keep track of him since I'd be passing directly south of the airport when I flew left downwind to runway 28. I figured I might also encounter some NORDOs (no radios) since an antique aircraft group was supposed to attend, and a lot of those older planes don't have electrical systems. Most will carry a battery operated hand held radio, but you never know, so it's best to really be on the lookout for them.

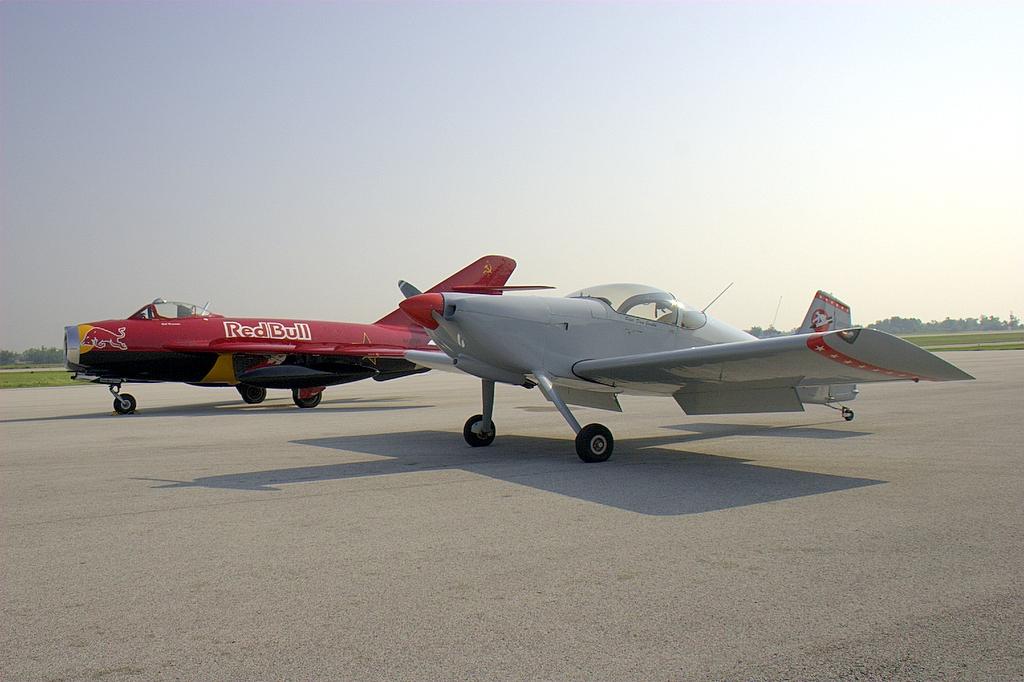
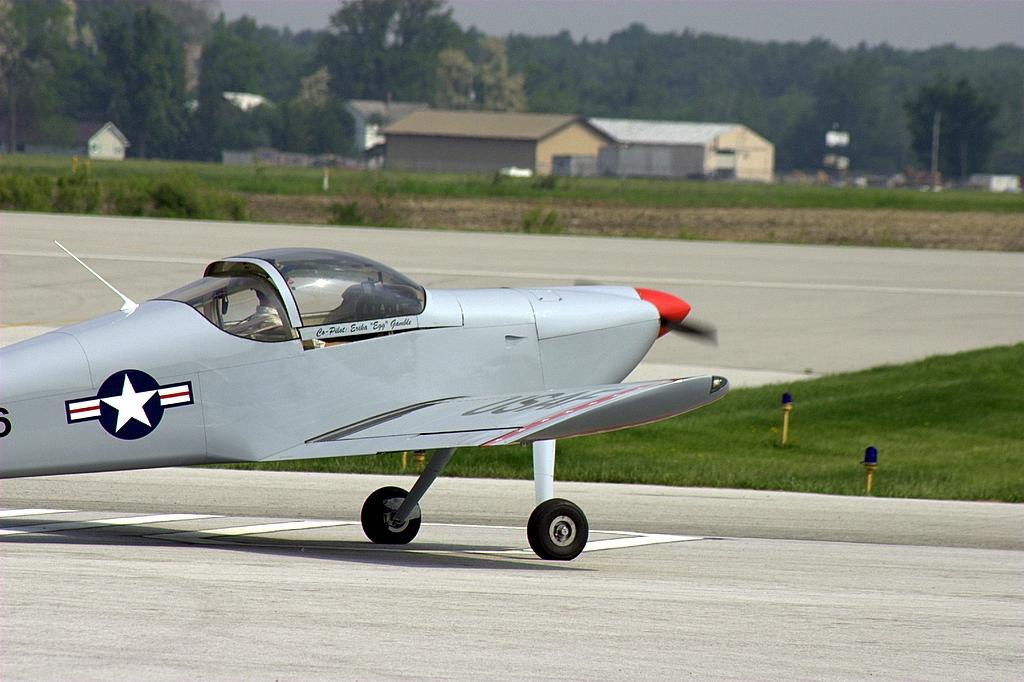
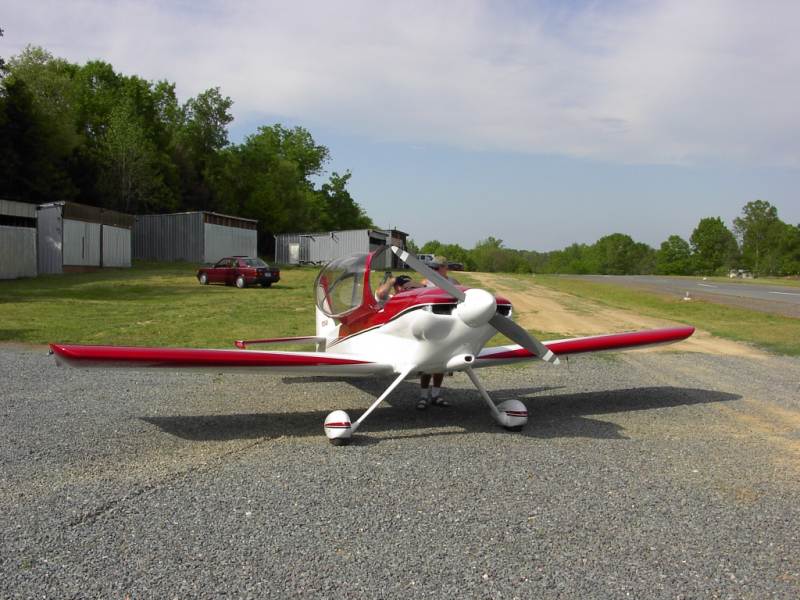
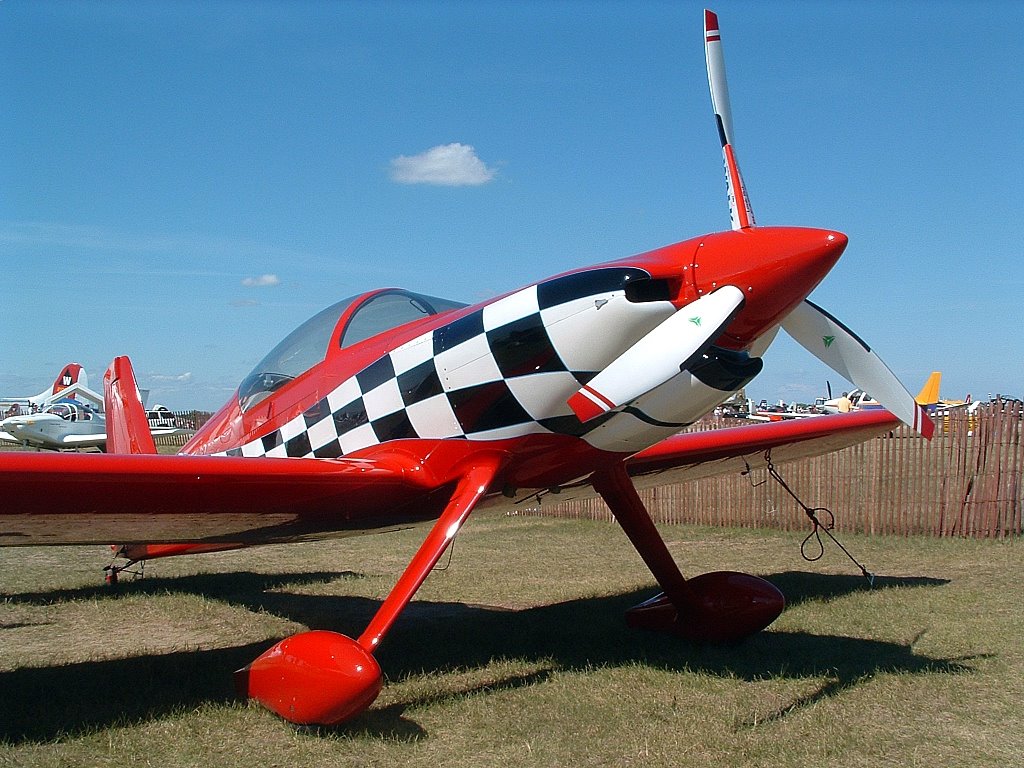
These guys stopped by:


I turned final with a Cessna right behind me, and since I can be a bit slow on the roll out, I try to get off the runway as soon as I can. Sometimes that means landing long if the first taxiway is pretty far down the runway, or it could mean landing short if there is a taxiway within a few hundred feet of the end of the runway. Lancaster is configured such that the first available taxiway called for a short landing, which went well enough considering the almost hypnotic waviness of the runway. Unfortunately, my plan went awry when I was faced with two planes taxiing out for takeoff. It would have been better to land long and take the middle taxiway after all. In any event, when noting the intimidating visage of a military marked taildragger, the other two pulled aside to let me pass. Thanks Flaps! And it's always nice to see Dogg and his Purty-8.

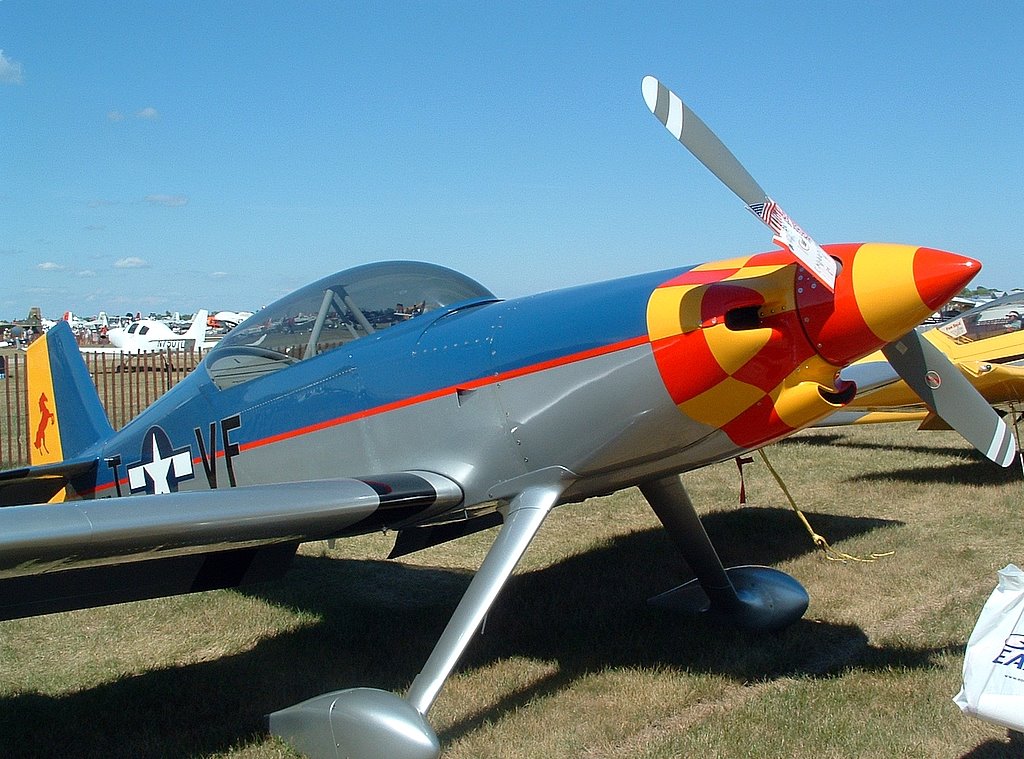
I taxied in and was parked by a friendly EAA volunteer right next to the RV-4 being flown by a very prolific build named Rick. Rick is a large part of my inspiration to build myself an airplane, but he's a bad influence on me when it comes to deciding between the F1-Rocket or RV-14 (RV-10 + RV-4 = RV-14). His decision was "all 3," at least temporarily. Rick took co-pilot Egg for her first ride in an RV, and therefore became instrumental in my getting my 6. She was hooked after the first flight, as is just about anybody that rides in one. It's very, very contagious, often being transmitted by simple ocular contact with printed likenesses. With her blessing, I was finally able to sever the last emotional bond to the Tampico.

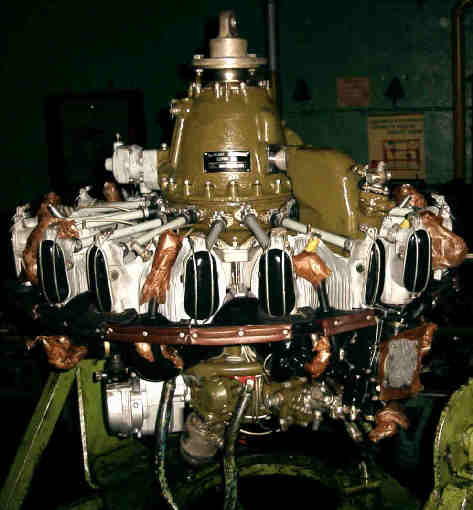
We wandered around a bit and looked at the other RVs, but the one thing I really wanted to do was take a look inside one of the hangars. I noticed it when I was driving down there to look at Papa Golf, and it looked like it might be a museum of sorts. And as it turns out, it is. They have a B-25 and an A-26, two WWII medium bombers, although I think the A-26 may have had a ground support role as well. I'd have to look that up to refresh my memory.

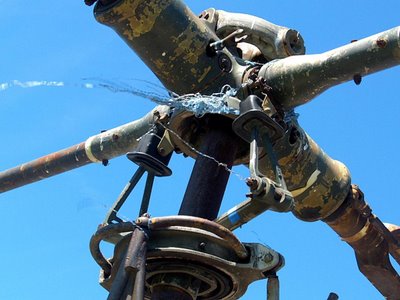
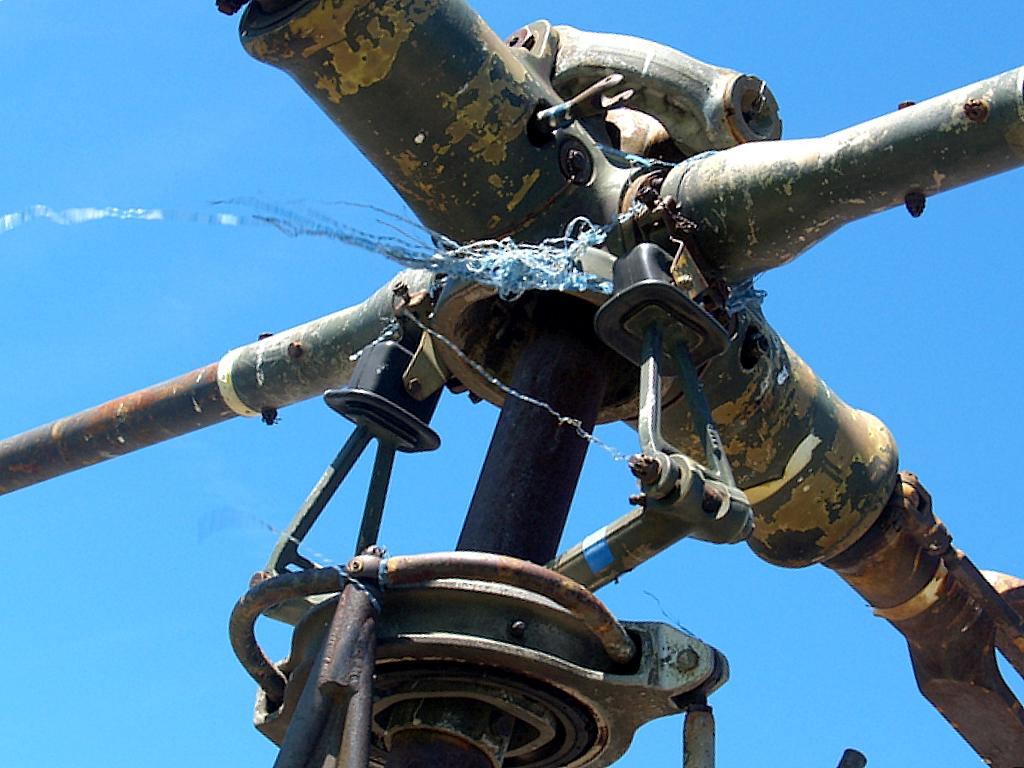
They'll restore this helicopter eventually:


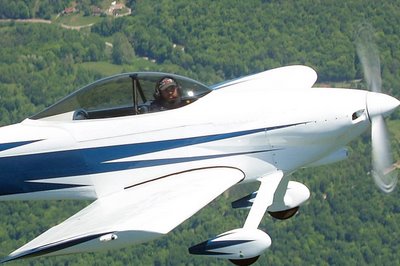
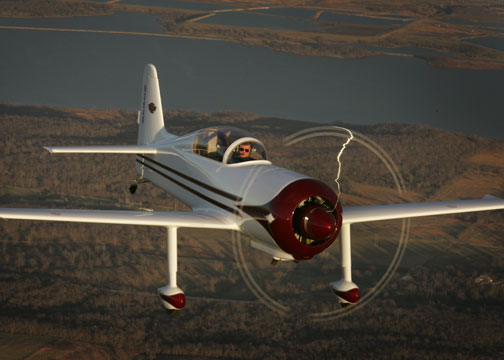
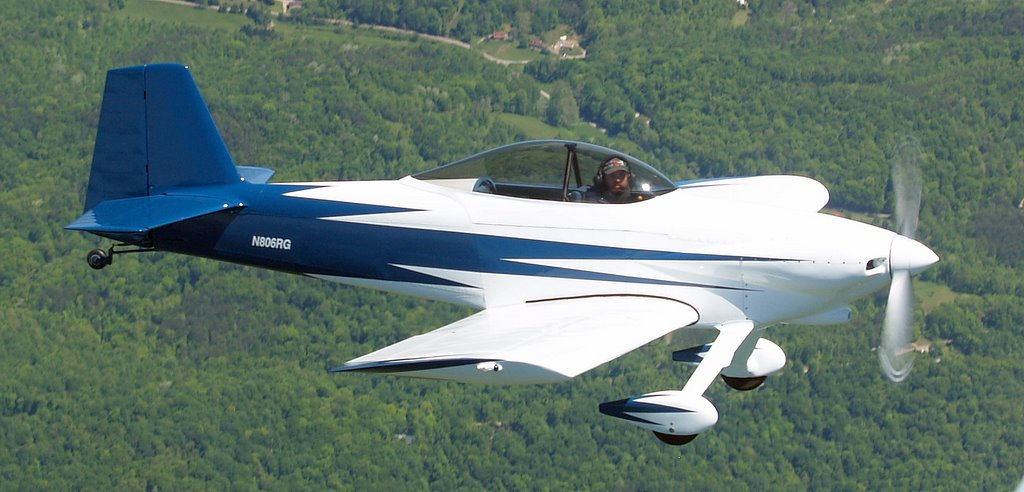
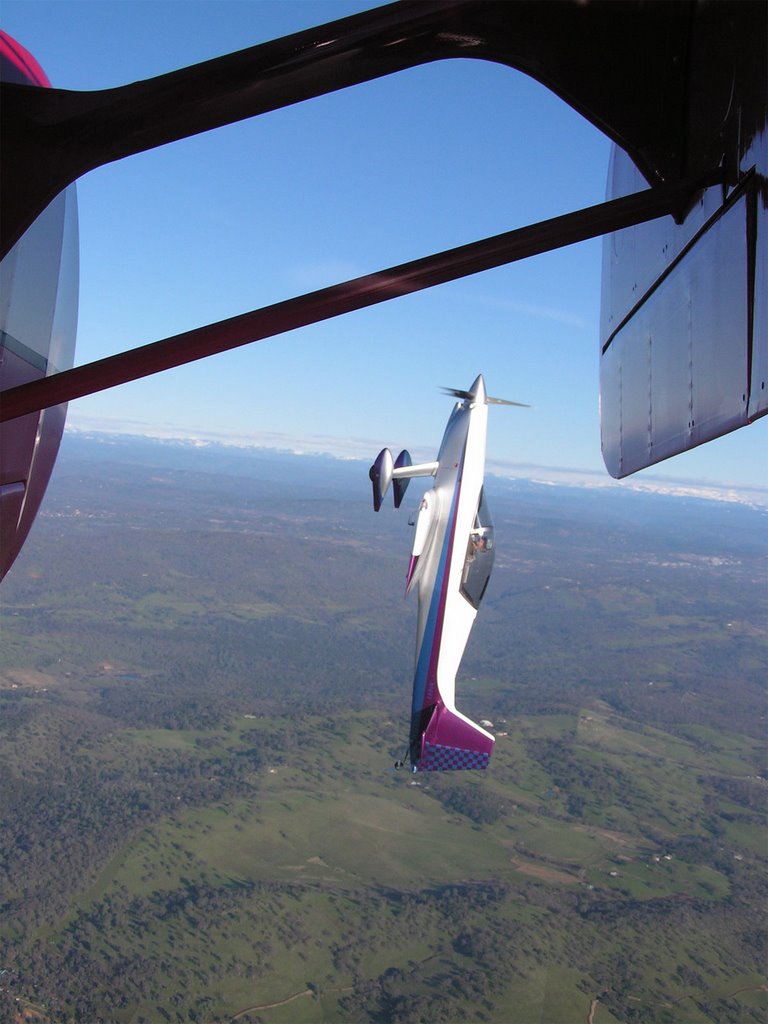
The RV-4 is still pretty new to Rick, so he asked if I could get a few air-to-air pictures for him. I had the SLR with me, so the only remaining concern I had was just how close he'd have to get to me since I only had the short lens. Rick does a lot of formation flying and has flown on the wing of newbies before, so I wasn't concerned that he'd run into me, but I wanted to know what to expect so I wouldn't make the ride too rough on him by making abrupt control inputs. The closer he got, the smoother I needed to be. We briefed a turn to the south and a climb to 5,000m which would get us out into the sparsely inhabited Hocking Hills area and get us up into the smoother air.

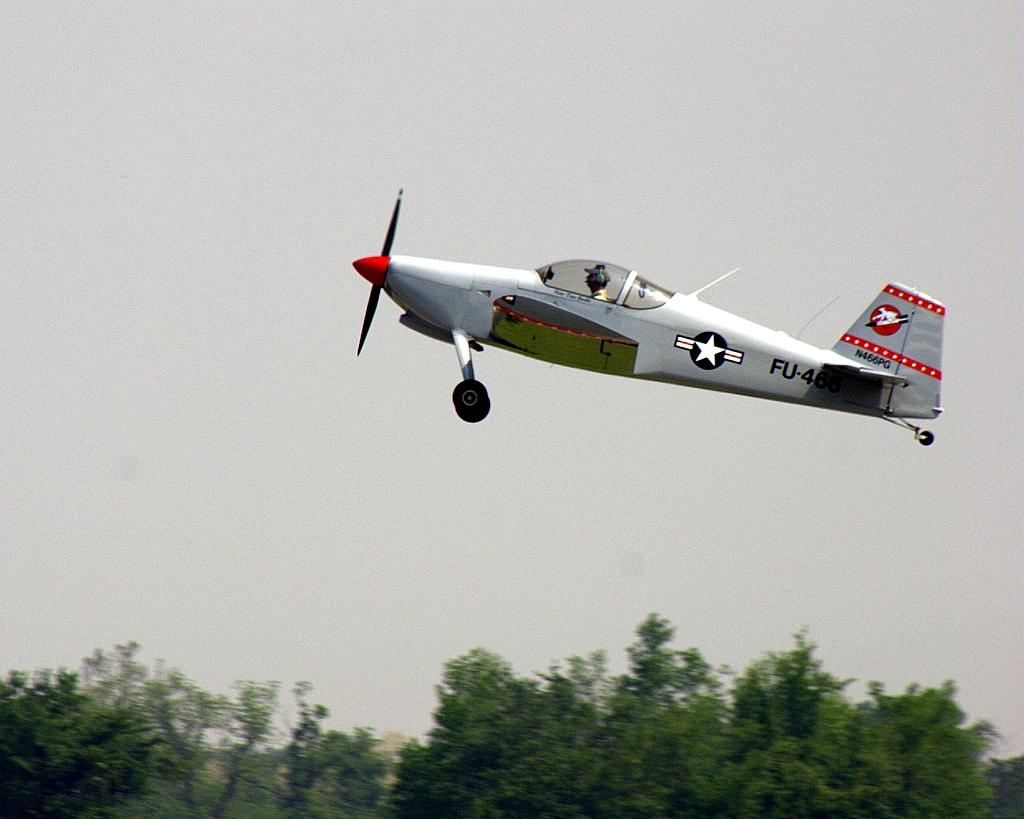
I like this one because it has part of my wing in it, but I have a few with just Rick in the frame too:


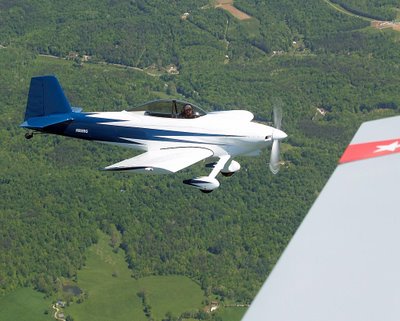
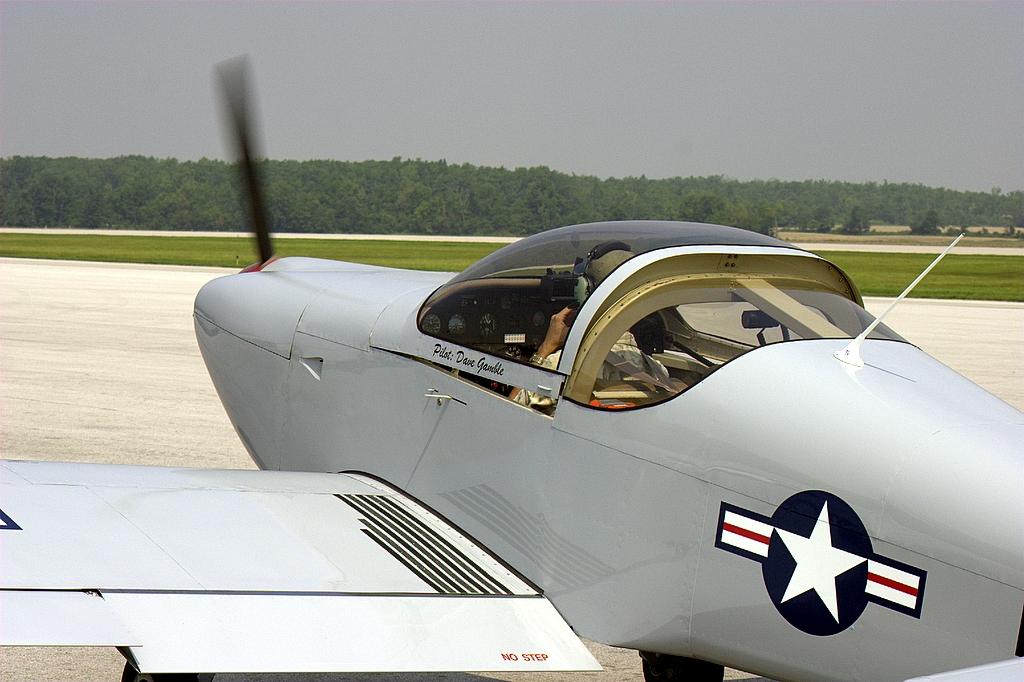
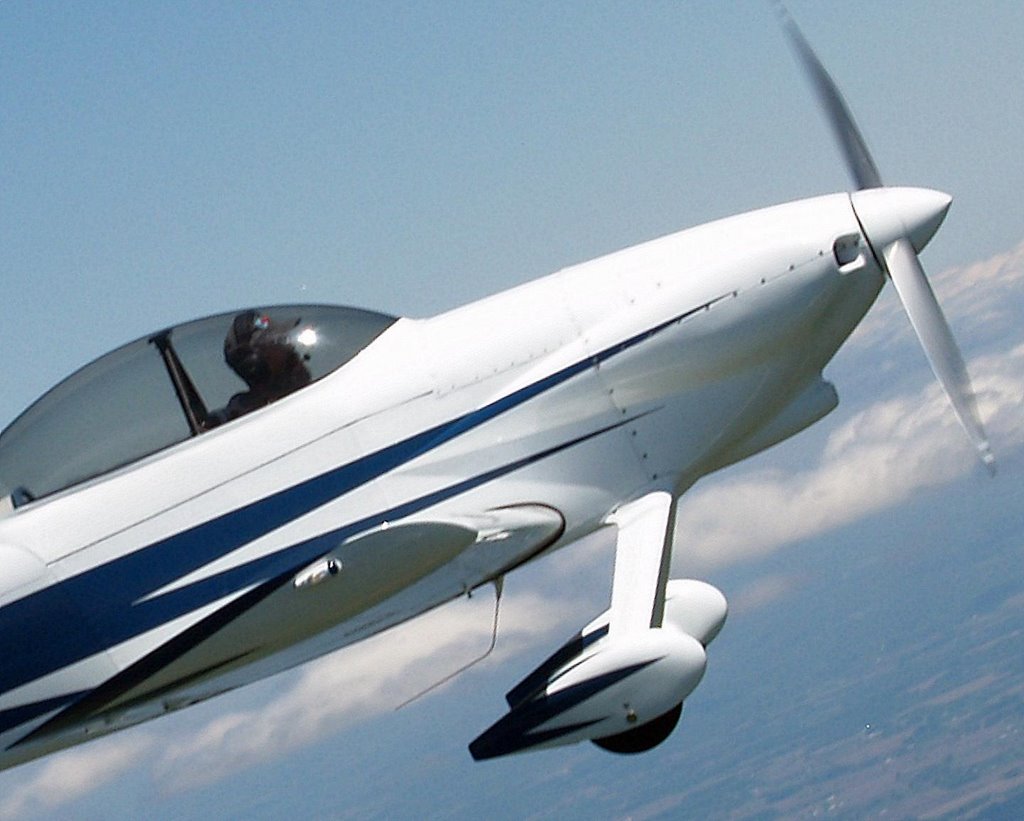
The 8 megapixel camera lets me crop quite aggressively, so other than its diffcult-to-frame aspect ratio, this picture would still have a high enough resolution to get a good sized print:


If you can settle for a snapshot sized print, you can get really, really aggressive with the cropping:


Things went fine with the flying, but watching Rick pull away from me while I was at full power reminded me that I need to get busy and replace the fairings and wheel pants. The old ones aren't even on the plane anymore until I patch up the screw holes - they got pretty worn out last summer when I was learning to land. That's costing me 10 mph or so, and with gas at almost $4 a gallon, I think a case can be made for investing in newer, more efficient fairings. Plus they will get fit, trimmed, sanded and painted without grounding the airplane, so I won't miss out on any of the flying season.

I'll have to replace the support brackets which may or may not involve jacking the plane and possibly removing a wheel, but that doesn't take long. I'll be done with school for the summer after Memorial Day so I'll have some time to work on it. I'll dig out my notes and see what I had decided on before. I think it was Team Rocket fairings and Van's wheel pants, but I'll want to confirm that before tossing out the $$$s.

As to landings, MadCo was not too good, a couple of little bounces. Lancaster was ok, but there was a little scuffing of tires until I could get the flaps up and get slowed down a bit. It was getting windier by the time I got there, so I carried a few extra mph on approach and paid for it by being too fast in the flare. Still, got stopped in time to impede Flaps and Dogg on their way to the runway. Back at Bolton, the winds had picked up to 15 gusting 20, a level that would have kept me at home if I had seen it forecast. It was only from 40 degrees left of the runway heading, though, so the sideways component would be much lower. The frontal component messes with me in the flare if it's gusty, though, so I couldn't just ignore it. Again, I held a few extra knots and extended my landing further down the runway (to avoid the long taxi back to the hangar from 4) but this time it was a complete greaser. I got a foot or so drift from the crosswind as the tires were just spinning up on the runway, but it was glass from there.

Back in the hangar and all of the parts are still on the plane, and there's no increase in the oil on the belly. I'll probably clean that off tomorrow since it seems to have finished it's purging.

So, my quick test flight went a bit long, but it was another beautiful day to have a plane, which makes it an extraordinary day to own an RV!

Tuesday, May 16, 2006

Trim tab repaired and replaced. Now, about this weather...

The rivets arrived from Oregon yesterday, and in preparation I had bought a pneumatic rivet puller from Harbor Freight over the weekend, so I gathered up all the stuff and carted it to school. I have a bit of free time available in the lab since I've finished all of the assigned projects, so this was a great way to combine the work I needed to do on the trim tab with having access to the great work space and tools availble at school.

I had already formed the doubler and match drilled it to the trim tab and control horn, so all I needed to do was drill the rivet holes in the doubler and the front of the trim tab, deburr the holes, and pop the rivets.

Before drilling:


Riveted and ready to go, just before painting:


The trim tab went back on the plane easily enough, and while the stop drill hole still looks huge to me, the rest of the beefed up structure is nearly invisible.

This should about wrap up the annual. I'm not sure what it will ultimately cost, but doing most of the work myself will really have kept the cost down, and fixing the trim tab was a great test of the things I've learned in A&P school this quarter. I don't think I'm ever going back to store bought planes!

Sunday, May 14, 2006

The "buildability" of the RV-10

I'm spending quite a bit of time reading through whatever examples of the RV-10 plans that I can find. For some reason, you can't buy a set of preview plans for the 10 like you can for all of the other Vans planes. After an extended search, though, I found a builder's site that posted pictures of the plans, albeit in pretty low resolution:


http://www.myrv10.com/Plans/RV10_Plans_sec06-pg04.html


Just glancing through a few pages of the empennage (tail) construction, it looks to be far easier than the projects I've been doing in school. Assuming the ability to perform routine sheet metal tasks like shearing, filing, drilling, and riveting, it really does appear to be a lot like putting together a grill, at least in the case of assembling airframe components. Since that aspect would likely take at least the first three years of building, my education in other aspects (such as electrical and engine installation) will have a chance to catch up before they're needed in practice.

Take a look at a few pages of the plans and you'll see that my contention that building an airplane is not one insurmountable task, rather it is a series of hundreds of mundane tasks, is pretty accurate. Having the luxury of already owning a flying RV I firmly believe that the scope of this build, estimated to be at least 5 years, will not daunt me. In fact, I wish I had a tail kit in the shop this morning so I could go down and do some metal work. I'll probably go to the hangar and play with some scrap metal and extra rivets instead.

Saturday, May 13, 2006

It's the 10

The internal decision pendulum has been swaying back and forth between the F1 Rocket and the RV-10 for a few days now and it has finally parked on the RV-10 side unless, of course, I change my mind again.

Countless articles have been written on the topic of selecting the right airplane for you, and regardless of whether the decision is which factory-built to buy or which experimental to build, the recommended decision making process is always the same: take a good, close look at your mission and situation.

'Mission' is simply the question "what kind of flying do you do?" This seems obvious, but it can sometimes be difficult when a couple of your favorite types of flying require completely different airplanes. For example, your missions may be carrying passengers or having a stable IFR platform for long trips, or having a plane that can be used simply for casual recreation flights like formation flying or light aerobatics.

There are many RV-6s out there that satisfy both missions (absent the ability to carry the entire family), but mine fails the IFR platform mission. So, let's stipulate that the RV-10 has the advantage over the Rocket for the travel mission, if only because of the 2 extra seats.

The recreational flying mission is well address by the Rocket. Part of the equation for my persional recreaction mission is low operating cost, and while you'd think the Rocket would be disqualified for the increased fuel costs of the 6-cylinder 260hp engine, that actually wouldn't be the case. The Rocket will fly just like a typical 200 hp RV-8 if you throttle it back, which naturally results in a fuel burn similar to the RV-8's. It will also fly like a P-51 if I feel frisky and don't mind burning a few more gallons. I think it's safe to say that the Rocket is the hands-down winner in this category.

There is one occasion where the Rocket is likely to have an increased fixed cost, though, and that is insurance. The RV-10 isn't exactly cheap to insure right now, but that situation will improve as the fleet hours build up and the actuarial tables are refined. I don't think that will happen with the Rocket, and I don't think there will be any discount for being a 2-seater, either.

The RV-10 has both a advantages and a disadvantage when it comes to the building process, and building cost is the primary component of 'Situation.' On the plus side, many, many RV-10s are being built so there are a whole lot of lifelines out there should problems arise, and the RV-10 plans and manual are reportedly far more "first-timer" friendly than the Rockets. Another building advantage the RV-10 has over the Rocket is that the -10 is available in a slow-build kit, while the Rocket is available only as a quick-build. I'd prefer a slow-build kit over a quick-build primarily because it aids the financial situation by adding at least two years to the build time, but also because I consider building this airplane to be a resume should I ever finish my A&P and want to specialize in experimentals. Financially, the problem with the quick-build is that it requires gobs of money right up front. With the slow-build, the cost can be spread across a few years since each major component is acquired separately. For example, the progression for the RV-10 is tail kit, wing kit, fuselage kit, finish kit. The progression for the Rocket is tailkit, everything else, already built and far pricier as a result. Truly, time is money in this case.

The incerased difficulty of the slow-build option in the case of the RV-10 is helped by the fact that the quality of the RV-10 slow-build is state-of-the-art, and asking an opinion from a builder that has an award-winning RV-6 under his belt and is currently building both a -10 and a Rocket got this reply: "a first time builder will find the 10 much like putting together a barbecue grill from Sears."

Note that having spent a deplorable evening a few years ago struggling with assembling a grill from Lowes, I'm going to have to rationalize that Sears sells a more easily assembled grill than Lowes or that grill assembly has been greatly simplified in the intervening years.

The one disadvantage of the RV-10 is the cost of the tail kit. Because it also includes the structure and skin that will make up the aft end of the fuselage (known as the tail cone), the price of the tail kit for the -10 is nearly twice that of the Rocket's. If you consider that the appeal of starting with the tail kit is that it is financially less risky than starting with the more expensive components, starting an RV-10 tail and not finishing it is costlier than abandoning the construction of a Rocket tail. That said, as long as a tail gets finished, and gets finished reasonably well, there is a resale market for it. Because I'm certain that I could complete a tail, I'm ignoring the higher entry risk that the RV-10 has and declaring it to be superior in the build category.

Without putting too fine a point on it, the financial possibilities with the RV-10 are also compelling. Beyond spreading out the build costs over a couple of more years, the -10 also offers the opportunity to have a recreational plane, albeit one nowhere near as capable as the Rocket, in addition to having the travel plane. While I would never consider sharing a 260hp taildragger with a partner, I don't have those qualms about having a partner in a non-aerobatic nosewheel plane, so the possibility of finding a partner got me to thinking.

I'm not entirely qualm-free with having a partner in the -10, having had a partnership before that soured me on the idea for awhile. I think it can be managed in such a way that the benefits outweigh the negatives, though. Let's assume that I have a completed RV-10 that I built for $110k. Market value on that plane would likely be in the $140-150k range. If I'm selling a share of a completed airplane, I'm selling it at half of market, not half of cost. So let's put $70k in the bank. It's possible that some of that will have been borrowed against for construction costs, so let's say I have $50k. I have to keep that money available somewhere in case a buy-out of the partner is ever required (remember, I've had a partner before), and what better place to park that money than in something like an RV-4, many examples of which are available for under $50k. An RV-4 is no Rocket, but the Rocket is a dream that can be deferred for now and an RV-4 is a very fun plane in its own right.

So, having decided on an RV-10, and assuming that I will proceed, the first thing to think about is shop space. The first step in ascertaining the space requirements will be, as always, Google. More on that topic in a few days.

Five minutes of browsing found this:

$41,000 • FLY RIGHT NOW • Cruise along at 180 mph! 2003 Rv-4, TTSN 291, 1986 Lycoming O-320-D2J 160 HP TTSN 2263, Tall stance gear, tall canopy, Electric Flaps, Nav lights, Strobes, full swivel tailwheel, oregon aero foam seats, MX11 flipflop com, Narco X ponder, Northstar Loran, Garmin handheld GPS, Dry pump vacum with AH and DG, electric turn and bank, G meter, hobbs, Metal sensenich RV cruise prop 291hours TT, Lightweight starter and alternator, quick drain on sump, spin on filter, new harness, air oil separator - no oil on belly ! compression 71,75,75,73 over 80, Engine is a first run 2263 hours since new. Plane has a beautiful 6500$ paint job, the metal work on the plane is of the highest level, Recent xponder and condition inspection.


I'd probably look for something lighter and less complex than this one, and with less time on the engine (although as an A&P student I could probably overhaul it myself), but I'm just sayin' is all.

Thursday, May 11, 2006

Speaking of F1 Rockets...

... here are a couple I saw at Oshkosh last year:


Annual unstalled, thoughts about the future

The screws I've been waiting for arrived via Pony Express from Oregon yesterday, so I can put all of the panels, etc. back on the plane tonight. I repaired the trim tab by fabricating a doubler in school Monday night, although I'm still awaiting the arrival of the rivets I need to attach it to the trim tab. Hopefully those will come today, assuming the pony isn't too tired from his cross-country jaunt in bringing the screws.

The idea for the doubler comes from the compendium of 24 years worth of newsletters from the Van's factory. This problem has been well known since the mid-90's, and in fact caused a change in the design of the trim tab. For me, though, the suggested fix is adequate: stop drill the crack, remove the control horn, fabricate a doubler from .032" or .040" 2024-T3 sheet metal, and rivet it all back together. I'm not thrilled with the look of the stop drill hole, but this plane has always been intended to be a weekend flyer, not a show plane. I'll stop seeing it within a week or two anyway once I get used to it being there.

I'm nearly done with my sheet metal class, and I think I'm going to miss it. There's something almost therapeutic about the work, and the feeling of accomplishment arising from creating a piece of airplane starting with a drawing and a flat piece of metal is going to be hard to substitute. This has gotten me to thinking about building again.

I had previously considered building an RV-8, but the more I think about it, that doesn't go far enough ahead of where I am today with my -6. All it would accomplish, other than the immense satisfaction of creating my very own airplane, would be a change in seating arrangements. I don't mean to discount the value of the building process, obviously, but co-goals in all of this MUST be to make a sound financial decision and to advance the capabilities of my airplane.

Thge sound financial decision aspect excludes building anything that doesn't have a vibrant and sustained resale value, and the run-away leader in that realm is clearly the Van's planes. Even today, with over 4,000 of them flying, it is possible to build for $80k and sell for $100k. I can't think of any other homebuilt that has that benefit. The combination of the immense and supportive user community and the reasonable insurance rates that result from the well-known safety history of the fleet combine to make a unique offering within the homebuilt community. The financial stability of the factory is important too.

I think about this a lot. A whole lot. I've narrowed it down to a couple of possible approaches, each having its own set of pros and cons. Approach 1 would be to find a 50% partner in building/owning the 4-seat RV-10, selling the RV-6 when the -10 is just about done, and buying my own single-seat "play" plane to address the non-travel, throw it around the sky kind of flying. Single-seat planes are very cheap because nearly everyone wants to carry at least one passenger now and then. The options run from a single-seat biplane such as an EAA biplane, up to an RV-3.

Here's an RV-10:

Not as sexy as the taildragging RVs, but great performance for 1/4 the cost of a similar store-bought plane.

Approach 2 goes the whole-hog into having a 2-seat airplane and no partner. In this case I would be building my dream plane: an F1 Rocket.


The Rocket is simlar in size to the RV-8, but uses a much larger engine, usually at least 260hp, compared to the 160-180 hp of the RV-8. Fun, fun, FUN to fly! It's a quick-build kit, which offers the benefit of faster completion but increases initial cost significantly. Still, one can be built for just under $100k, but easily sold at at least a 20% profit should I ever decide I'm not interested in having fun anymore. I have to say, though, that it's hard to see me ever getting tired of 190 knots and 3000fpm climb!

If neither of those works out, there's always this:


Well, probably not that.

Friday, May 05, 2006

Annual: chasing down a few oil leaks

"Leaks" is too strong a word, actually. A more appropriate term might be "seepage." It's just that every time I pull the cowls off, nearly every horizontal surface at the bottom of the engine or its attached accessories has a single drip of oil dangling from it, and the rest of the compartment is covered in a fine mist of oil. This is coming from various points around the engine where just enough oil seeps out to be caught in the whirlwind of cooling air that blows around in the engine compartment.

It's very hard to track down justg where the oil is seeping, but in some cases there is enough residue near the "leak" to indicate a spot as being part of the problem. ONe such spot was the valve cover over the number 4 cylinder. That's pretty easy to fix, requiring nothing more than replacing the valve cover gasket. I took the cover off to take a look at the state of the gasket and found it to be dry, brittle, and compressed to a thickness akin to piece of rice paper.


It was extremely obvious as to why this area was leaking! I naturally assumed that if this gasket was decayed to such a degree, it was highly likely that the other three were too. I pulled off the remainder of the valve covers and found that those three were actually worse than the first I had looked at. It's clear that as previous owners had noted the tell-tale oil seepage from the covers, they had taken the expedient approach of simply tightening the screws a bit tighter. That ended up doing nothing more than squeezing any remaining cork gasket material out abd leaving a metal-to-metal contact area where the valve cover meets the cylinder head. The old cork had been compressed to hard into the cylinder head that I had to (as gently as possible) scrape it off of there. Once that was done, I installed a newer type of silicone-based (silicone: it's not just for showcase breasts anymore!) gasket. Reportedly these new gaskets never harden or wear out.

Let's hope that's true.

Re-doin' it Old School

I had to start completely over on the node rib due to a rather glaring mistake. I drilled the huge 3 1/8" lightening hole exactly one inch to far forward. I didn't notice anything wrong until I went to install the stiffener that goes inside the rib and there was nothing but air to rivet it to.

I couldn't understand how I could possibly have mis-measured that horribly, but as I was building the new rib I almost made the exact same mistake. The cause turned out to be a mark that I placed on the chord line, which you may recall being the X-axis used to plot the points on the metal to give it the aerodynamic shape. I was using a 6 inch measure, and as the points got beyond six inches, I placed a small hash mark at the 6" point and used that as the basis of further measurements. The center of the lightening hole is seven inches from the start of the chord line, so I put another hash mark there. When I went to measure the vertical (Y-axis) location of the center, I caught myself using the 6" hash mark instead of the 7" mark. I musty have made the same mistake on the first piece, but at least I caught myself in the act this time and made the correction.

Everything goes easier the second time, and this was no exception from that rule. I had the new rib done by the end of class. It still needs some clean-up, bit it's done for the most part:


Normally the metal wouldn't be all scratched up like this, but the scrap pieces I start with are already distressed to a ridiculous degree. In other words, I didn't make those scratches. Well, at least not all of them. There are a couple of spots inside the flange where the air shears had trouble cutting through the fluted areas and left some marks on the inside skin. Those could be burnished out easily enough, and the primer that you'd use on a real part would provide corrosion protection to the areas that had lost their very thin pure aluminum coating through the process of cleaning up the scratches.

So, there it is. The last "official" project of the class. I'll finish it up Monday night and either go on to another project if there's anything left on the "optional" list, or I'll bring in the trim tab from the RV and build a strengthening doubler as per Van's advice to solve the cracking problem.

Wednesday, May 03, 2006

Oh drat, that's gonna have to be fixed

The annual condition inspection had been proceeding nicely, and for the most part there have been only minor problems found. A couple of oil seeps (they aren't significant enough to justify the moniker 'leaks') and a slightly slipping alternator belt looked to be the worst of it, until...


If you look closely at this picture of the elevator trim tab, you can see a small crack developing where the control arm is riveted to the side. Click on the picture for the full size view if you can't see it. The short-term fix is very easy: drill a stop hole at the very end of the crack. That should keep the crack from growing for awhile, but the long-term fix will be more involved, and will probably take the form of building a new trim tab. My concern is that the new tab would eventually break in exactly the same way - it's apparent from looking at it that the skin is stressed inappropriately with the current design. I solicited advice from the Van's internet forum (run by a fella named Doug Reeves, it's a peer-level support group) and the first respondant opined that the control arm should really be on the bottom of the trim tab, not on the side as mine is. I haven't looked at the plans yet to determine whether that is a recent change brought about by this existence of this very problem, or if for some reason the builder of my plane strayed from the plans in this case. It doesn't really matter, I think when I repair it I will move the control arm to a better, less stressful location.

Update:

This part of the plane was built according to the plans, which were later amended using a different mounting point because this very problem arose with a lot of the RV-6s built during the 90's.

Tuesday, May 02, 2006

Doin' it Old School

Back before the days of kits like the Van's RVs, where many parts are already fabricated for you, an experimental plane was build by buying a set of planes and a stack of sheet metal. Every part had to be hand crafted, and the investment in time and effort was monumental. This goes a long ways towards explaining the enormous success of the Van's kits: they were among the first that performed most of the difficult fabrication at the factory. It was still no mean feat to build an early Van's kit, but having parts like the ribs done at the factory removed hundreds of hours of painstaking work.

Last night in school I briefly visited the land of aircraft building past.

Starting with nothing but a drawing and a flat piece of .025" sheet metal, I built a nose rib.

This isn't the one I made, but it's similar:


You might be able to tell by the shape of it that the nose rib is a piece of the wing. Actually, in any given wing there will be any number of nose ribs, depending on the span of the wing and the spacing of the ribs. It's function is to provide the aerodynamic shape of the wing from the leading edge back to the spar. There will be aanother rib that goes from the back of the spar to the trailing edge of the wing. The skin of the wing will be riveted to flanges (90 degree bends) at the top and bottom of the rib. Because they create the shape of the wing, each rib needs to be very near the size and shape of the other ribs. In other words, precision, consistentcy, and accuracy are vitally important.

Following the drawing was an interesting mental exercise. You start by drawing a "chord line," which is a horizontal line that will act as the X axis when plotting the points that will give the rib its shape. There is a table of points that get plotted the length of the chord line, which will provide the linear distance down the line (positive X) and Upper and Lower values (positive and negative Y) each point. I diligently plotted all of those points onto a nice, clean piece of sheet metal, and proudly showed the results to the teacher. "Nice work, but you needed to draw that onto a piece of wood." D'oh! The problem, you see, is that the flanges can't be bent in the big sheet metal bender-thingy because 1) they're curved, and 2) after the first bend, you can't get the part into the bending brake anymore. What you do instead is draw the outline on a piece of wood, cut it out with a band saw, and bend the flanges of the rib around the edges of the wood by whacking it with a rawhide mallet.

All was not lost, however, since hundreds and hundreds of these ribs have been build by students that preceeded me in the program. Interestingly, though, of the many wood forms in the bin there were equally as many different sizes. I sorted through them until I found one that more or less agreed with the lines I had drawn and used it instead of starting over with the time-consuming measurements.
The bending was not all that fun, truth be told. Because of the curvature of the shape, you have to "flute" the flanges. Strange alliterative lingo aside, all that means is taking a pair of pliers and creating bumps in the flange to absorb the unwanted length of the sheet metal. The picture above doesn't show any flutes - it was created using the alternative approach of cutting a lot of relief gaps. The planes I was following did that too, but only near the front where the curvature is greatest. I tried cutting those with snips, but it was too hard to get a clean cut, so I used a tool called a nibbler, which worked very well.


Instead of the thin cut (like scissors would make in paper) shears make, the nibbler cuts a 1/8" gap. It was far superior to the snips for making the relief cuts that would allow the metal to bend around for the flanges.

Drilling the lightening holes was fun. The lightening holes are the two large holes you can see in the rib, and the purpose of them is simply to remove unneeded material to save weight. The weight saved from one single rib is miniscule, but propogated across as many parts as possible it becomes significant. I cut them using holecutters in the drill press. Oonce cut, the edges of the circles need to be flanged too, in order to increase the rigidity of the rib. That's done with a special set of forming punches, although I don't know what they're called. They come in two pieces, one on one side, the other on the other side. I just put the whole assembly in a vise and squeezed them together, and bingo! there're your flanges. Easy as pie.

I'm not quite done with the rib yet - I still need to rivet a stiffener onto it, but that shouldn't take more than a few minutes. Once done, I'll have spent about four hours on this part. Multiply that by the 20+ that I'd have needed to built just that one part of the wing and you can see why building your own airplane out of metal was such a daunting prospect back before the modern kits we have today were available.

Monday, May 01, 2006

Pre-annual Prep Work

Now that I have an experimental class plane, I can do a lot more of the grunt work required in preparing the plane for anunal inspection (or, more accurately, "condition inspection") and save hundreds of dollars. Of course, now that I've spent a few Sunday afternoon hours removing rounded-out screws (and questioning the sanity of whichever of the previous owners/maintainers decided no screw was too ruined to not put right back into the plane), I'm remembering why I paid someone else $50/hr. to do this.

My newly found higher standards received via A&P training will drive me to pore through the plans an order all new screws for every panel I've removed. In addition to there being roughly 5% that I couldn't re-use even if I was daft enough to try, I also noticed a bit of a grab-bag mentality used by whomever replaced them last time. Rows that should have all the same type of screw head and length instead have a random selection of different types and sizes. It doesn't make any real difference structurally, but this is my first annual and I'm looking at it as an opportunity to really clean house. The plane has been flying for 8 years now, and in the course of normal maintenance this kind of thing creeps in. Every now and then you just have to bite the bullet and start over.

I pulled a few more panels than were actually needed, using the same "this is the first annual so we should really be thorough" mentality. I pulled the floor boards in order to get a good look at the mechanics of the control sticks, for example. That required pulling off side panels and removing the aileron trim and fuel tank selector handles. It took a total of about four hours to get all the pieces/parts removed, and I anticipate it will take even longer to get it all put back together again. All in all, though, the plane looks great inside and out. There are a couple of nutplates that might need to be replaced, but for the most part we're looking at a pretty easy (and inexpensive) annual this year.