
Last night in school I briefly visited the land of aircraft building past.
Starting with nothing but a drawing and a flat piece of .025" sheet metal, I built a nose rib.
This isn't the one I made, but it's similar:
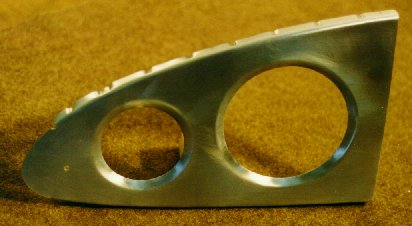
You might be able to tell by the shape of it that the nose rib is a piece of the wing. Actually, in any given wing there will be any number of nose ribs, depending on the span of the wing and the spacing of the ribs. It's function is to provide the aerodynamic shape of the wing from the leading edge back to the spar. There will be aanother rib that goes from the back of the spar to the trailing edge of the wing. The skin of the wing will be riveted to flanges (90 degree bends) at the top and bottom of the rib. Because they create the shape of the wing, each rib needs to be very near the size and shape of the other ribs. In other words, precision, consistentcy, and accuracy are vitally important.
Following the drawing was an interesting mental exercise. You start by drawing a "chord line," which is a horizontal line that will act as the X axis when plotting the points that will give the rib its shape. There is a table of points that get plotted the length of the chord line, which will provide the linear distance down the line (positive X) and Upper and Lower values (positive and negative Y) each point. I diligently plotted all of those points onto a nice, clean piece of sheet metal, and proudly showed the results to the teacher. "Nice work, but you needed to draw that onto a piece of wood." D'oh! The problem, you see, is that the flanges can't be bent in the big sheet metal bender-thingy because 1) they're curved, and 2) after the first bend, you can't get the part into the bending brake anymore. What you do instead is draw the outline on a piece of wood, cut it out with a band saw, and bend the flanges of the rib around the edges of the wood by whacking it with a rawhide mallet.
All was not lost, however, since hundreds and hundreds of these ribs have been build by students that preceeded me in the program. Interestingly, though, of the many wood forms in the bin there were equally as many different sizes. I sorted through them until I found one that more or less agreed with the lines I had drawn and used it instead of starting over with the time-consuming measurements.
The bending was not all that fun, truth be told. Because of the curvature of the shape, you have to "flute" the flanges. Strange alliterative lingo aside, all that means is taking a pair of pliers and creating bumps in the flange to absorb the unwanted length of the sheet metal. The picture above doesn't show any flutes - it was created using the alternative approach of cutting a lot of relief gaps. The planes I was following did that too, but only near the front where the curvature is greatest. I tried cutting those with snips, but it was too hard to get a clean cut, so I used a tool called a nibbler, which worked very well.

Instead of the thin cut (like scissors would make in paper) shears make, the nibbler cuts a 1/8" gap. It was far superior to the snips for making the relief cuts that would allow the metal to bend around for the flanges.
Drilling the lightening holes was fun. The lightening holes are the two large holes you can see in the rib, and the purpose of them is simply to remove unneeded material to save weight. The weight saved from one single rib is miniscule, but propogated across as many parts as possible it becomes significant. I cut them using holecutters in the drill press. Oonce cut, the edges of the circles need to be flanged too, in order to increase the rigidity of the rib. That's done with a special set of forming punches, although I don't know what they're called. They come in two pieces, one on one side, the other on the other side. I just put the whole assembly in a vise and squeezed them together, and bingo! there're your flanges. Easy as pie.
I'm not quite done with the rib yet - I still need to rivet a stiffener onto it, but that shouldn't take more than a few minutes. Once done, I'll have spent about four hours on this part. Multiply that by the 20+ that I'd have needed to built just that one part of the wing and you can see why building your own airplane out of metal was such a daunting prospect back before the modern kits we have today were available.
No comments:
Post a Comment